

How to use FreeFORM Drill
This guide walks you through writing a show in FreeFORM Drill, from an empty field to dot sheets in your students' hands and the drill on their phones. It's written for band directors and drill writers. You don't need to have used Pyware or UDB before, but if you have, most of this will feel familiar.
FreeFORM runs in your web browser. The front page, https://freeformdrill.org/, says what it is; click Open the editor there, or go straight to https://freeformdrill.org/app/. There's nothing to install and no account to make. (Share links made before the editor moved to /app/ still work.)
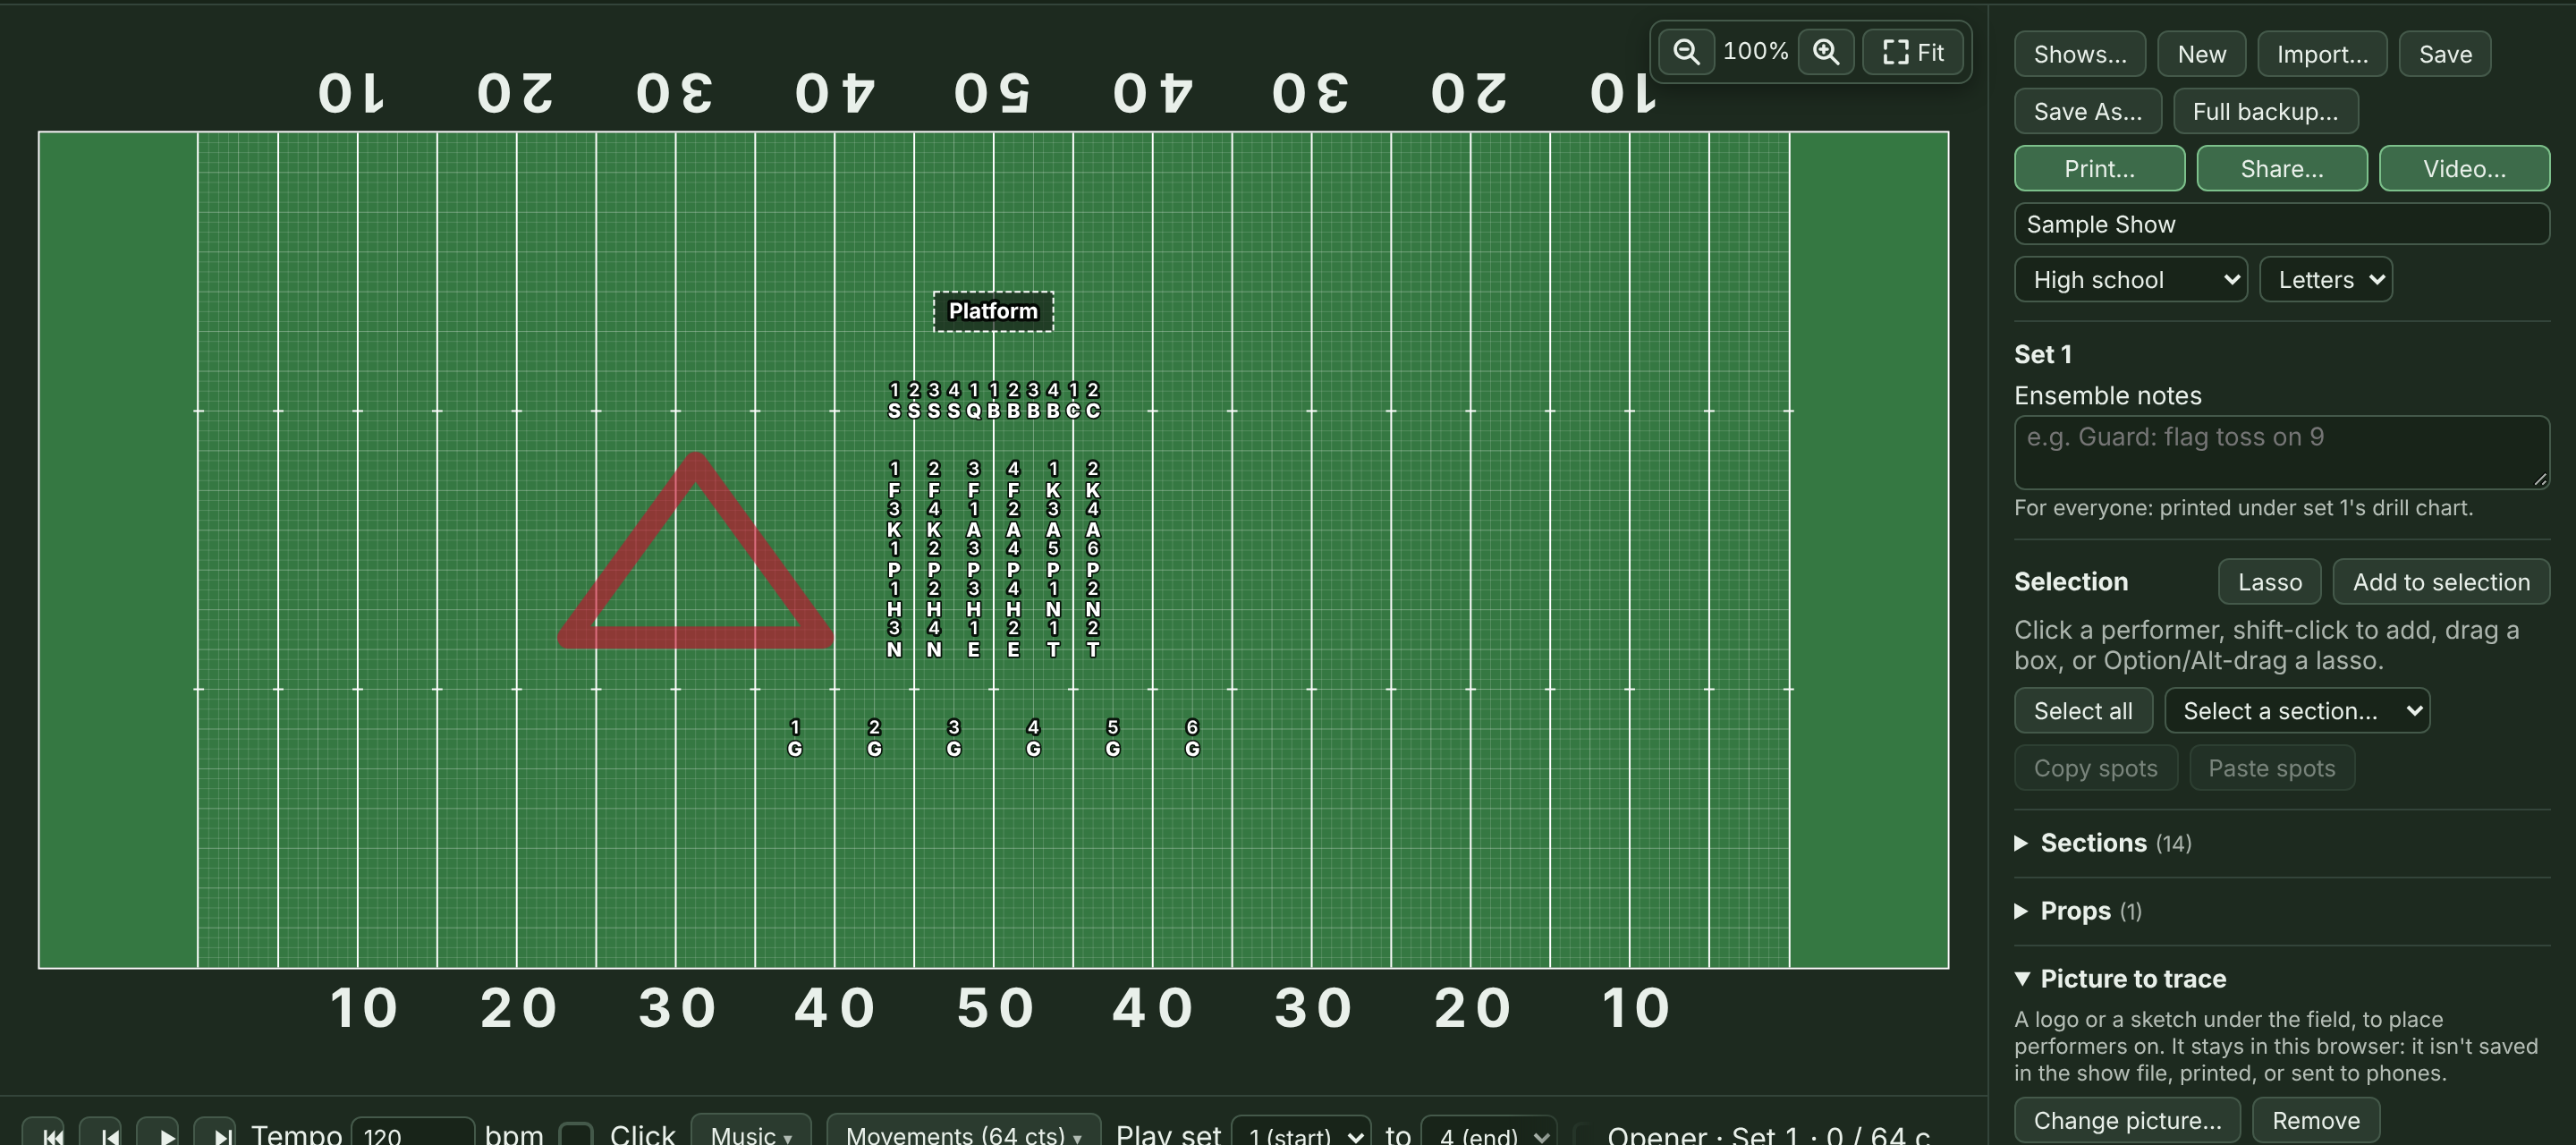
The pictures in this guide come from a small sample show (47 performers, 4 sets) that ships with the code. The pictures of warnings come from its practice show, the same drill with a few problems left in (see Review the whole show). Your screen will look the same, just with your own drill on it.
Contents
- Before you start
- A quick tour of the editor
- Set up a new show
- Add performers
- Select and move performers
- Sets, counts, and the timeline
- Shapes: lines, arcs, curves, circles, polygons, stars, spirals, blocks, and letters
- Rotate, stretch, and flip
- Paths: straight, follow the leader, and custom
- Step-offs and turning moves
- Props
- Step-size and too-close warnings
- Review the whole show
- Dot labels
- Markup and notes
- Play it back
- Add your music
- Print dot sheets and drill charts
- Make a video
- Send the show to your performers
- What performers see on their phones
- Using an iPad
- Saving, backing up, and opening files
- Keyboard shortcuts
- If something goes wrong
Before you start
You'll want a computer or an iPad to write drill. FreeFORM needs a current version of Chrome, Edge, Firefox, or Safari, or iPadOS 16.4 or later (any iPad from 2017 on). If your browser is too old, you'll get a page that says so.
Phones only get the performer view. That's on purpose: a phone screen is too small to write drill on, but it's perfect for a student checking their spot.
On a school Chromebook, check before you rely on the autosave. Many schools set Chromebooks to clear everything in the browser when you sign out, which would take your shows with it. Save to a file (Google Drive works) at the end of every session, and use Import… to open it next time.
One thing to know up front: your shows are saved in the browser you're using. FreeFORM saves every change automatically, but only on that computer, in that browser. If you clear your browser data, or switch from Chrome to Safari, your shows won't be there. Use Save often to keep a file you control (see Saving, backing up, and opening files).
A quick tour of the editor
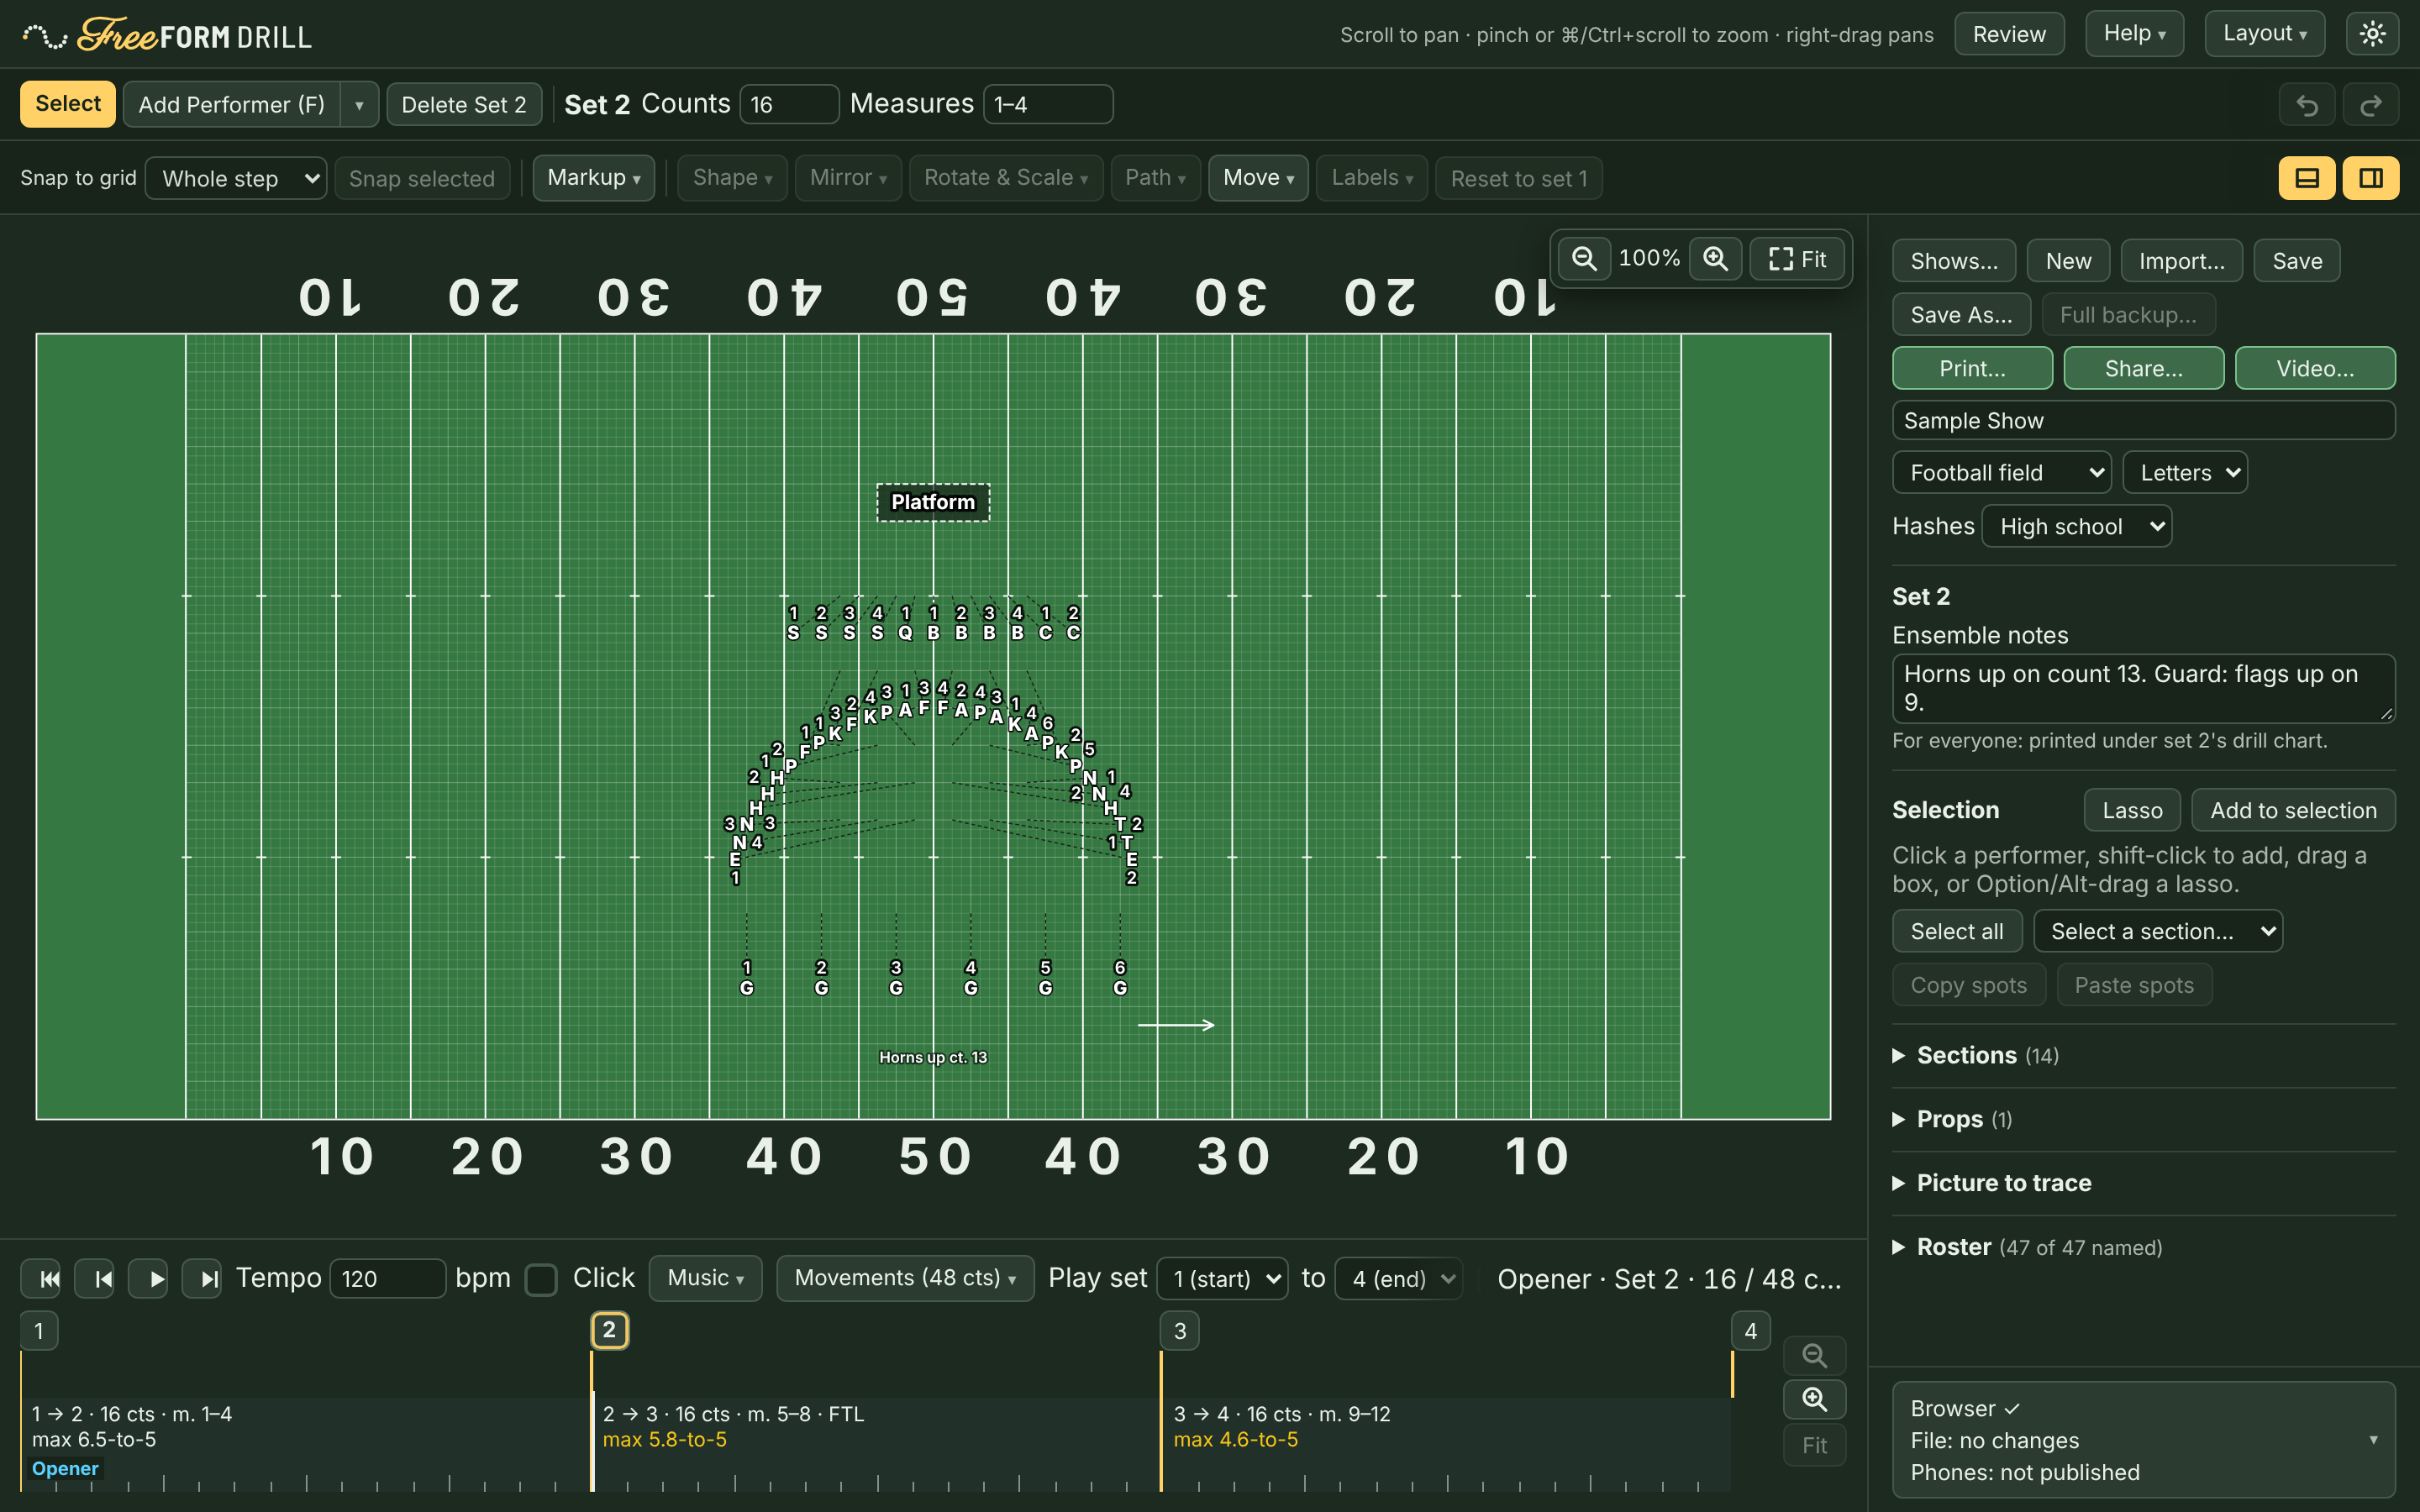
From top to bottom:
The top bar has the logo, a reminder of how to move around the field, Help (in three groups. Learn: the How-to guide, which opens this guide in a new tab at freeformdrill.org/guide/, the Getting started checklist, Send it to your band, and Get a show back. Examples: Try the sample show, a finished show to look around in, and Try the practice show, the same show with three problems to find and fix. FreeFORM Drill: Send feedback, a short form to report a problem or suggest something (it goes straight to me, with no account needed), Support FreeFORM, a tip jar on Ko-fi (FreeFORM is free either way), About FreeFORM Drill, the front page, See the code on GitHub, where FreeFORM Drill's code, plan, and decision log are open for anyone to read, and Open-source credits, the open-source work FreeFORM Drill is built with and each one's license), Layout (Sidebar on the left or right, Timeline at the top or bottom, and White field or green; this browser remembers your choices), and at the far right the sun/moon button, which switches between dark mode and light mode. Until you click it, FreeFORM follows your computer's or iPad's own light or dark setting. The field looks the same either way.
The drill toolbar has two rows. The first row has Select, Add (performers, a set, or a prop), and Delete, then the set you're on with its Counts and Measures. At the right end are Undo and Redo. The second row has the tools for placing and moving performers: Snap to grid, Markup, Shape, Mirror, Rotate & Scale, Path, Move, Labels, and Reset to set. At its right end are the timeline button and the sidebar button.
The field is in the middle. You're looking at it from the press box: the front sideline is at the bottom and Side 1 is on the left. Scroll to move around, and pinch (or hold ⌘ or Ctrl and scroll) to zoom. The zoom buttons sit in the field's top-right corner: − and + zoom out and in, the number between them is how far you're zoomed (100% shows the whole field), and Fit zooms back out to the whole field.
A white field. If you'd rather write on paper colors, choose Layout → White field. The turf turns white with black lines, letters, and labels. Selected performers keep their gold, with a dark ring, and step warnings keep their colors on a dark edge. Layout → Green field switches back. It only changes what you see on this computer or iPad: printed charts are always black on white, and videos stay green. Phones have their own White field button.
The timeline runs across the bottom. Each set has a numbered button, and each move between sets shows its counts, measures, and biggest step size.
The sidebar on the right (or the left, under Layout) holds the show's file buttons (including Shows…, the list of every show in this browser), then Print… and Share… on a row of their own, the title, and hash marks; the current set's notes; whatever you have selected; and the Sections and Roster lists. The sidebar button (at the right end of the toolbar) shows and hides it.
Set up a new show
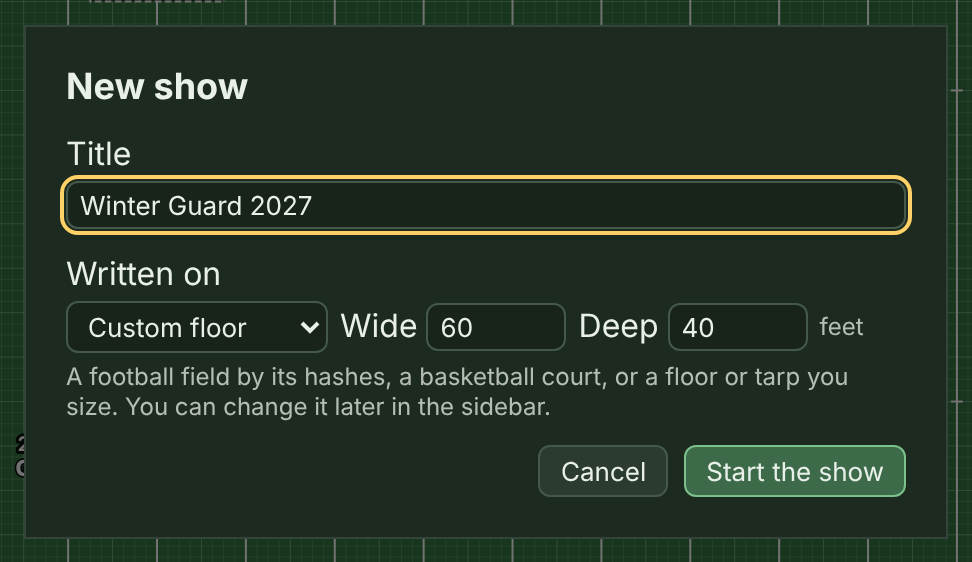
Click New in the sidebar to start a show. A box asks for two things first: the show's Title, and what it's Written on: a Football field (pick its Hashes: High school, College / DCI, or NFL), a Basketball court, or a Custom floor with its Wide and Deep in feet (see step 2 below). It starts on whatever your last new show used, so a winter guard writer doesn't have to pick the floor every time. Click Start the show. You can change either one later in the sidebar. The show you had open stays in this browser: Shows… opens it again (see Several shows: Opener, Ballad, Closer).
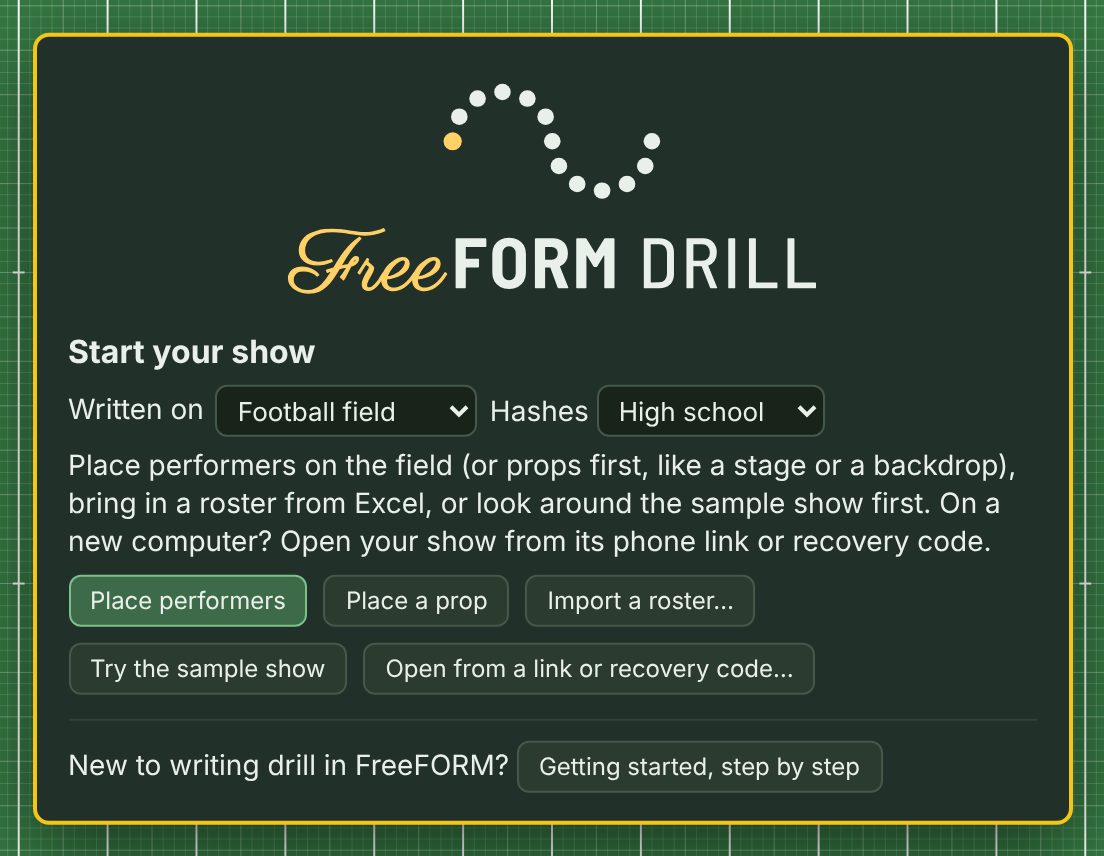
When the field has no performers, the Start your show note in the middle of the field has the same Written on menu at the top (handy on your first visit, which opens a blank show without asking), then five ways to begin: Place performers opens the Add menu so you can pick a section and start clicking, Place a prop puts a prop on the field first (a stage or a backdrop you'll write around; see Props), Import a roster… brings in a list from Excel (see Names under Add performers), Try the sample show opens a finished 47-performer show to look around in first, and Open from a link or recovery code… brings in a show you published from another computer (see A new computer or iPad mid-season). Help (in the top bar), then Try the sample show, opens the same show any time. It opens as a show of its own, so yours stays under Shows…. While you're placing performers, the note gets out of the way, and once there's a prop on the field it moves to the top, so the prop isn't hidden under it.
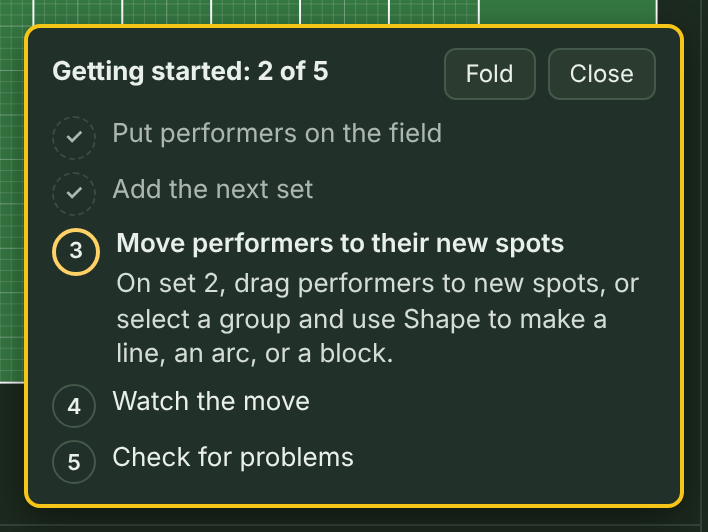
Getting started, step by step. New to FreeFORM? Click Getting started, step by step at the bottom of the Start your show note (or Help, then Getting started checklist, on any show) for a short checklist: put performers on the field, add the next set, move performers to their new spots, watch the move, and check for problems in Review. When all five are done, it offers Send it to your band (see Send the show to your performers). On a blank field, the note becomes its first step, with the same five buttons. Once you're placing performers, it moves to the field's bottom-right corner. Each step ticks itself off when you do it, and the next one says how. Nothing is locked: do things in any order. Fold shrinks it to one line, and Close turns it off for that show.
Name it. Type the title in the box under the file buttons. It prints on every dot sheet and chart.
Pick your field. You picked it when you started the show, and the menu under the title changes it: Football field, or Basketball court and Custom floor for indoor shows (more on those just below). For a football field, the Hashes menu under it picks High school, College / DCI, or NFL. FreeFORM draws the field the way drill software does, with whole-step hashes:
Level Sideline to hash / hash to hash / hash to sideline High school 28 / 28 / 28 steps College / DCI 32 / 20 / 32 steps NFL 36 / 12 / 36 steps If you change the hashes after you've written drill, FreeFORM asks whether performers should keep their places relative to the hashes (on the hash stays on the hash) or keep their exact spots on the field.
Indoor shows. Basketball court draws a 94 by 50 foot court with its lines. Custom floor is a plain floor or tarp: type how Wide and Deep it is in feet. Indoors, coordinates read from the center line and the nearer front or back edge, like "3 steps Side 1 of center, 2.5 steps behind Front Sideline" on a court or "… behind Front Edge" on a floor. The step grid works the same as outside. If you switch a show you've already written onto a floor, performers keep their spots in steps, and FreeFORM tells you if any end up off the floor. Place exactly is for football fields only for now.
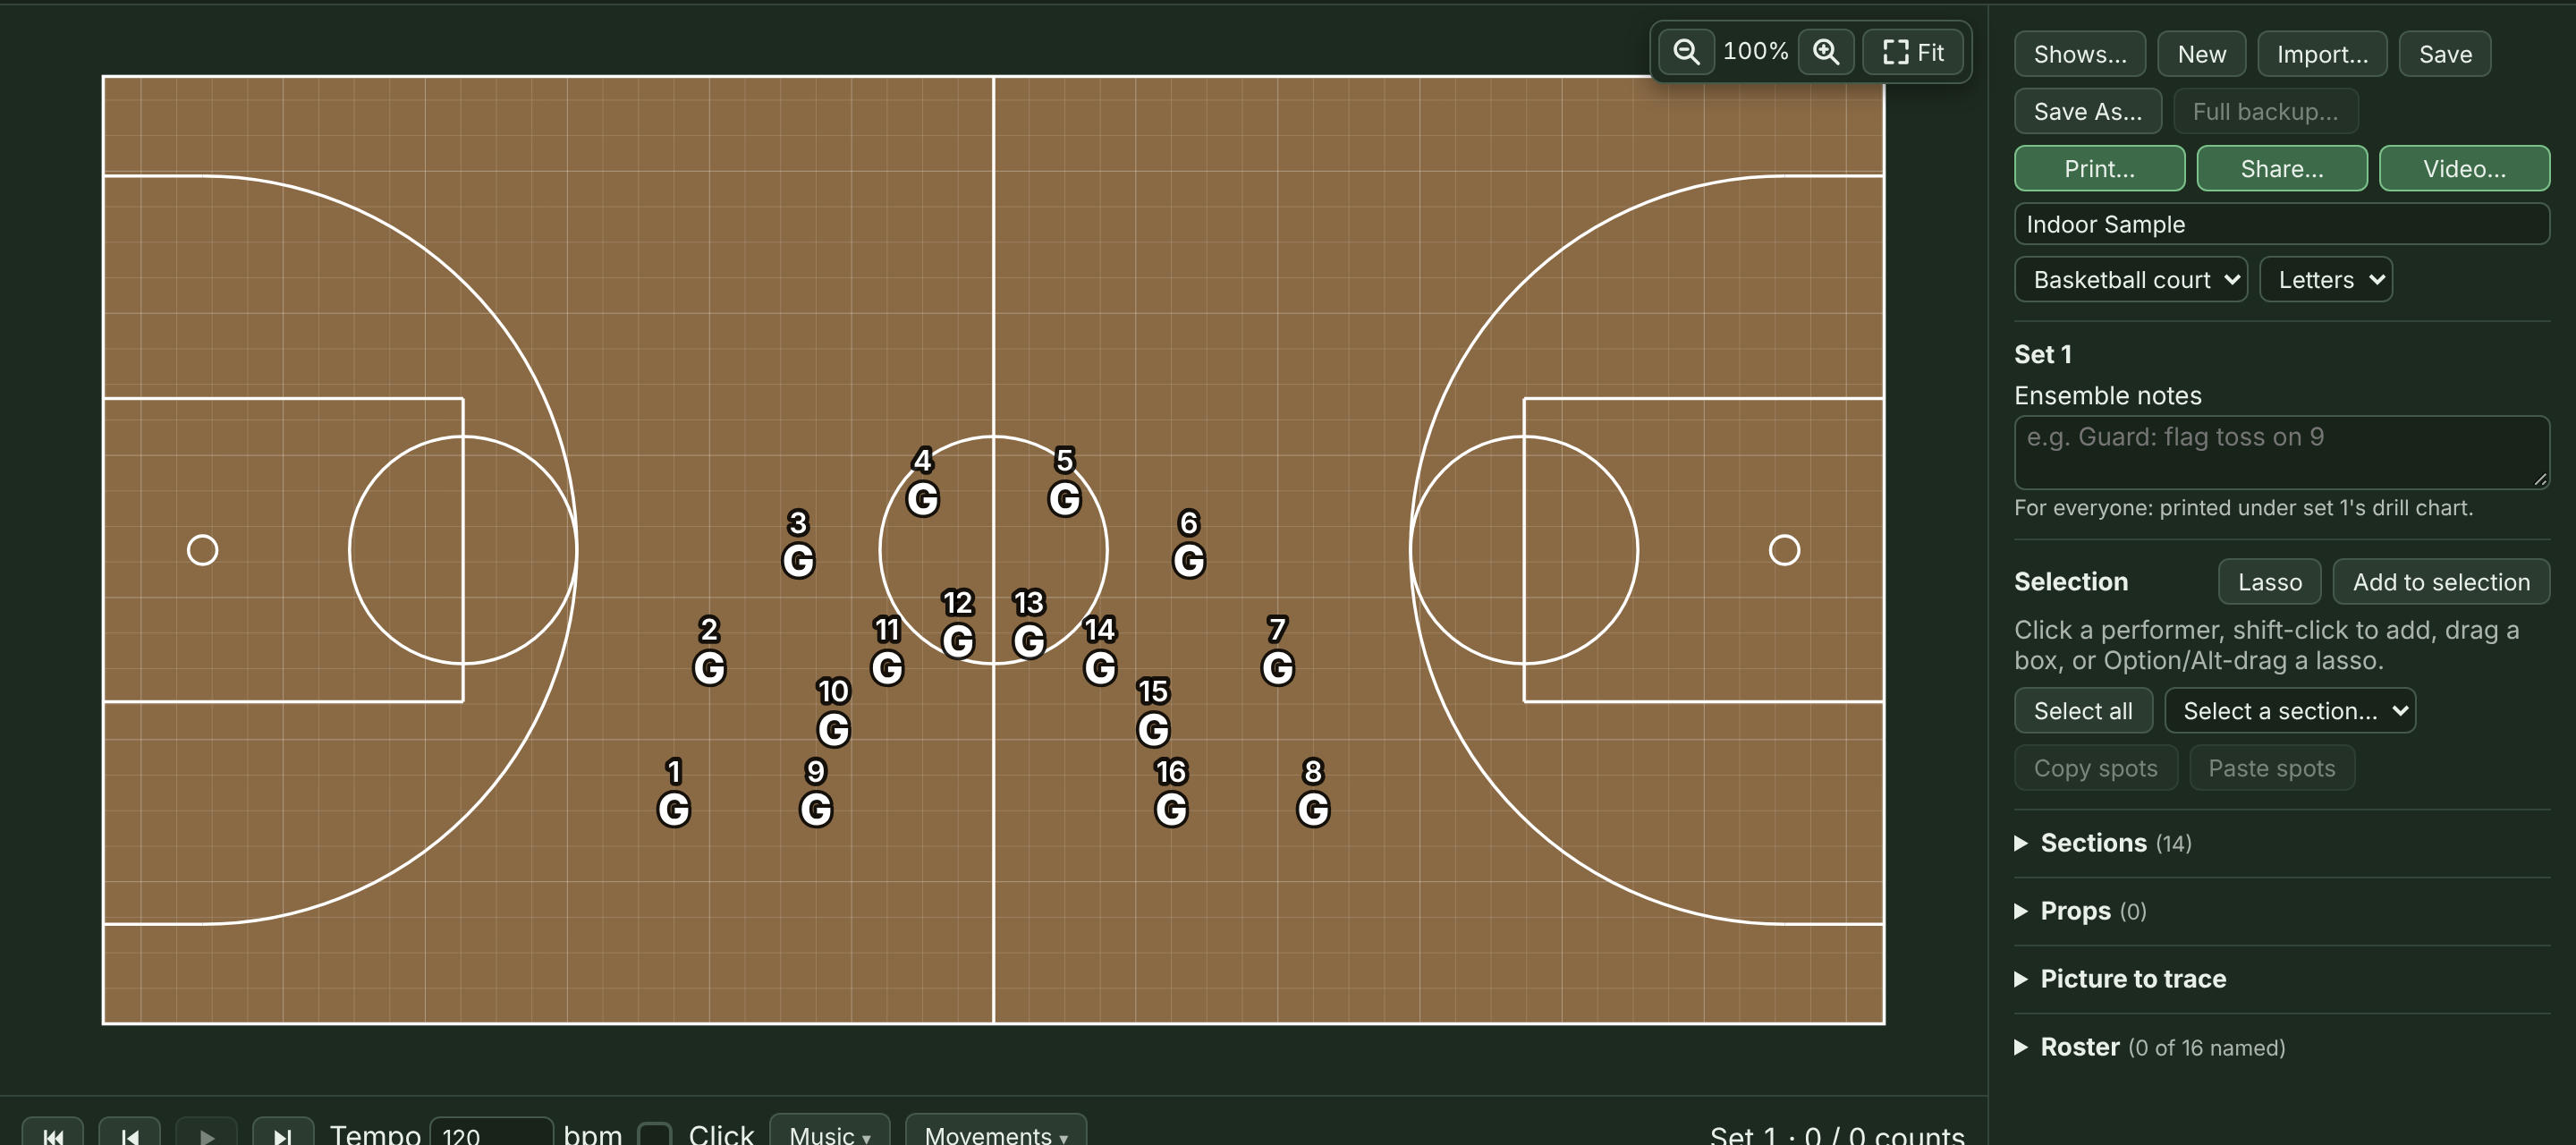
Letters or dots. By default each performer is drawn as their section letter with their number beside it (a P with a 4). Switch the menu beside the field to Dots if you'd rather see plain dots labeled P4.
Check your sections. Open Sections in the sidebar.
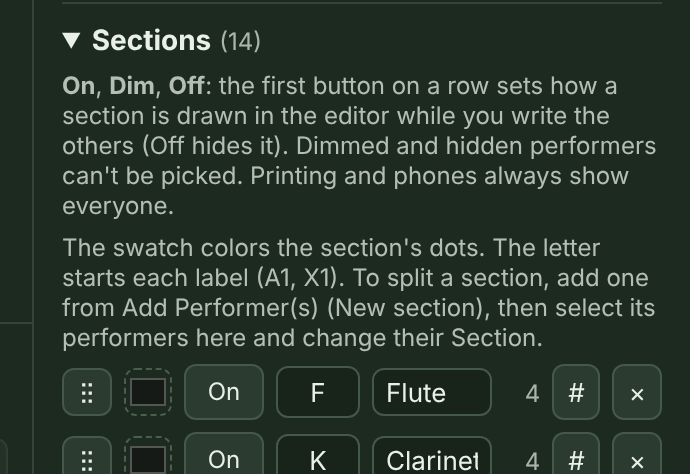
New shows start with Flute (F), Clarinet (K), Alto Sax (A), Tenor Sax (X), Trumpet (P), Mellophone (H), Trombone (N), Baritone (E), Tuba (T), Snare (S), Quads (Q), Bass Drum (B), Cymbals (C), and Color Guard (G). There's no front ensemble, since they usually stay put, but you can add one.
In the Sections list you can:
- Rename a section or change its letter. If two sections share a letter, FreeFORM flags them, since their labels would look the same.
- Give a section a color with the swatch. Its dots show in that color on the field, on phones, and on printed charts. Clear colors goes back to plain dots.
- Delete a section. If it has performers, you pick where they go. (New sections are added from Add; see below.)
- Reorder the list by dragging the dotted grip at the left of a row, or use Sort for score order, by letter, or by name. Dot sheets print in this order.
- Renumber a section with #: Close the gaps (X4, X5, X6 become X1, X2, X3), Left to right (Side 1 to Side 2), or Front to back (rank by rank), as they stand in the current set.
If your program always uses the same sections, set them up once and choose Starting list → Use this list for new shows. New shows in that browser will start with your list. Back to FreeFORM's list undoes it.
Add performers
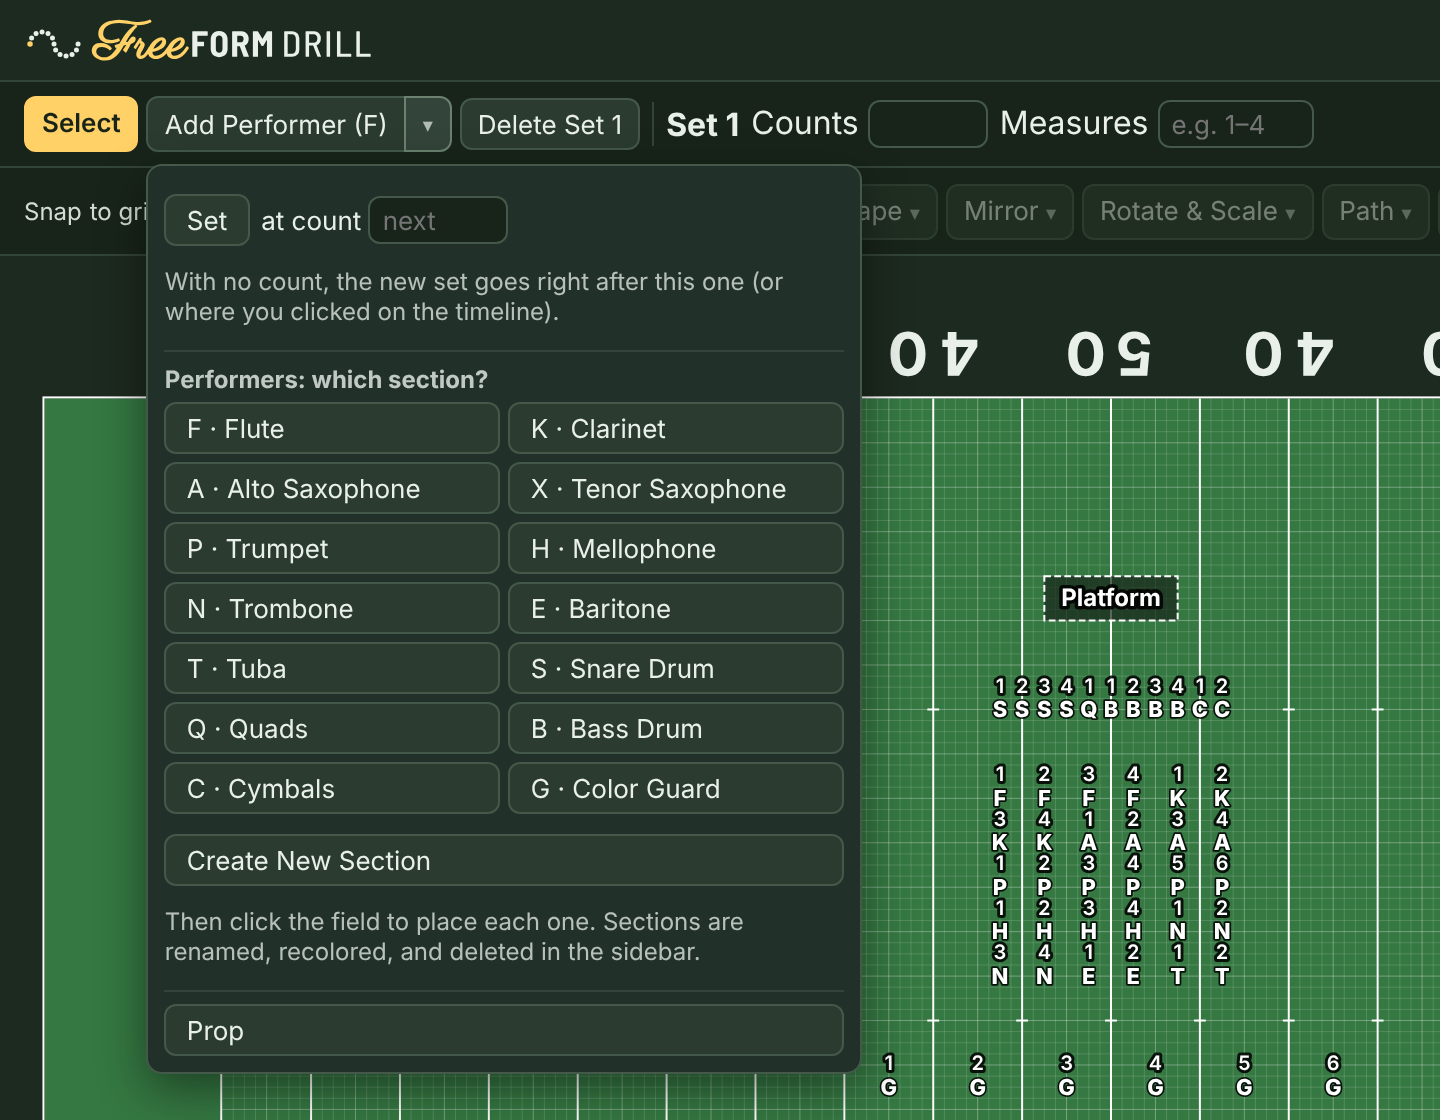
Add is two buttons in one. The ▾ part opens its menu, where you pick what to add: a set, a section's performers, or a prop. The main part repeats your last pick, and its name says what that is: Add Performer (P) places more trumpets, Add Set adds another set, and Add Prop adds another prop.
After Start the show you land here: the field is blank, adding performers is on, and the Add menu is open.
- Click Add's ▾ and pick a section under Performers. For a section that isn't there yet (a drum major, a soloist), click Create New Section, type its name and letter, and click Add: it's made and picked in one step. Later, Add Performer (P) (or whichever section you used last) picks up where you left off, and so does the A key.
- Click the field wherever you want each one. They're numbered in order: P1, P2, P3, and so on.
- Press V or Esc (or click Select) when you're done.
Performers are part of the whole show, so a performer you add appears in every set, on the same spot, until you move them.
Names. Each dot can have the name of the student who marches it. Click a dot and type the name at the top of Selection in the sidebar. The Roster list shows every dot and its name.
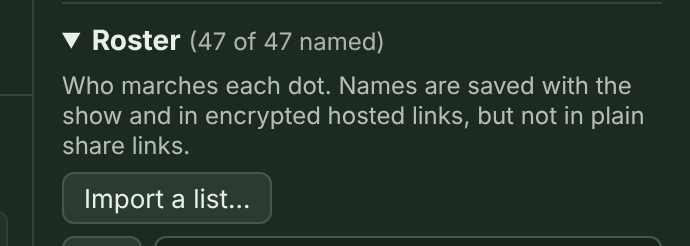
If you already have your roster in a spreadsheet, use Import a list… in Roster. Copy the cells from Excel and paste them, or choose a CSV file. FreeFORM reads the column headers (Name, or First and Last; Instrument or Section; Dot or Label), and you can fix any column it reads wrong. It shows you what will happen to every row before anything changes:
- A row with a dot (P4) names that dot, or adds it if it doesn't exist yet.
- A row with only an instrument names that section's next unnamed dot, or adds a new one.
- An instrument that doesn't match any section (say, a bassoonist who marches baritone) asks you which section those players go in.
New dots from an import wait in rows on the front sideline, centered on the 50. The whole import is one step, so a single Undo takes it all back.
Names are saved with the show and print on dot sheets. Plain share links leave them out, since anyone with the link could read them. Locked hosted links keep them (see Send the show to your performers).
Select and move performers
With Select on:
- Click a performer to select them.
- Shift-click to add or remove performers from the selection.
- Drag a box on open field to select everyone inside it.
- Option-drag (Alt-drag on Windows) on open field to draw a lasso: a freeform outline around the performers you want, for shapes a box can't fit, like one side of an arc. Everyone inside the outline is selected when you let go.
- Drag any selected performer to move the whole selection.
On a touch screen there's no Shift key, so turn on Add to selection in the sidebar's Selection area. Every tap, box, or lasso then adds to what's already selected. There's no Option key either, so turn on Lasso, next to it, and dragging on open field draws a lasso instead of a box. (Shift and Option work together too: Shift-Option-drag adds a lasso's performers to the selection.)
The Selection area also has Select all (⌘A, or Ctrl+A on Windows) and Select a section…, which picks every performer in that section. With two performers selected, it shows how many steps apart they are.
Copying spots from one set to another. Select performers, click Copy spots (⌘C, or Ctrl+C), go to another set, and click Paste spots (⌘V, or Ctrl+V). The same performers go back to the same spots. This is handy for a picture that comes back later in the show.
Snap to grid (in the toolbar) sets how dragging and adding land: on a Whole step, Half step, or Quarter step grid, or anywhere (Free). If performers are already off the grid (after a rotate, a shape, or an import), select them and click Snap selected, next to it, to round them onto the grid (with Free chosen, onto whole steps). FreeFORM warns you if two performers would land on the same spot.
Dimming or hiding sections. When the field is crowded, open Sections in the sidebar and click the first button on a section's row. It cycles On, Dim (drawn faint, with no labels), and Off (hidden). Dimmed and hidden performers can't be clicked, boxed, or picked by Select all, and their paths aren't drawn, so you can write the guard without grabbing the horns. Show all brings everyone back. This only changes your view in the editor, in this browser: printed charts and phones always show everyone.
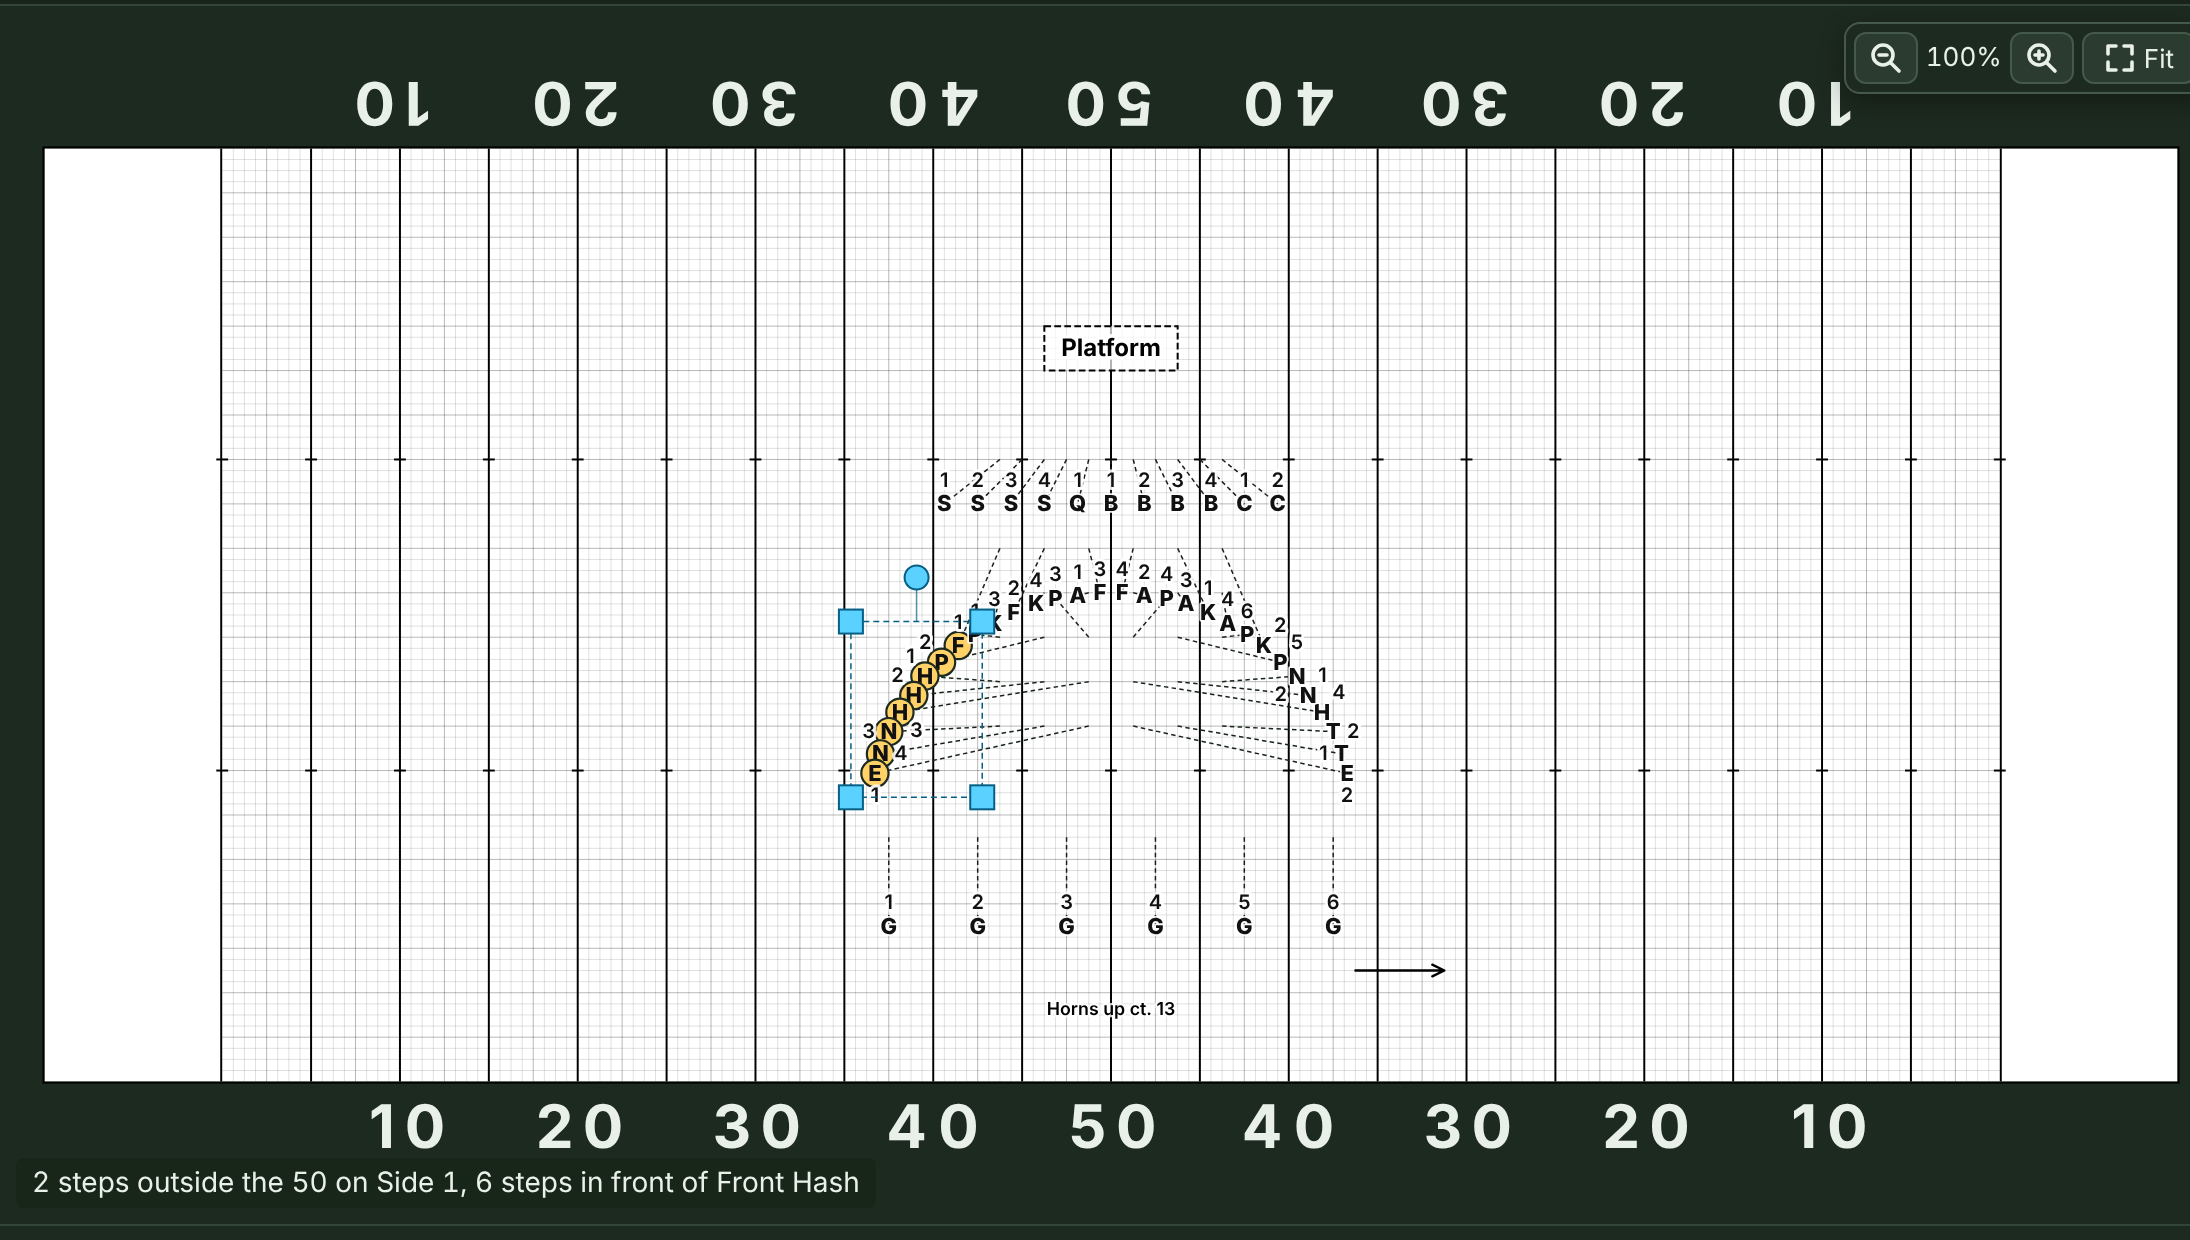
Reading coordinates. Click one performer and the sidebar shows exactly where they are, in standard drill language.
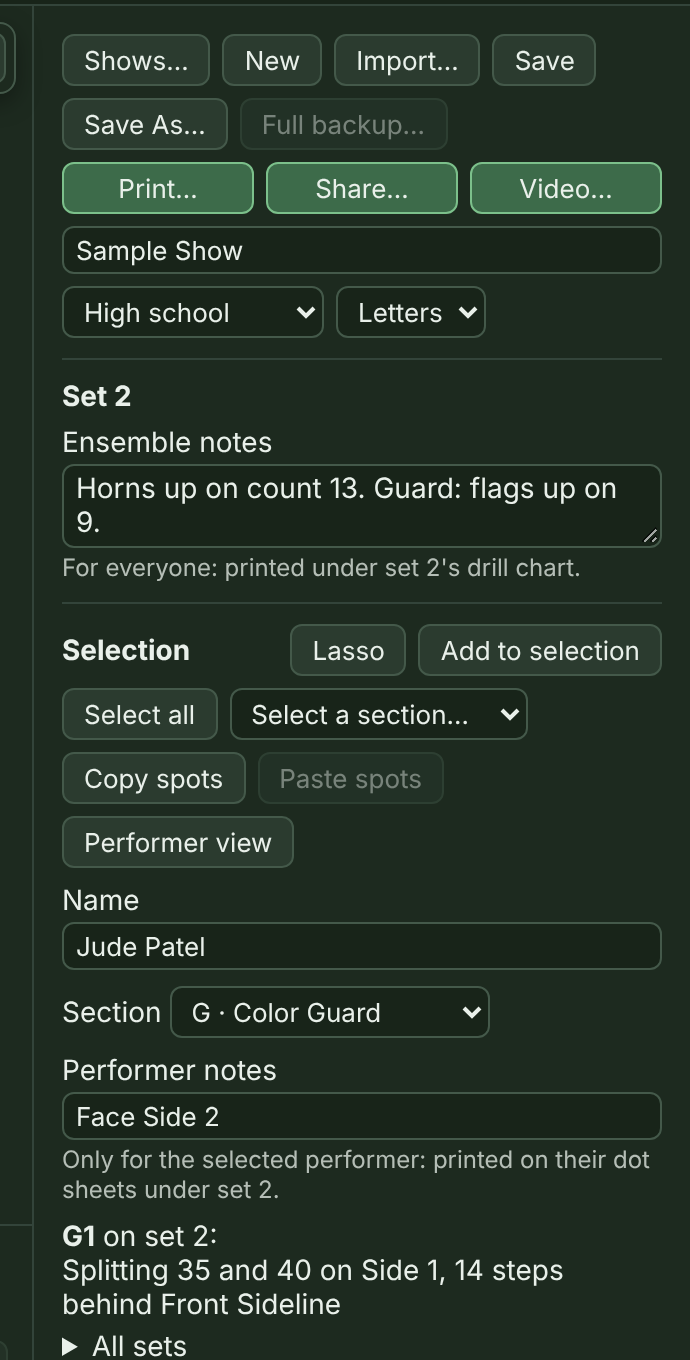
Coordinates read side to side first, then front to back, from the nearest yard line and the nearest sideline or hash, rounded to quarter steps. For example: "2 steps outside the Side 2 45, 2 steps in front of Front Hash," "Splitting 40 and 45 on Side 1," or "On the 50." Open All sets to see that performer's spot in every set.
Placing someone exactly. Open Place exactly (this set) under the coordinate, fill in the steps, inside or outside, the side and yard line, then the steps in front of or behind a sideline or hash, and click Place.
Moves carry forward through holds. When you move someone in a set, every later set where they were still standing on their old spot (holding) moves with them, up to the first set where you'd already put them somewhere else. So if you add performers, then place them in set 2, they stay there in sets 3, 4 and on until you move them again, and drill you've already written for later sets is never changed. This works the same for dragging, shapes, flips, rotating and stretching, snapping, and Place exactly.
Reset to set in the toolbar puts the selected performers back where they were in the set before, so you can start their move over.
Sets, counts, and the timeline

A set is one picture of the drill, and the move into it takes a number of counts. Set 1 is the opening set, so it has no move into it. A set's Counts are the counts of the move into it: 16 counts on set 3 means it takes 16 counts to get from set 2 to set 3.
Between sets, you're previewing. When the playhead is partway through a move, the field shows where everyone is on that count, but you can't move or add performers there: edits go on a set. The toolbar shows this in place of the set name, for example Ct 6 of 16 · Go to Set 3. Click it to jump to set 3. If you try to drag or add a performer mid-move, a note at the bottom of the field says the same thing.
- Add's ▾, then Set, adds a set 16 counts after the one you're on, and the sets after it move along. You're back on Select afterward, and the button now reads Add Set, so the next set is one click. The new set starts as a copy of the one you were on, so you only move the people who move.
- Change a set's Counts and Measures on the toolbar's first row, next to Delete. New counts take effect when you press Enter or tap away, so the set doesn't jump around while you type. Type measures the way the score numbers them (a pickup bar is m. 1).
- Delete with nothing selected removes the set you're on, after asking. (With performers, a prop, or markup selected, it deletes those instead. The button says what it will delete: Delete Set 3, Delete P4, Delete 6 performers, Delete prop, or Delete markup. The Delete key never deletes a set.) The sets always stay numbered in order: delete set 7 of 8 and the old 8 becomes 7. Adding a set in the middle moves the later ones up a number the same way. Sub-sets keep their place after the set before them and stay lettered in order (the old 8A becomes 7A).
- Click a set's button on the timeline to go to it, or click any count to see where everyone is on that count.
- Drag a set's button to move it to a different count. The sets around it stay where they are.
Each move on the timeline shows its counts, measures, and the biggest step anyone takes (colored if it's too big, see Step-size warnings).
In a narrow window, the row of play controls at the top of the timeline scrolls sideways too: a faded edge means there's more past it.
The timeline scrolls sideways for a long show. Use the mouse wheel or a swipe over it, or right-drag. The magnifying glasses at the right end zoom the timeline in and out, and Fit shows the whole show.
Movements: laying out the show by counts first. If you know your music's length before you write, open Movements (under the field, beside Music) and type each tune's total counts.
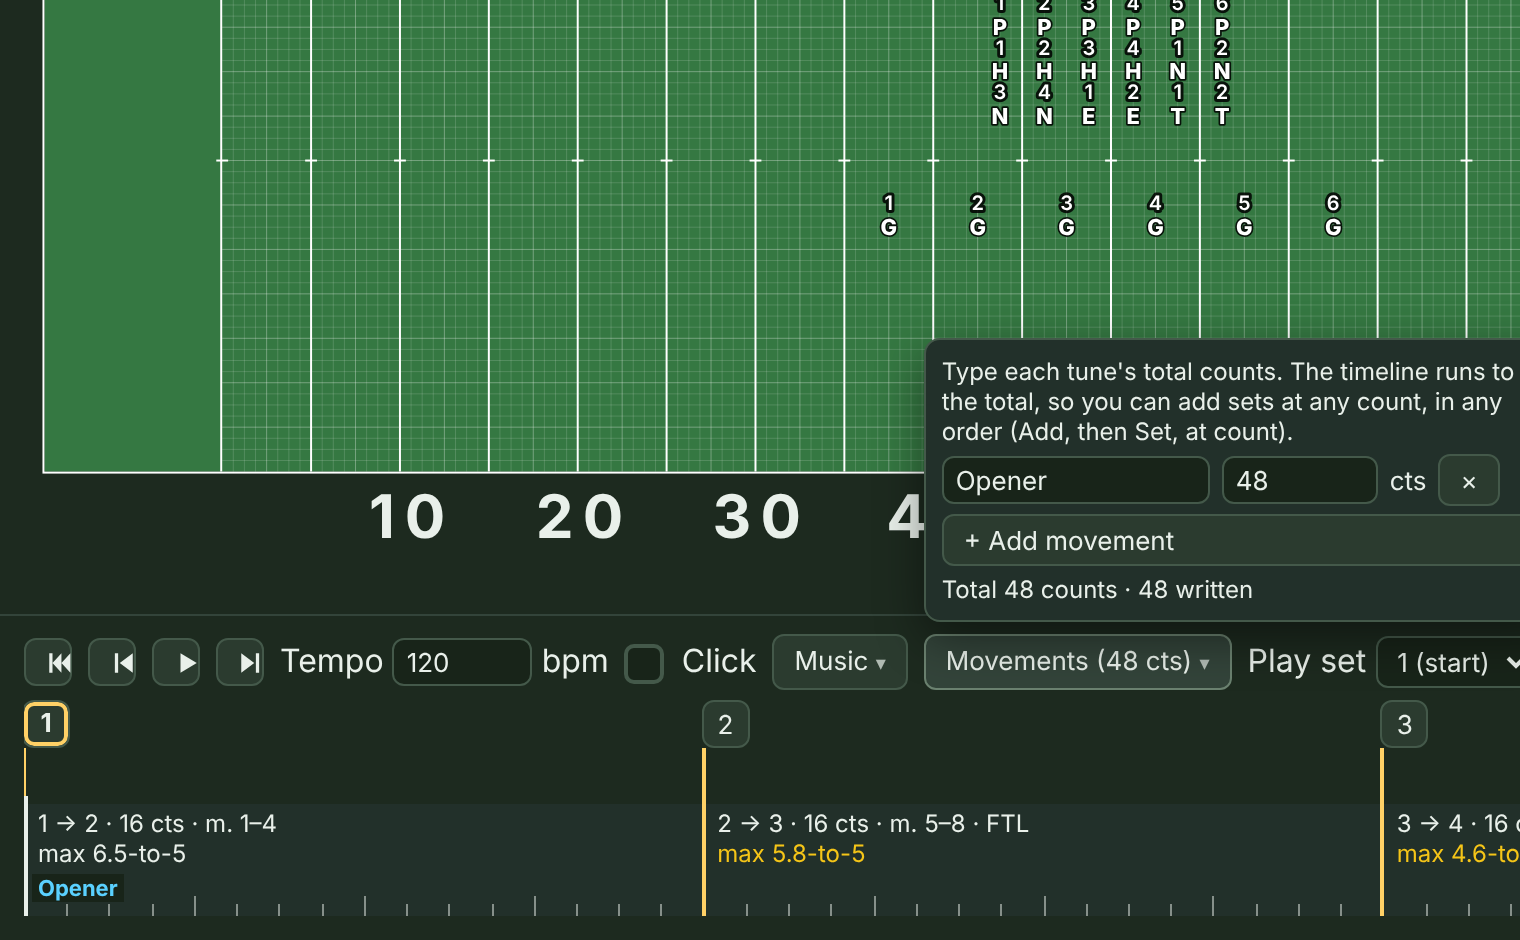
The timeline then runs the full length, with the part you haven't written yet striped Not written yet. To add a set at a particular count, click that count on the timeline, then click Add Set (or Add's ▾, then Set). Or type the count in the at count box next to Set. No other set moves. A set added in the middle of a move splits it and gets a sub-set name (1A after 1), the way Pyware names them.
Shapes: lines, arcs, curves, circles, polygons, stars, spirals, blocks, and letters
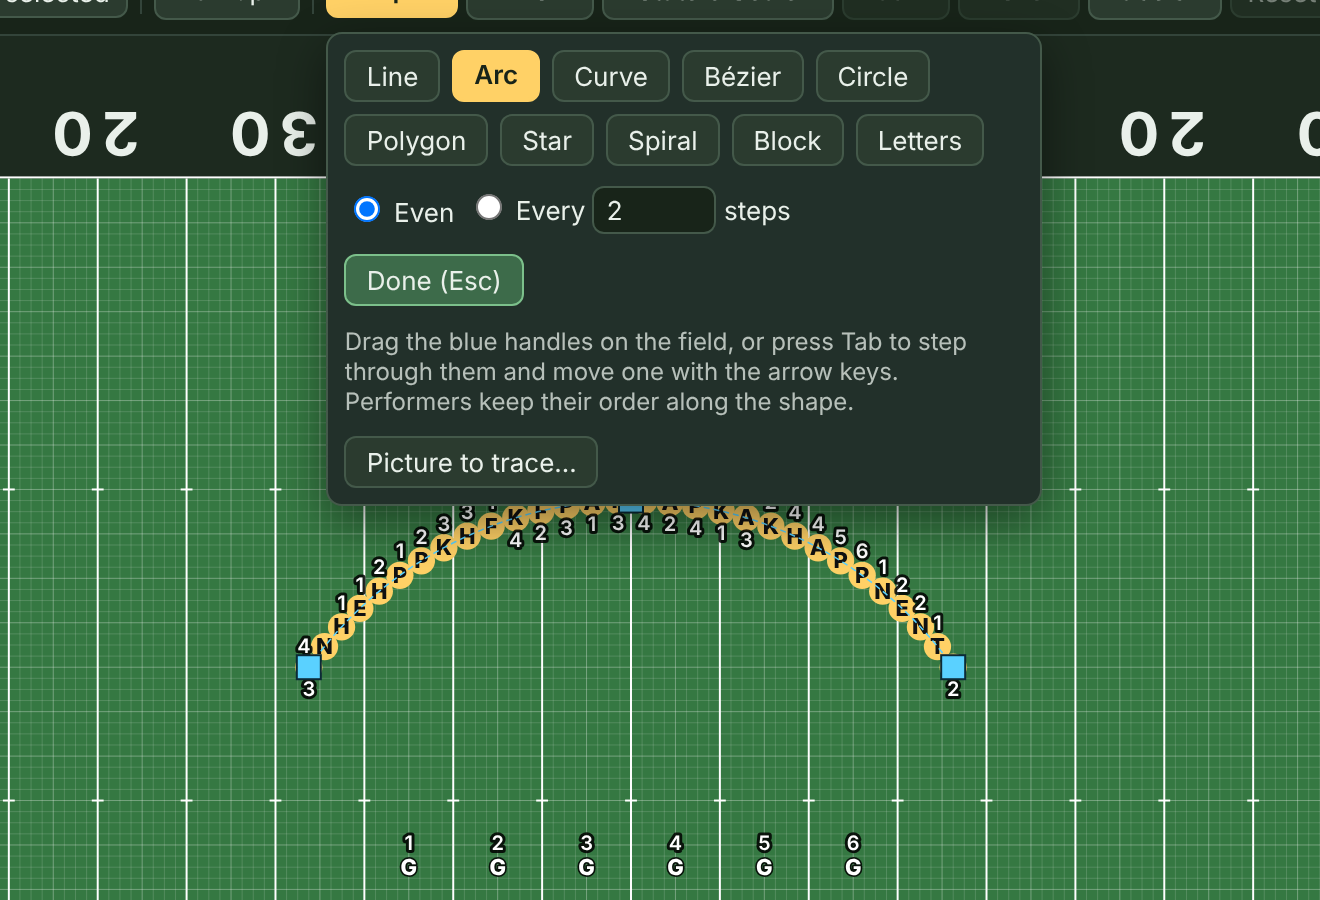
- Select the performers you want in the shape.
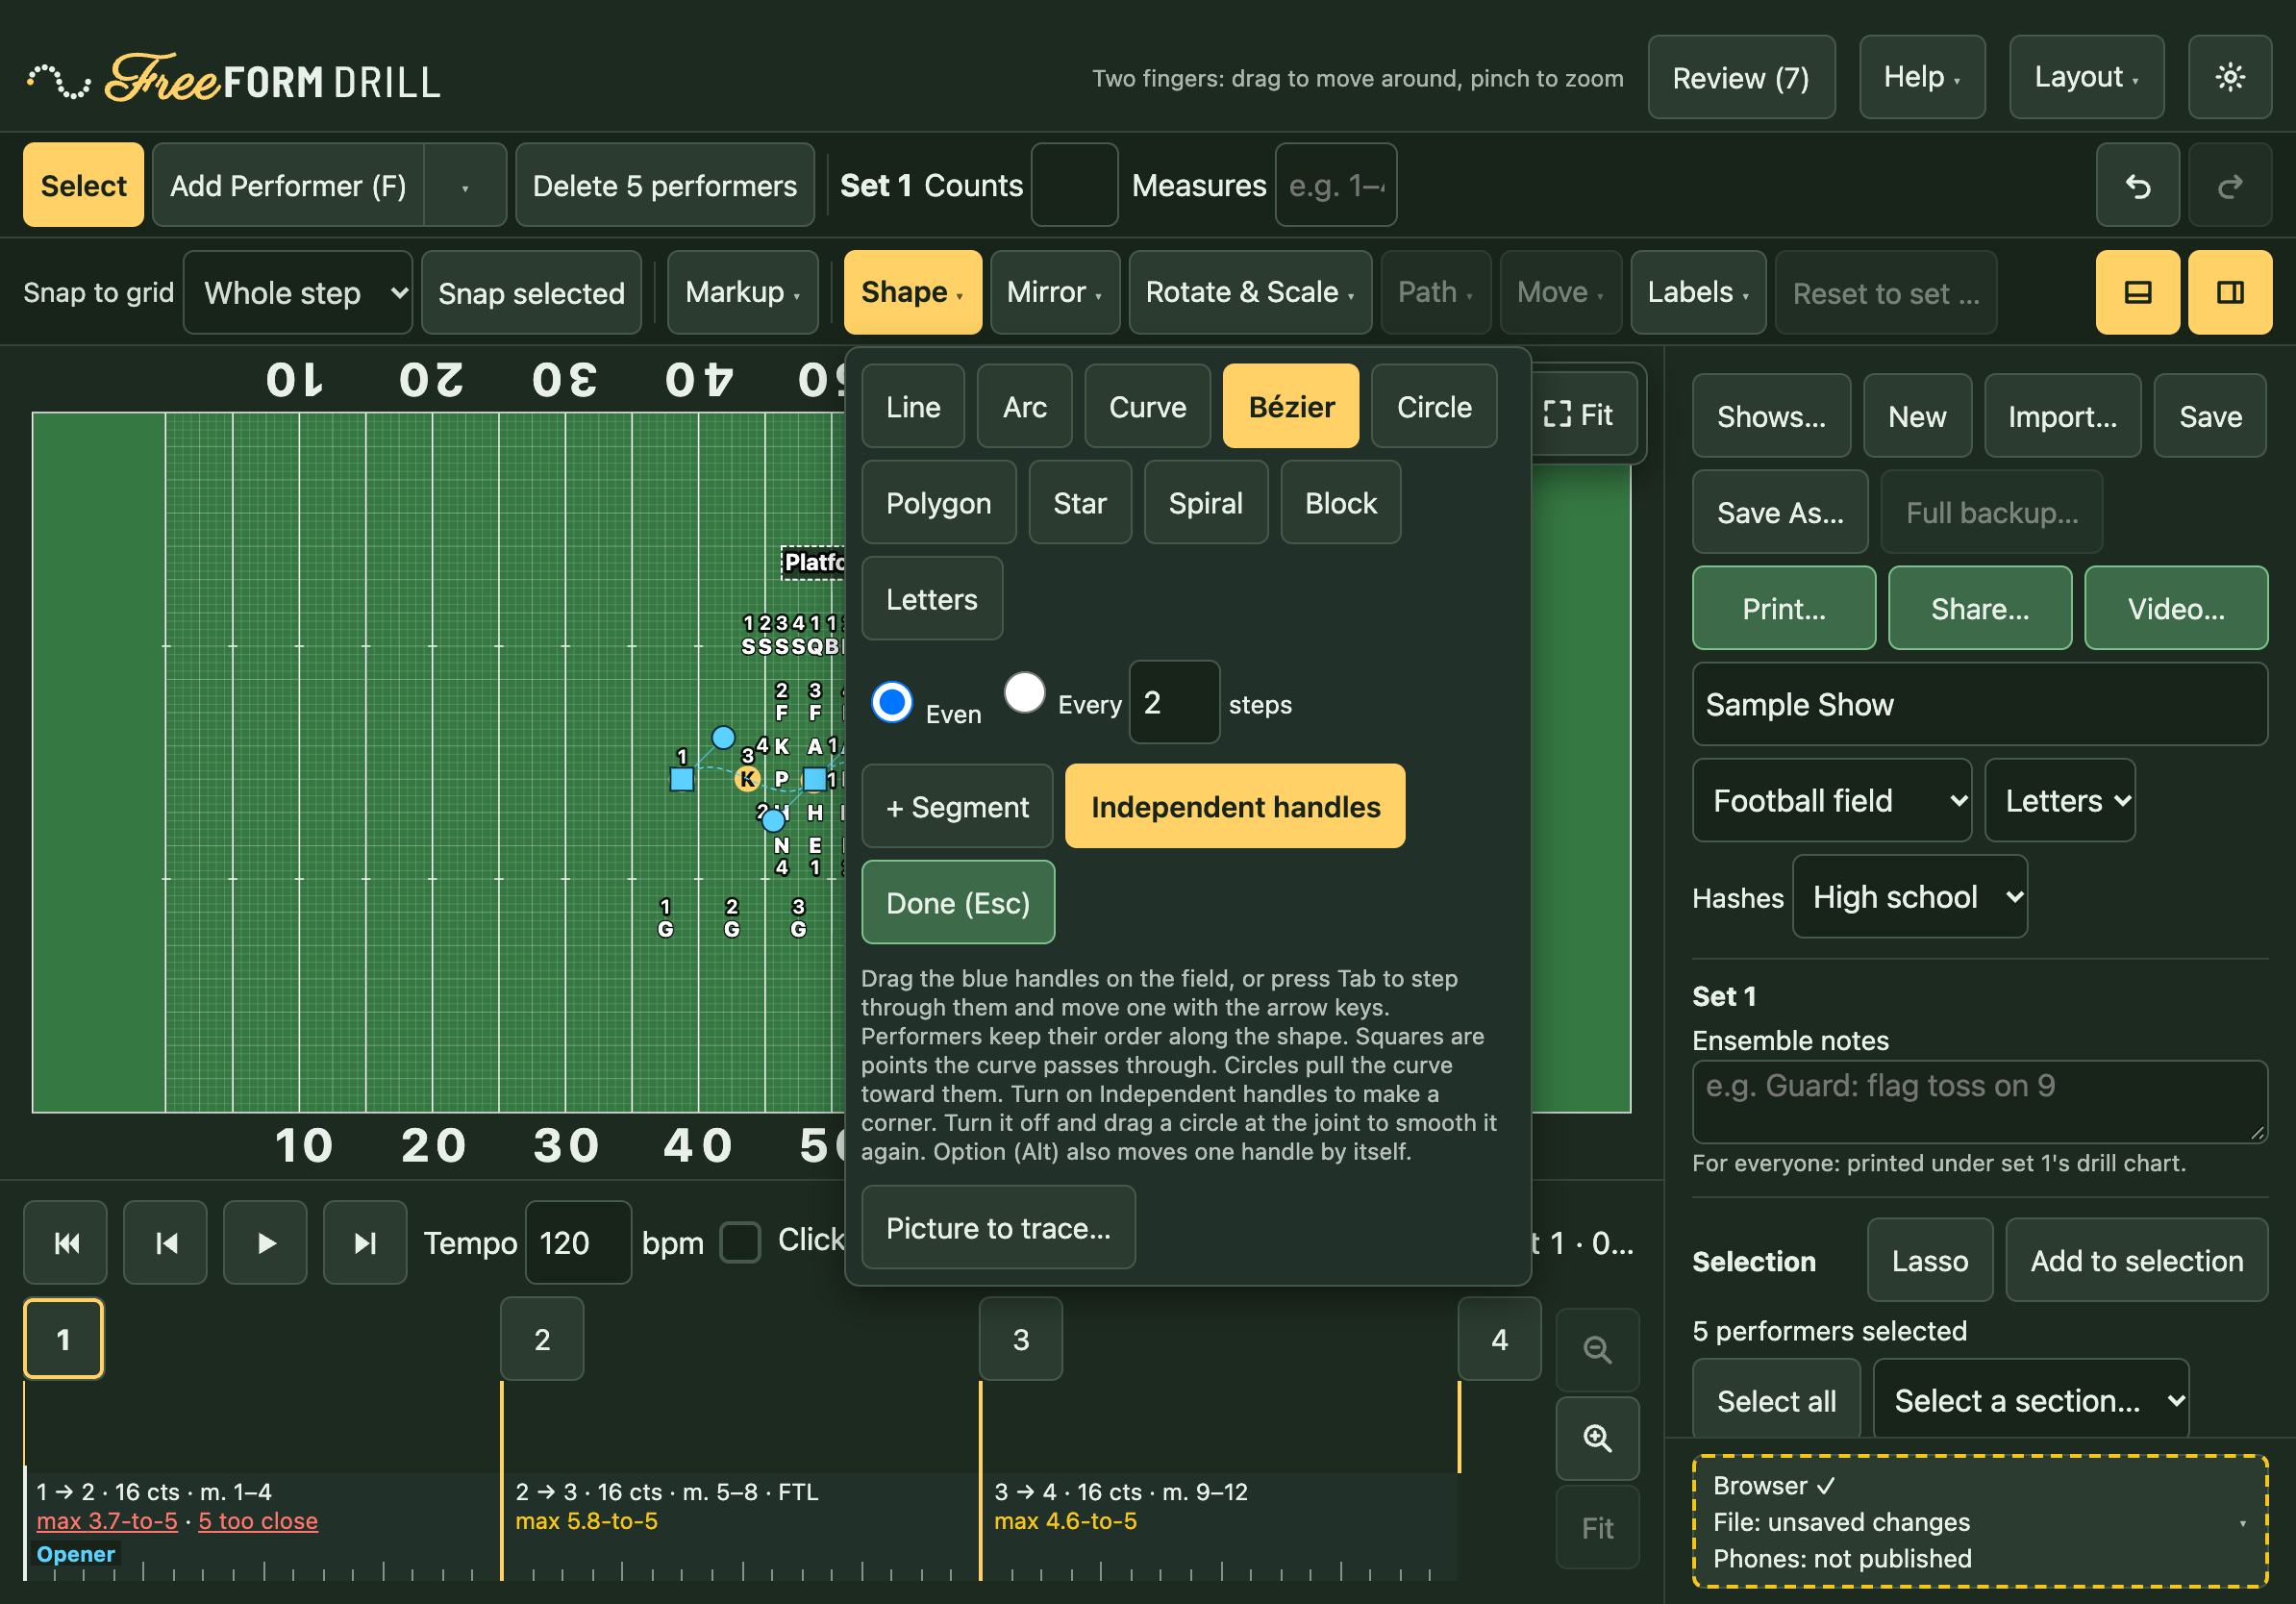
- Open Shape and pick Line, Arc, Curve, Bézier, Circle, Polygon, Star, Spiral, Block, or Letters. Or press its letter (see Keyboard shortcuts).
- Drag the blue handles on the field to adjust the shape. Choose Even spacing, or Every so many steps.
- Click Done (or press Esc) when it looks right.
Moving handles with the keyboard. With a shape open, press Tab (click the field first if a button has focus) to step to its first handle: a gold ring goes around it, and a note at the bottom of the field names it and says where it is, like "Arc, middle: 2 steps inside the Side 1 45, 3 steps in front of Back Hash." Tab goes to the next handle and Shift+Tab to the one before. The arrow keys move the handle 1 step (Shift for 4 steps, Option or Alt for half a step), Enter keeps it where it is, and Esc puts it back where it was when you picked it. Tab past the last handle goes on to the rest of the page as usual.
FreeFORM decides who goes to which spot by keeping total travel from the previous set as short as it can, so the paths don't cross. Curves can take extra points (+ Curve point) and Béziers extra segments (+ Segment). Blocks also take a number of Columns.
Bézier handles. In Shape, turn on Independent handles to drag one handle at a time with a finger, Apple Pencil, or mouse. Turn it off and drag a round handle at a joint to make that joint smooth again. The switch itself leaves the curve in place. If the panel covers a handle, tap Shape to tuck it away while you edit, then tap Shape again to bring it back. You can also hold Option (Alt on Windows) while dragging to move a single handle.
Polygons are regular: every side is the same length. Set the number of Sides (3 for a triangle, 4 for a diamond, 6 for a hexagon). A polygon has two handles: the center, and a corner. Drag the corner to size the polygon and turn it.
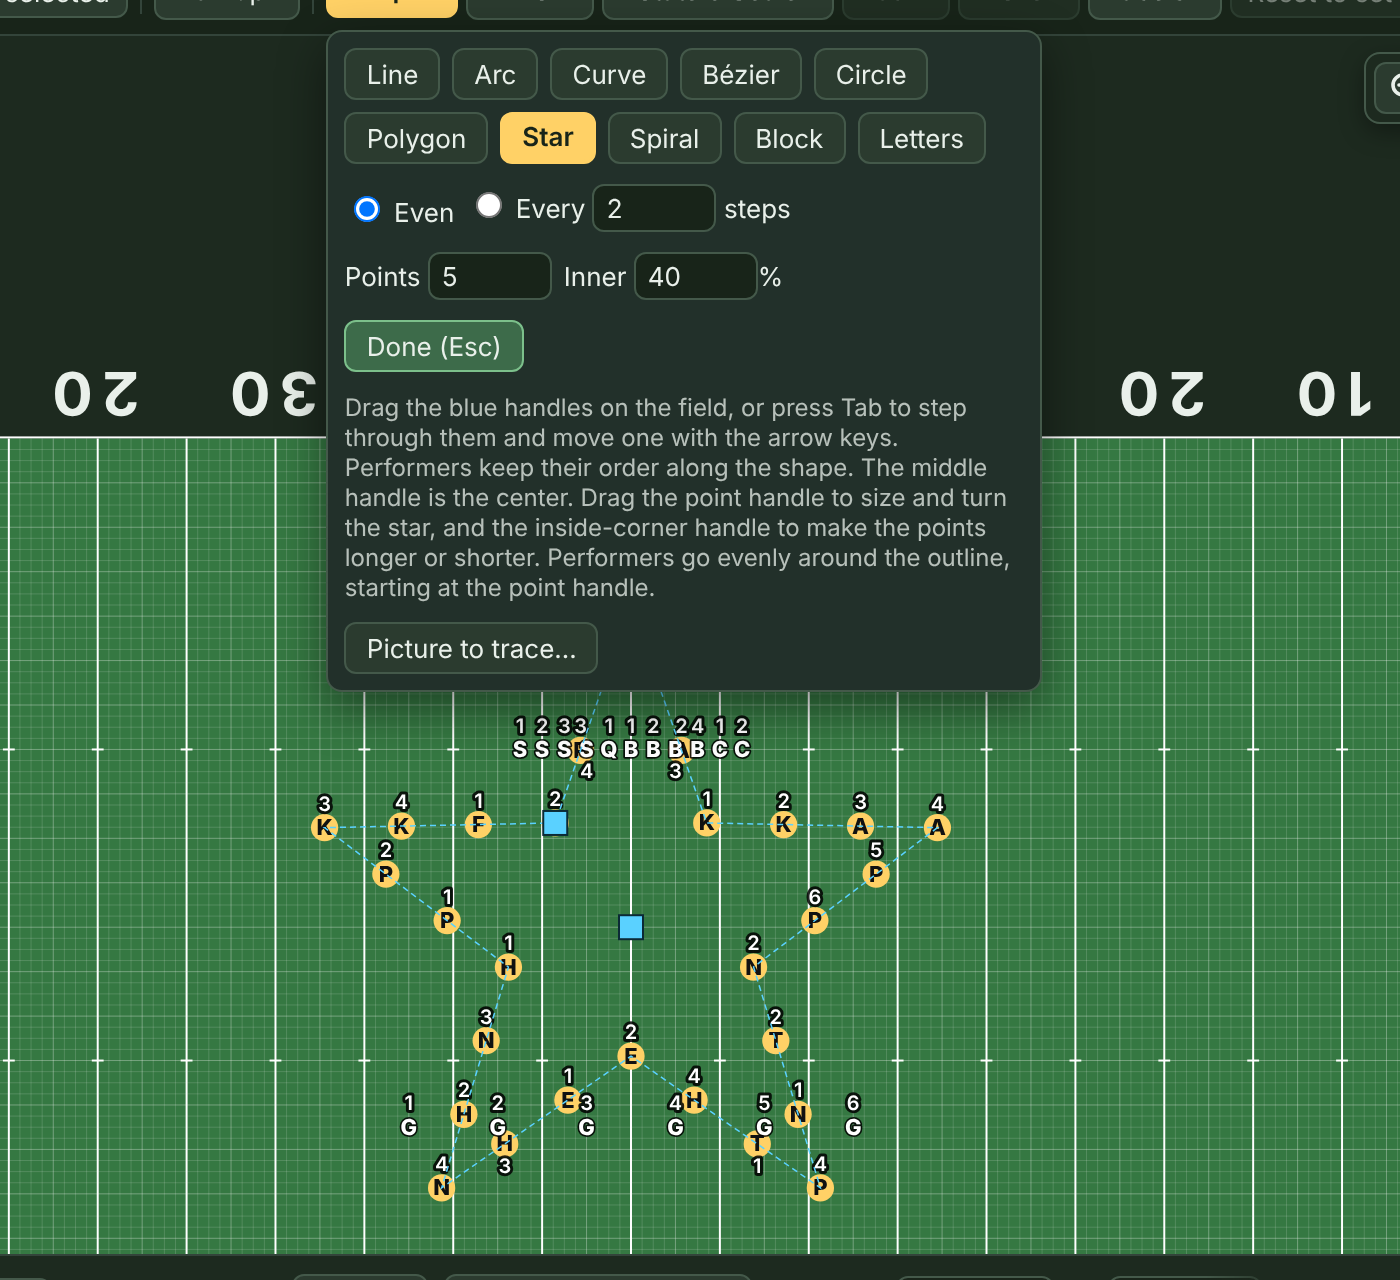
Stars have three handles: the center, a point, and an inside corner. Drag the point to size the star and turn it. Drag the inside corner toward the center for long, thin points, or away for short, fat ones. It stays on its corner as you drag. Set the number of Points, or type how deep the inside corners sit in Inner, as a percent of the distance from the center to the points. Performers go evenly around the outline, starting at the corner under the handle. To put someone on every corner, use a number of performers that's a multiple of the corners (5, 10, 15 for a 5-sided polygon; 10, 20 for a 5-point star, which has 10 corners).
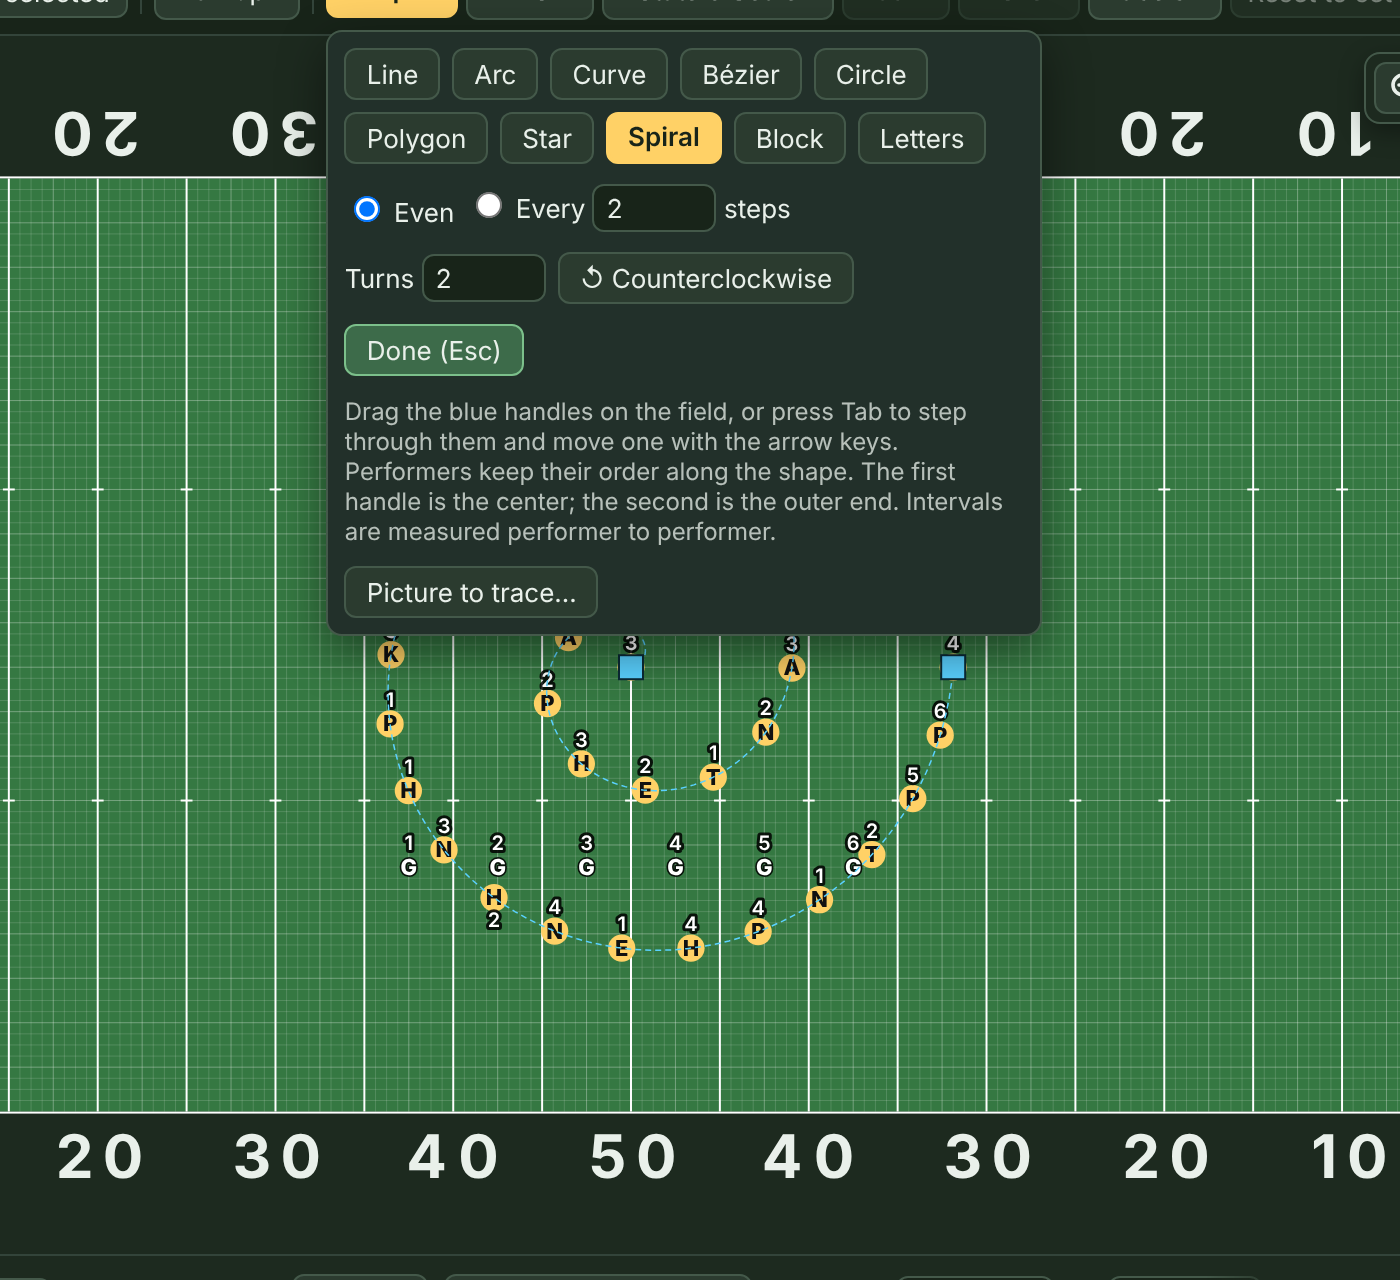
Spirals start in the center and wind out to the outer end. The first handle is the center and the second is the outer end. Set the number of Turns, and click the direction button to wind it Counterclockwise or Clockwise. The coils stay the same distance apart all the way out. Spacing is measured in a straight line from one performer to the next, so performers near the tight center get the same interval as everyone else. If the coils get closer than 2 steps, FreeFORM warns you, because performers on neighboring coils would be too close. Use fewer turns or make the spiral bigger.
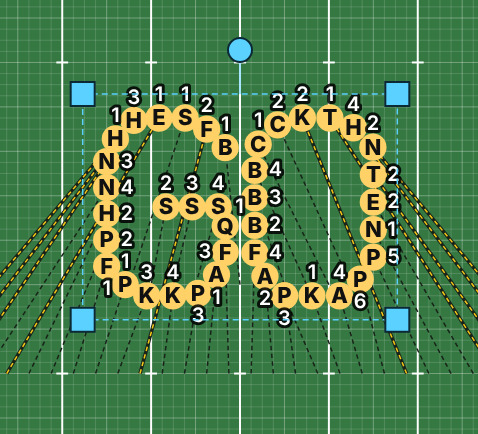
Letters spell a word with performers. Type it in Spell: capital letters, numbers, hyphens, and spaces. The word fills the box between the two handles, and it starts as wide as the letters need, so they keep their shape. Drag the handles to make it bigger or smaller. Performers are shared out along the strokes, more on the long ones, and every letter reaches its corners. A letter reads best with about 8 to 12 performers, so a short word works better than a long one.
Tracing a picture. To copy a logo or a sketch onto the field, open Picture to trace in the sidebar (or click Picture to trace… at the bottom of the Shape menu) and click Add a picture…. It shows under the field, see-through. Set how Wide it is in steps, where it sits (Across is steps from the 50, Up is steps from the front sideline), and how strong it shows with See-through. Then place performers on it by hand or with the shapes. The picture stays in the browser you added it in: it isn't saved in the ordinary show file (only in a Full backup…), printed, or sent to phones. Remove takes it away.
Rotate, stretch, and flip
Select two or more performers and a dashed frame appears around them.
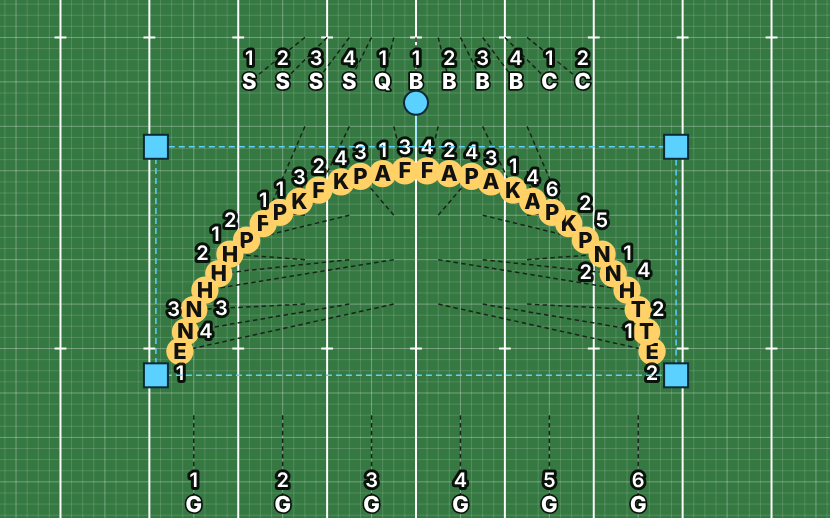
- Drag the round knob above the frame to rotate the selection around its center. It lands on whole degrees and pulls toward multiples of 15°, so 45° and 90° are easy to hit.
- Drag a corner to stretch. Drag sideways to make the group wider or narrower, up or down to make it deeper or shallower, or diagonally for both. Each direction pulls toward 100%, so a slightly crooked sideways drag won't change the depth.
The amount shows in the bottom-left corner of the field while you drag, and each drag is one Undo. Stretching follows the field's lines (side to side and front to back), even after you've rotated a group.
Two menus do the same jobs with exact numbers.
Mirror flips the selection or copies one side onto the other:
- Flip across the 50 swaps Side 1 and Side 2, and Flip front ↔ back swaps front and back.
- Copy Side 1 → 2 (or 2 → 1) gives the other side the mirror image. FreeFORM pairs each performer with the one in the mirror-opposite spot. The other side moves the same way, too: a delayed step-off, a turning move, or a follow-the-leader group on the side you copy comes along, so each partner holds, turns, or follows just like its twin.
Rotate & Scale turns the selection by a typed number of degrees (↺ counterclockwise, ↻ clockwise), and Expand and Contract scale it evenly by a typed percent. Around picks what it turns around: the center, or one of the selected performers. Pick the performer on the end of a line for a gate turn. It needs 2 or more performers selected.
Mirror and Rotate & Scale keep the form you have and move or resize it. To change the form itself, like a block into an arc, use Shape.
Rotating or stretching usually leaves performers between grid steps. Select them and click Snap selected (next to Snap to grid) if you want them back on whole, half, or quarter steps.
Paths: straight, follow the leader, and custom
Path (in the toolbar) sets how the selected performers get to their spots in the move into the set you're on. It has three choices:
- Straight, the default: each performer goes straight to their spot.
- Follow the leader (FTL, for 2 or more performers): the others march the leader's path in order.
- Custom (one performer): they march through points you click on the field.
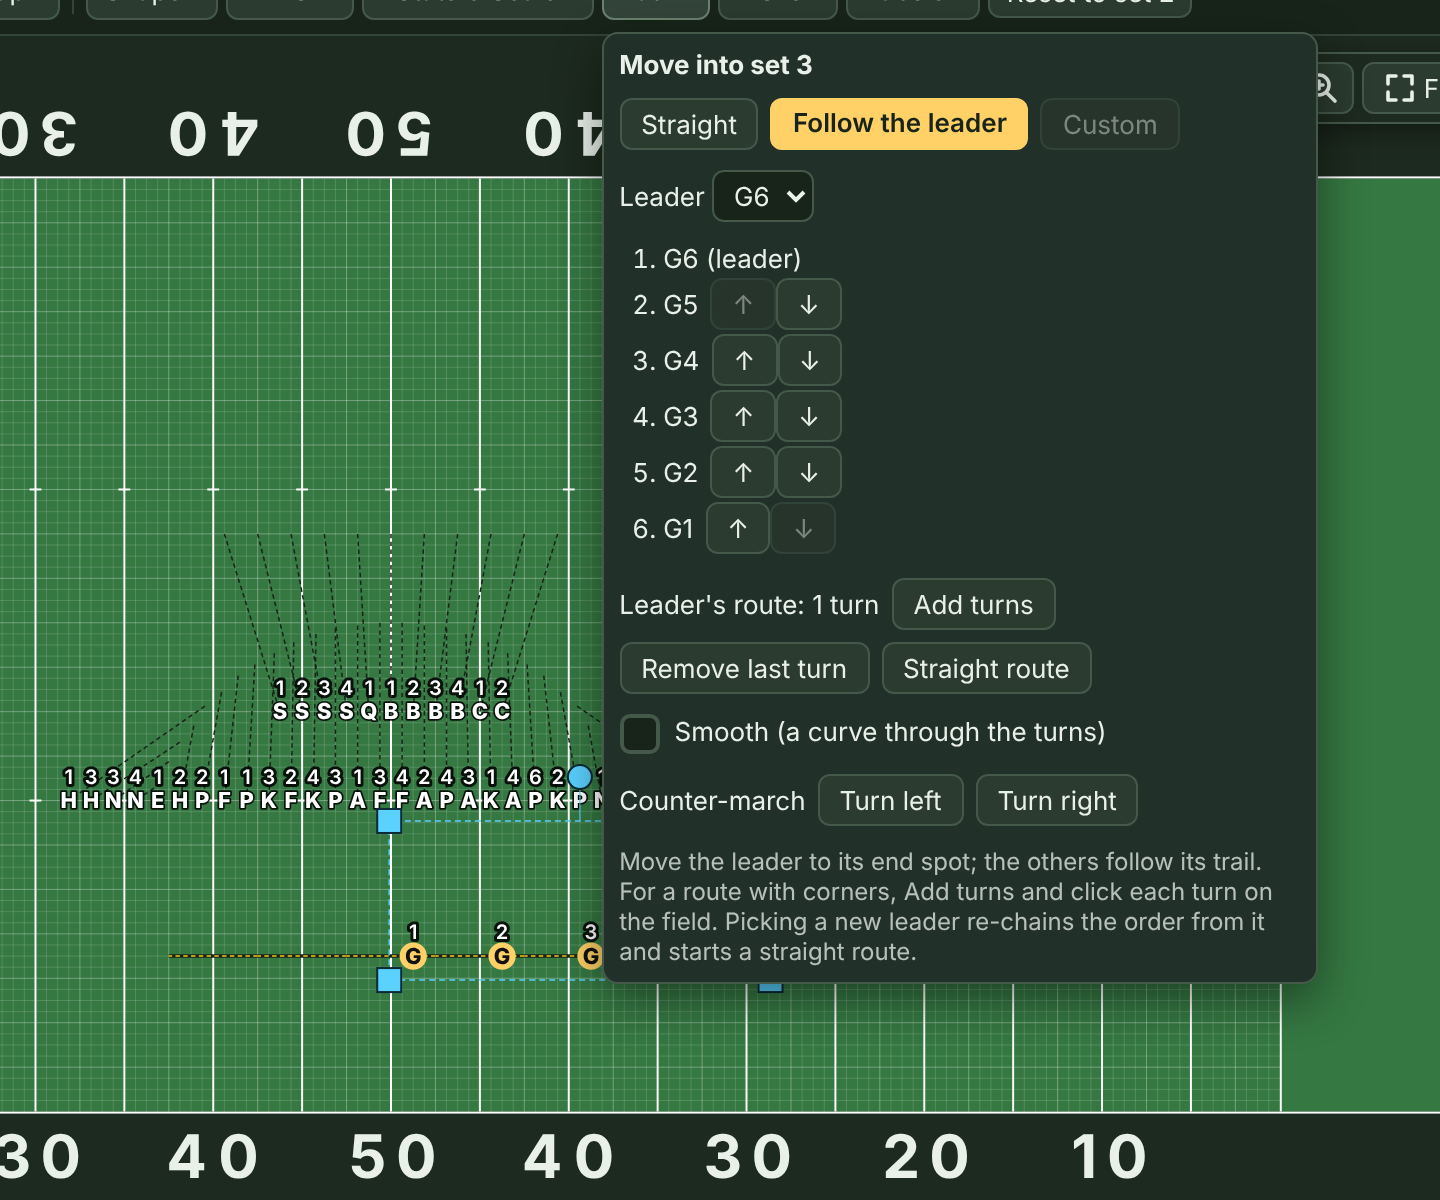
Follow the leader:
- Go to the set the move ends on, and select the group.
- Open Path, click Follow the leader, pick the Leader, and put the others in order with the arrows.
- Drag the leader to their end spot. Everyone else follows the trail.
- For a route with corners, click Add turns, then click each turn on the field in marching order. Press Esc when you're done.
With the group selected, each turn has a blue handle you can drag. To move one by keyboard, click the field (so no button has focus) and press Tab: a gold ring goes around the first turn, and the note at the bottom of the field names it and says where it is, like "Follow the leader (G6 leads), turn 1: On the Side 2 30, 14 steps behind Front Sideline." Tab and Shift+Tab step through the turns, the arrow keys move the one you're on (Shift for 4 steps, Option or Alt for half a step), Enter keeps it, and Esc puts it back. Remove last turn and Straight route take turns back out, and Straight at the top of Path turns follow the leader off for that group. Turns move with the group when you drag, flip, rotate, or stretch it, and Copy Side 1 → 2 copies an FTL group to the other side.
Everyone in an FTL move covers the leader's whole route at one steady step size, so a turn never makes anybody take a giant step.
Smooth. Once a route has turns, check Smooth to round the corners into a curve that passes through every turn. Everyone still marches it at one steady step size.
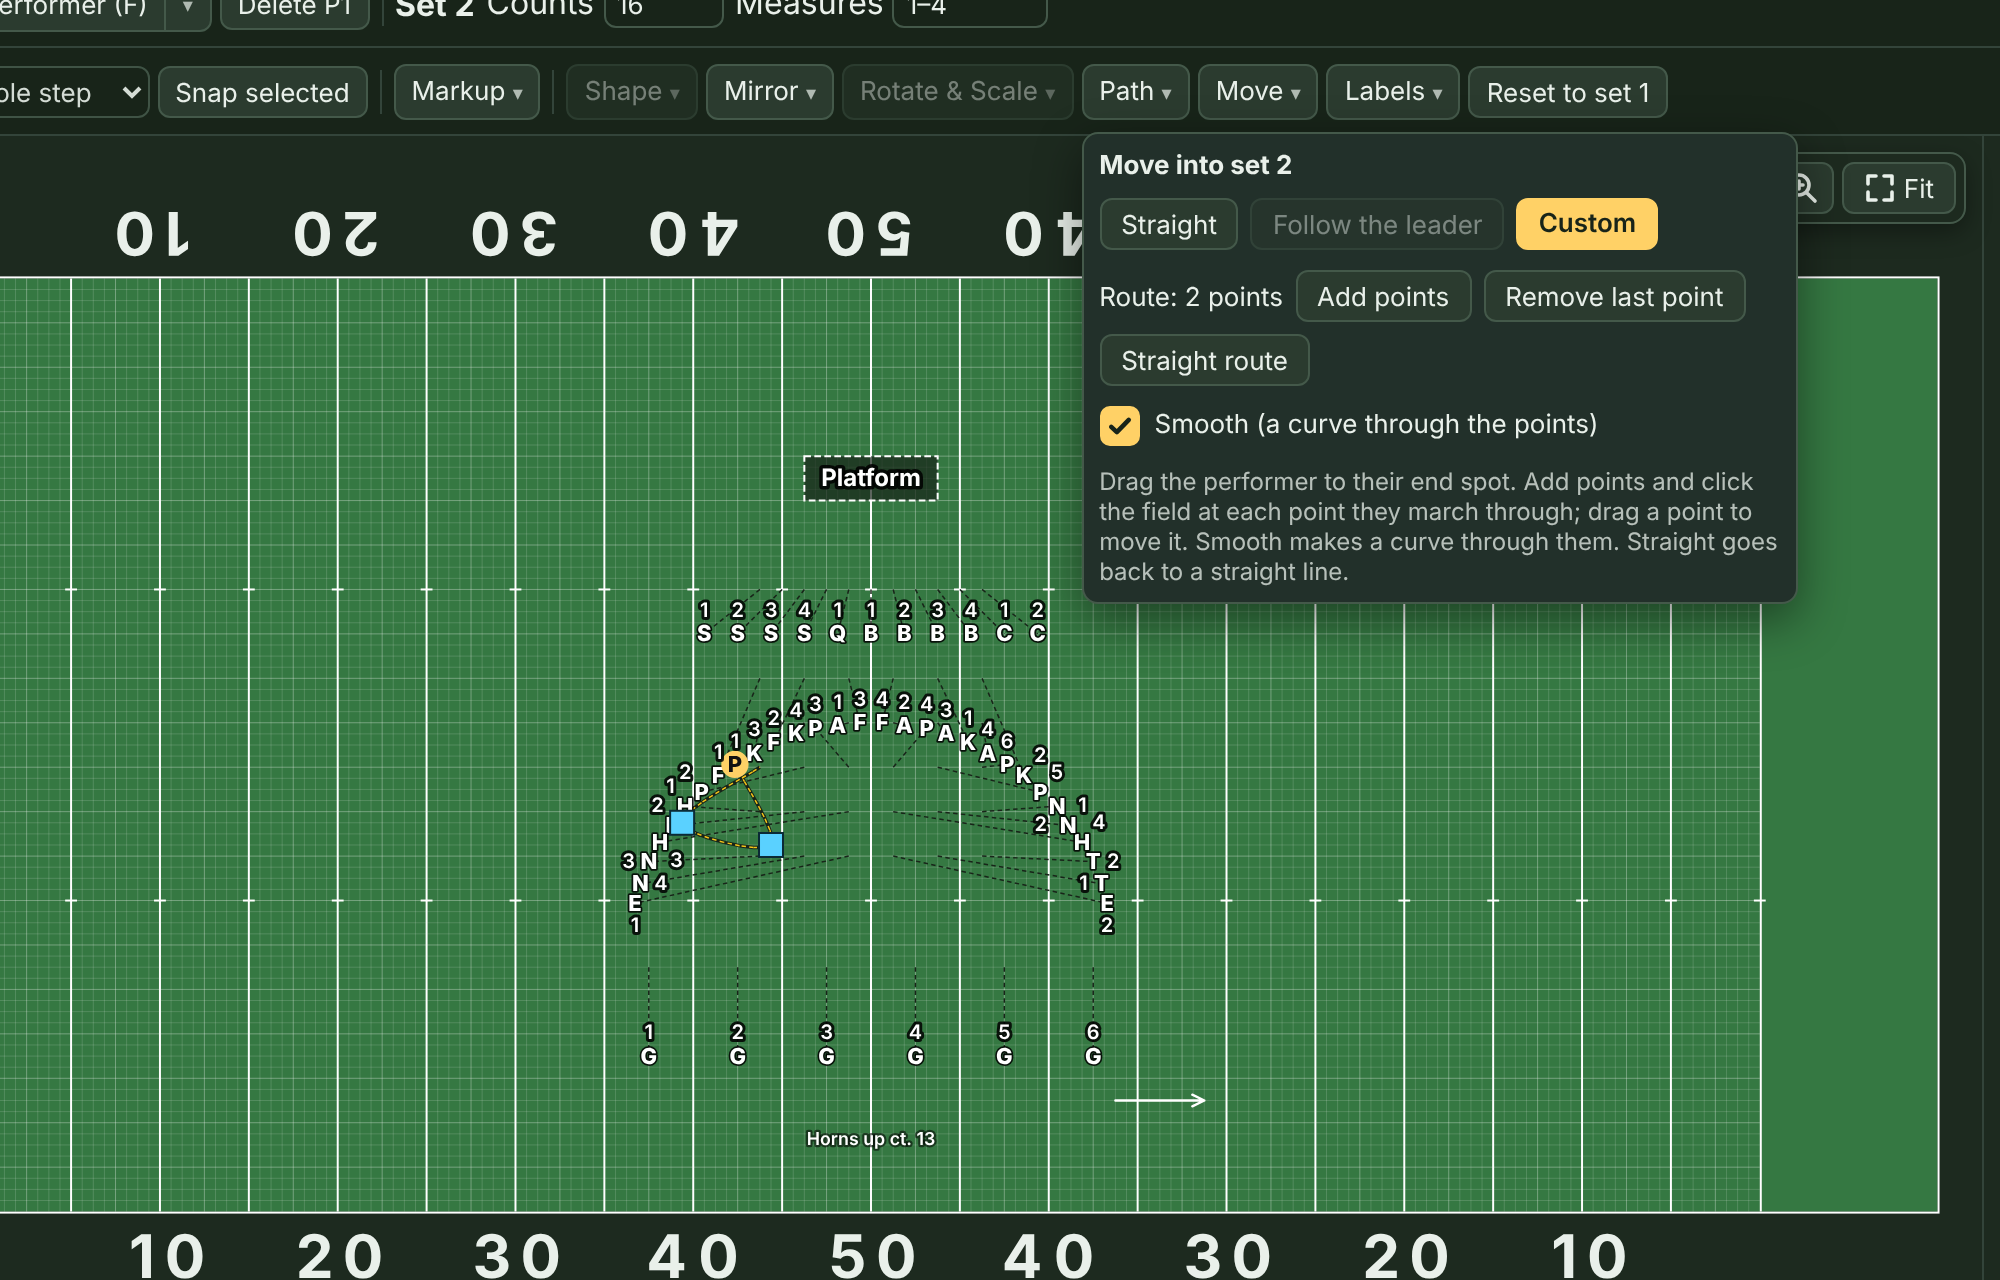
Custom. A soloist or drum major who loops around a form can have a path of their own. Select just that performer, open Path, and click Custom. Then click the field at each point they march through, in order, and press Esc. Smooth makes it a curve, you can drag the points to move them (or press Tab to step through them and move one with the arrow keys, as with follow-the-leader turns), and Straight goes back to a straight line.
Counter-march. Make an FTL group from a file, with the leader at the front of the file. Then click Turn left or Turn right next to Counter-march. The leader turns into the next lane, one step over, and marches back past the file. Everyone follows, so the file ends up reversed, one step beside where it started. Check the step size, since the leader marches the whole length of the file.
Step-offs and turning moves
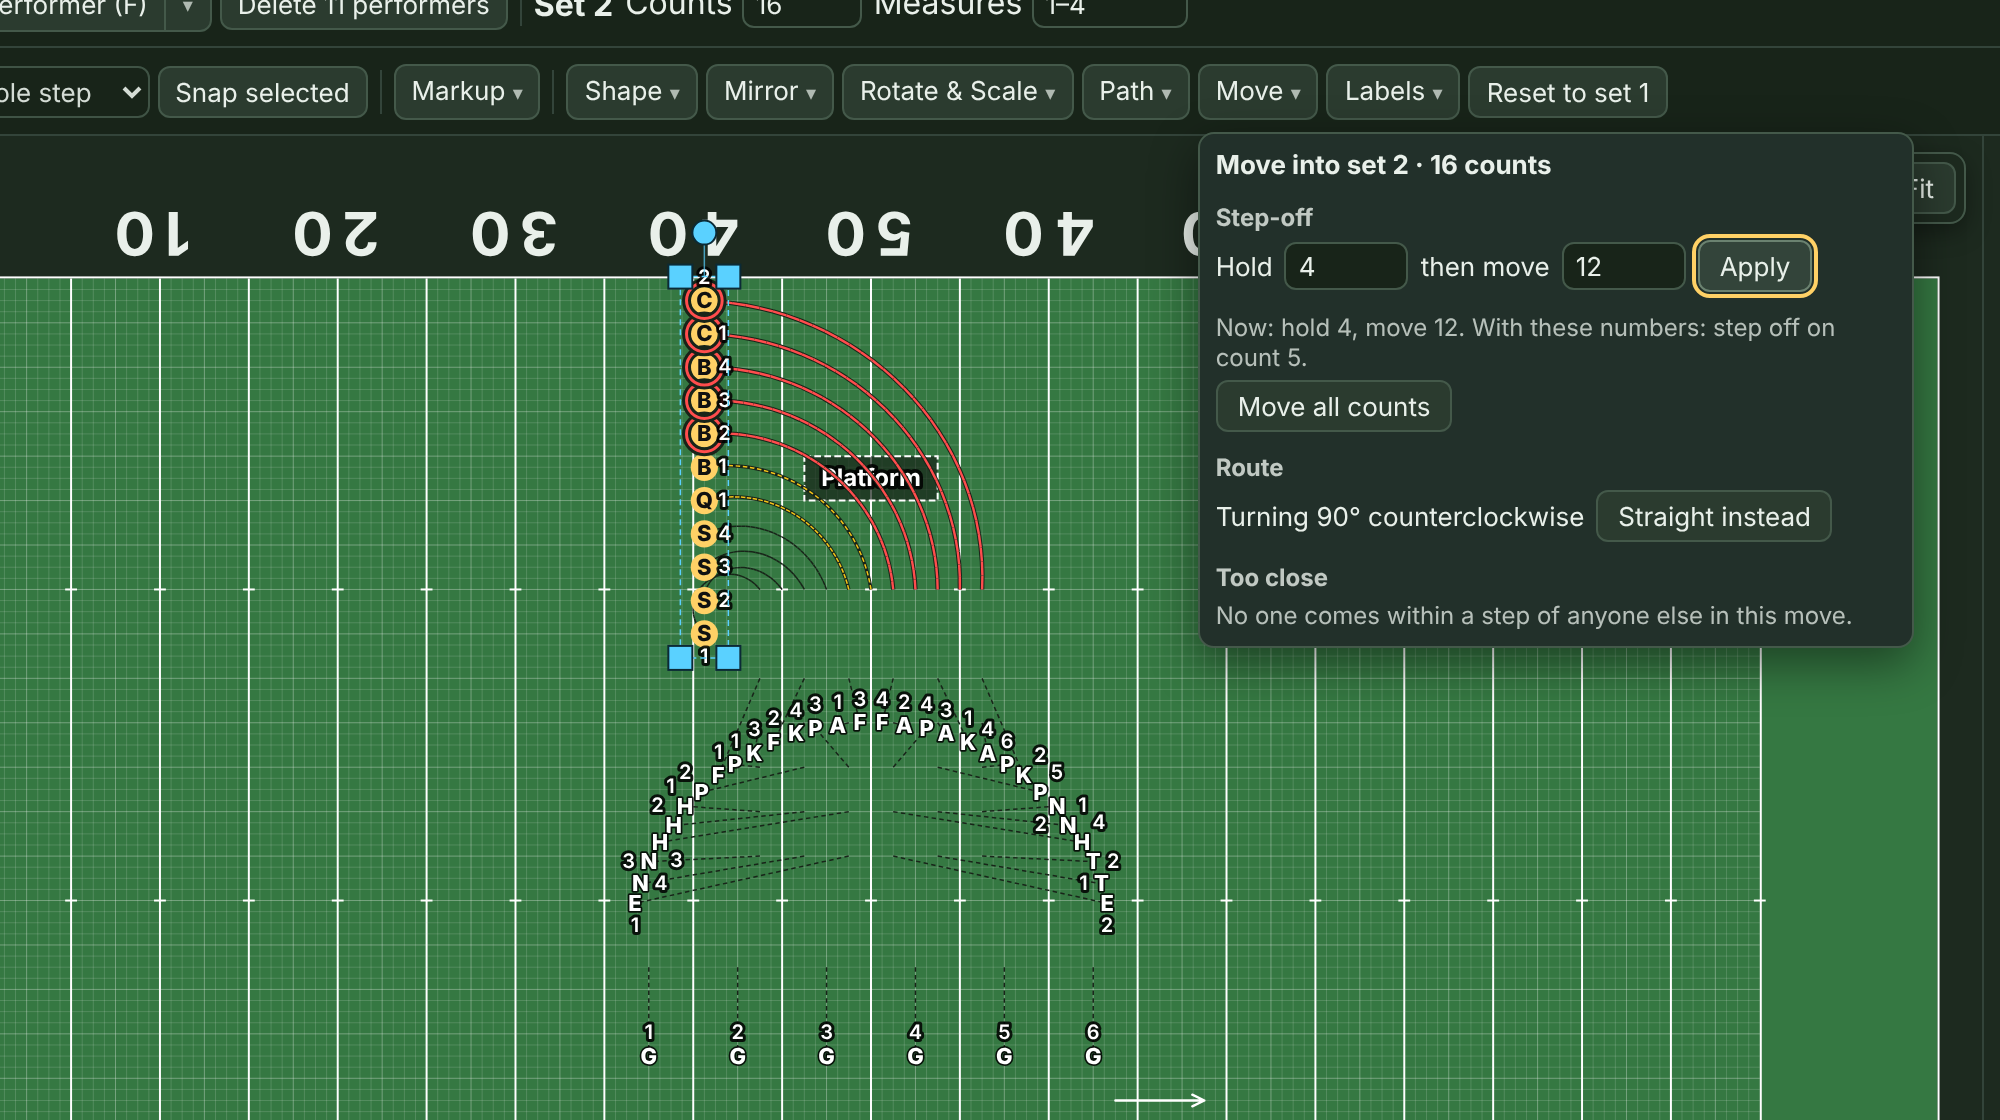
The Move menu (in the toolbar) is about the move into the set you're on.
Delayed step-offs. Not everyone has to move on count 1. Select the performers, open Move, type the counts to Hold and the counts to then move, and click Apply. Hold 4, then move 12 means they stand still for 4 counts, step off on count 5, and arrive on count 16. If the two numbers add up to less than the move's counts, they hold at the end. Move all counts puts them back to stepping off on count 1. They take one step size the whole time they move, and the step-size warnings count only the counts they move.
Turning moves. When you rotate a group, its move into the set is a straight line for each performer by default, so a block turning 90° shrinks through its middle on the way. To march it as a real turn, select the group, open Move, and click Turn as a group. FreeFORM finds the turn that takes the group from its old spots to its new ones, and each performer marches an arc around it, at one step size. A gate turn on the end of a line keeps the end performer standing still. Straight instead goes back to straight lines. Rotate the group first (with Rotate & Scale or the knob on the field); a group that only slides has no turn to march.
A delayed step-off and a turning move work together: hold 4, then turn in 12, for example.
Props
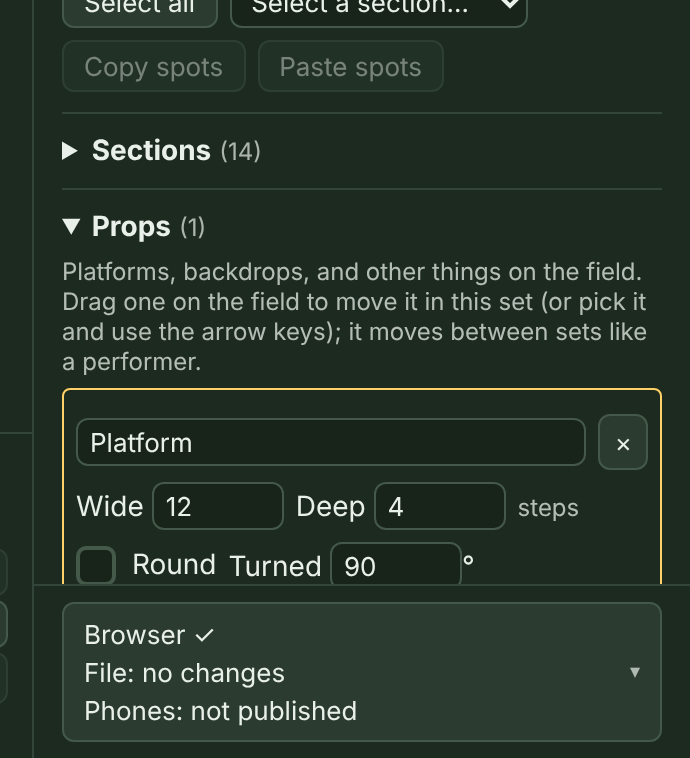
Props are things on the field that aren't performers: a platform, a backdrop, a ramp. Click Add's ▾, then Prop (after that, Add Prop adds another). It starts as a square 8 steps wide and 8 deep in the middle of the field (if a prop is already there, 2 steps right and 2 down from it, so they don't land on top of each other), in every set, and it's picked, with its box open in the sidebar. (+ Prop under Props in the sidebar, and Place a prop on a blank field's Start your show note, do the same.)
- Type its name, and set how Wide (side to side) and Deep (front to back) it is, in steps. Check Round for an oval or circle.
- Drag it on the field to move it in the set you're on. While you drag, the readout in the corner of the field shows where its center is, and Center in its box in the sidebar shows the same. Like a performer, it moves into later sets where it was still standing on its old spot, and it rolls from spot to spot between sets.
- By keyboard: with a prop picked, the arrow keys move it 1 step (Shift for 4 steps, Option or Alt for half a step), and the note at the bottom of the field says where its center is. To pick one without the mouse, Tab to its box under Props in the sidebar. Type its turn in Turned.
- Turned turns it in this set, in degrees counterclockwise. Between sets it turns the short way.
- Click it on the field to pick it (performers standing on it get picked first), and press Delete (the key or the button) or click × to remove it from the whole show.
Props show on the field, on printed charts, and on phones.
Step-size and too-close warnings
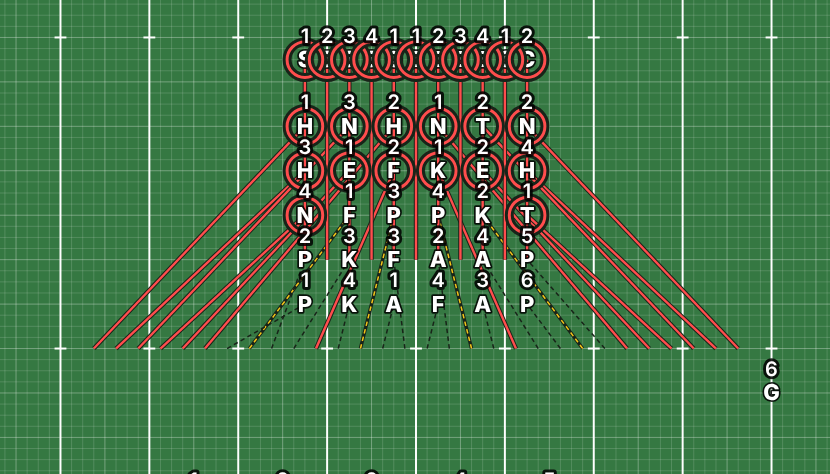
FreeFORM checks every move against the counts it has:
- Yellow means someone's step is bigger than a 6-to-5.
- Red means it's over the show's step limit: bigger than a 4-to-5 unless you change it, which is about as big a step as anyone should take.
The colors show on the path lines on the field and in the timeline's "max" readout for each move. A red path is also solid and wider than the others (the rest are dashed), so it stands out even for someone who can't tell red from green. On the field, everyone over the limit in the move you're looking at also gets a red ring, so you can see who it is. When a move's "max" is red, it's underlined: click it to go to that set with everyone over the limit selected, and a note at the bottom of the field names them. To fix a red move, add counts, shorten the distance, or split the move with a sub-set.
Changing the step size limit. Open Review (in the top bar) and type a number in Step size limit at the top. It's a setting, not a warning: it tells Review when to warn. The number works like the step size itself: the smaller the number, the bigger the step. So a smaller limit allows bigger steps, and a bigger limit is stricter. A younger band might use 6 (anything bigger than a 6-to-5, about 30 inches, turns red). A corps-style show with big moves might use 3 (only steps bigger than a 3-to-5, about 60 inches, turn red). For reference, an 8-to-5 is 22.5 inches, a 6-to-5 is 30, a 4-to-5 is 45, and a 3-to-5 is 60. It's saved with the show, from a 2-to-5 up to an 8-to-5.
Too close. FreeFORM also checks every move, start to finish, for two performers less than a step apart, even if they're fine at both ends. It catches fast crossings that happen between counts, too, and performers who come close partway around a turn or a follow-the-leader corner. The timeline shows how many pairs come too close in each move ("2 too close" in red). Click that warning to jump to the count where the closest pair is nearest: both performers are selected, and a note at the bottom of the field says who they are and how close they get. Open Move to see every pair, how close they get, and on what count. Select picks a pair so you can fix them, by spreading their spots, giving one a delayed step-off, or changing who goes to which spot.
Review the whole show
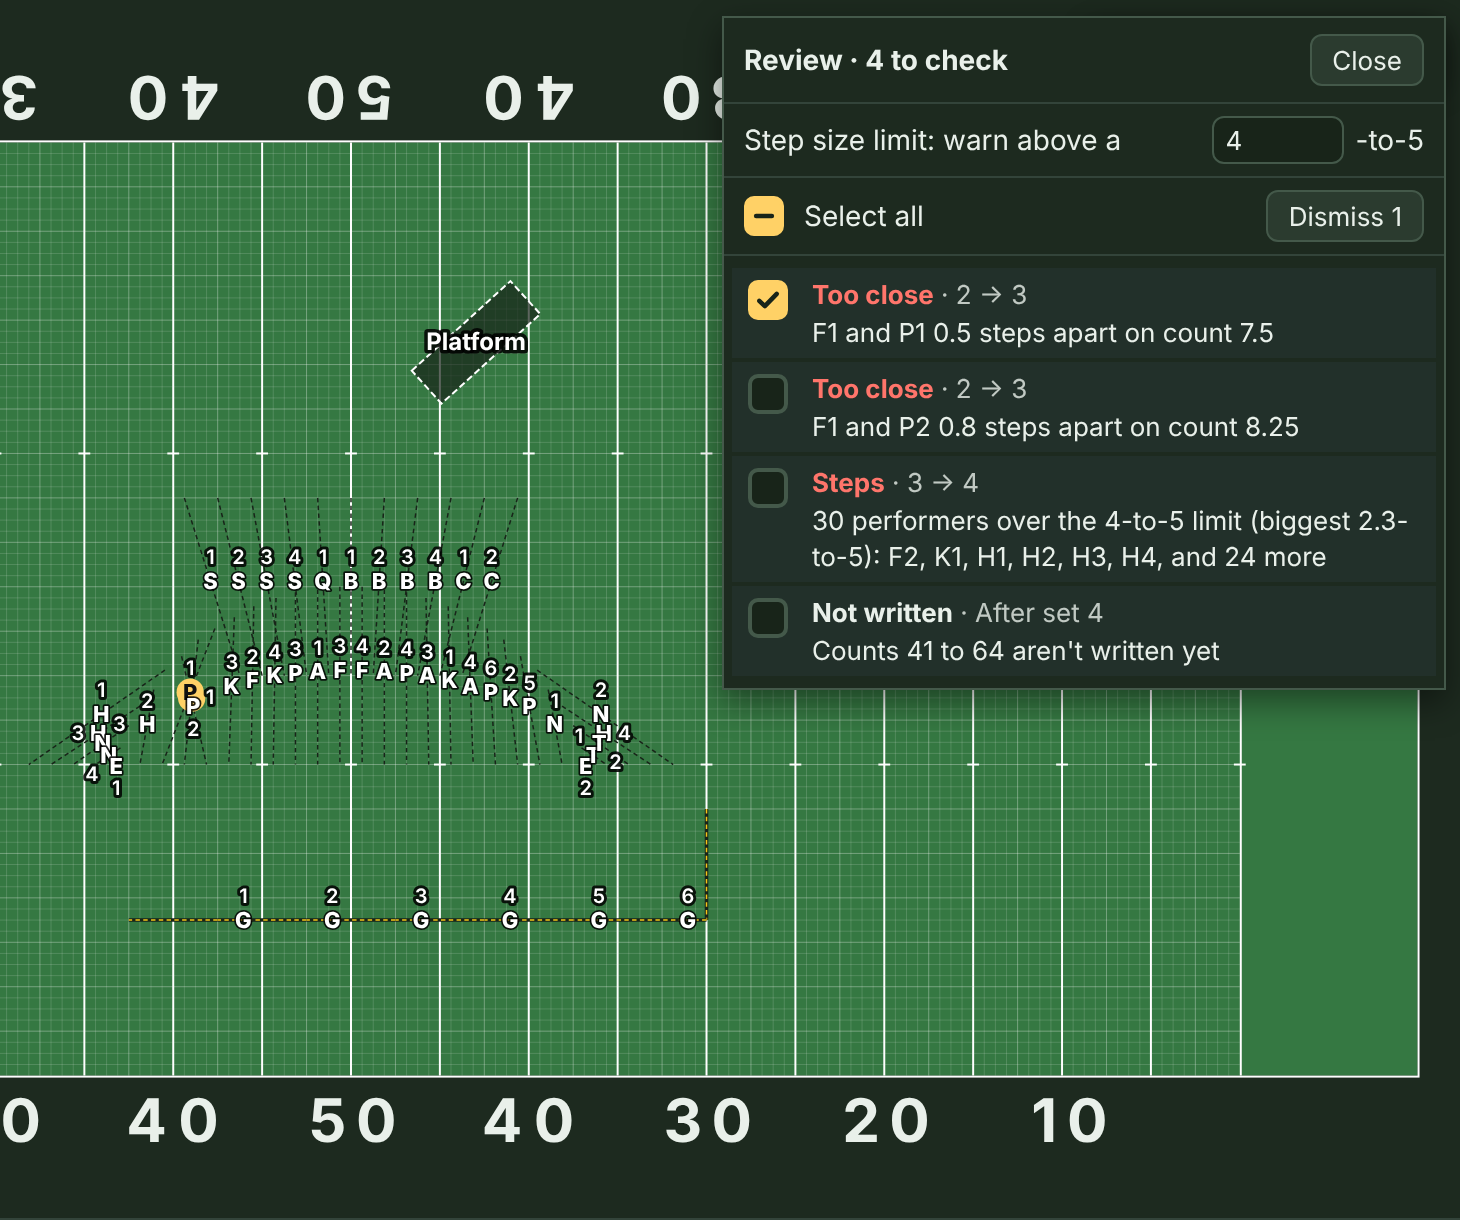
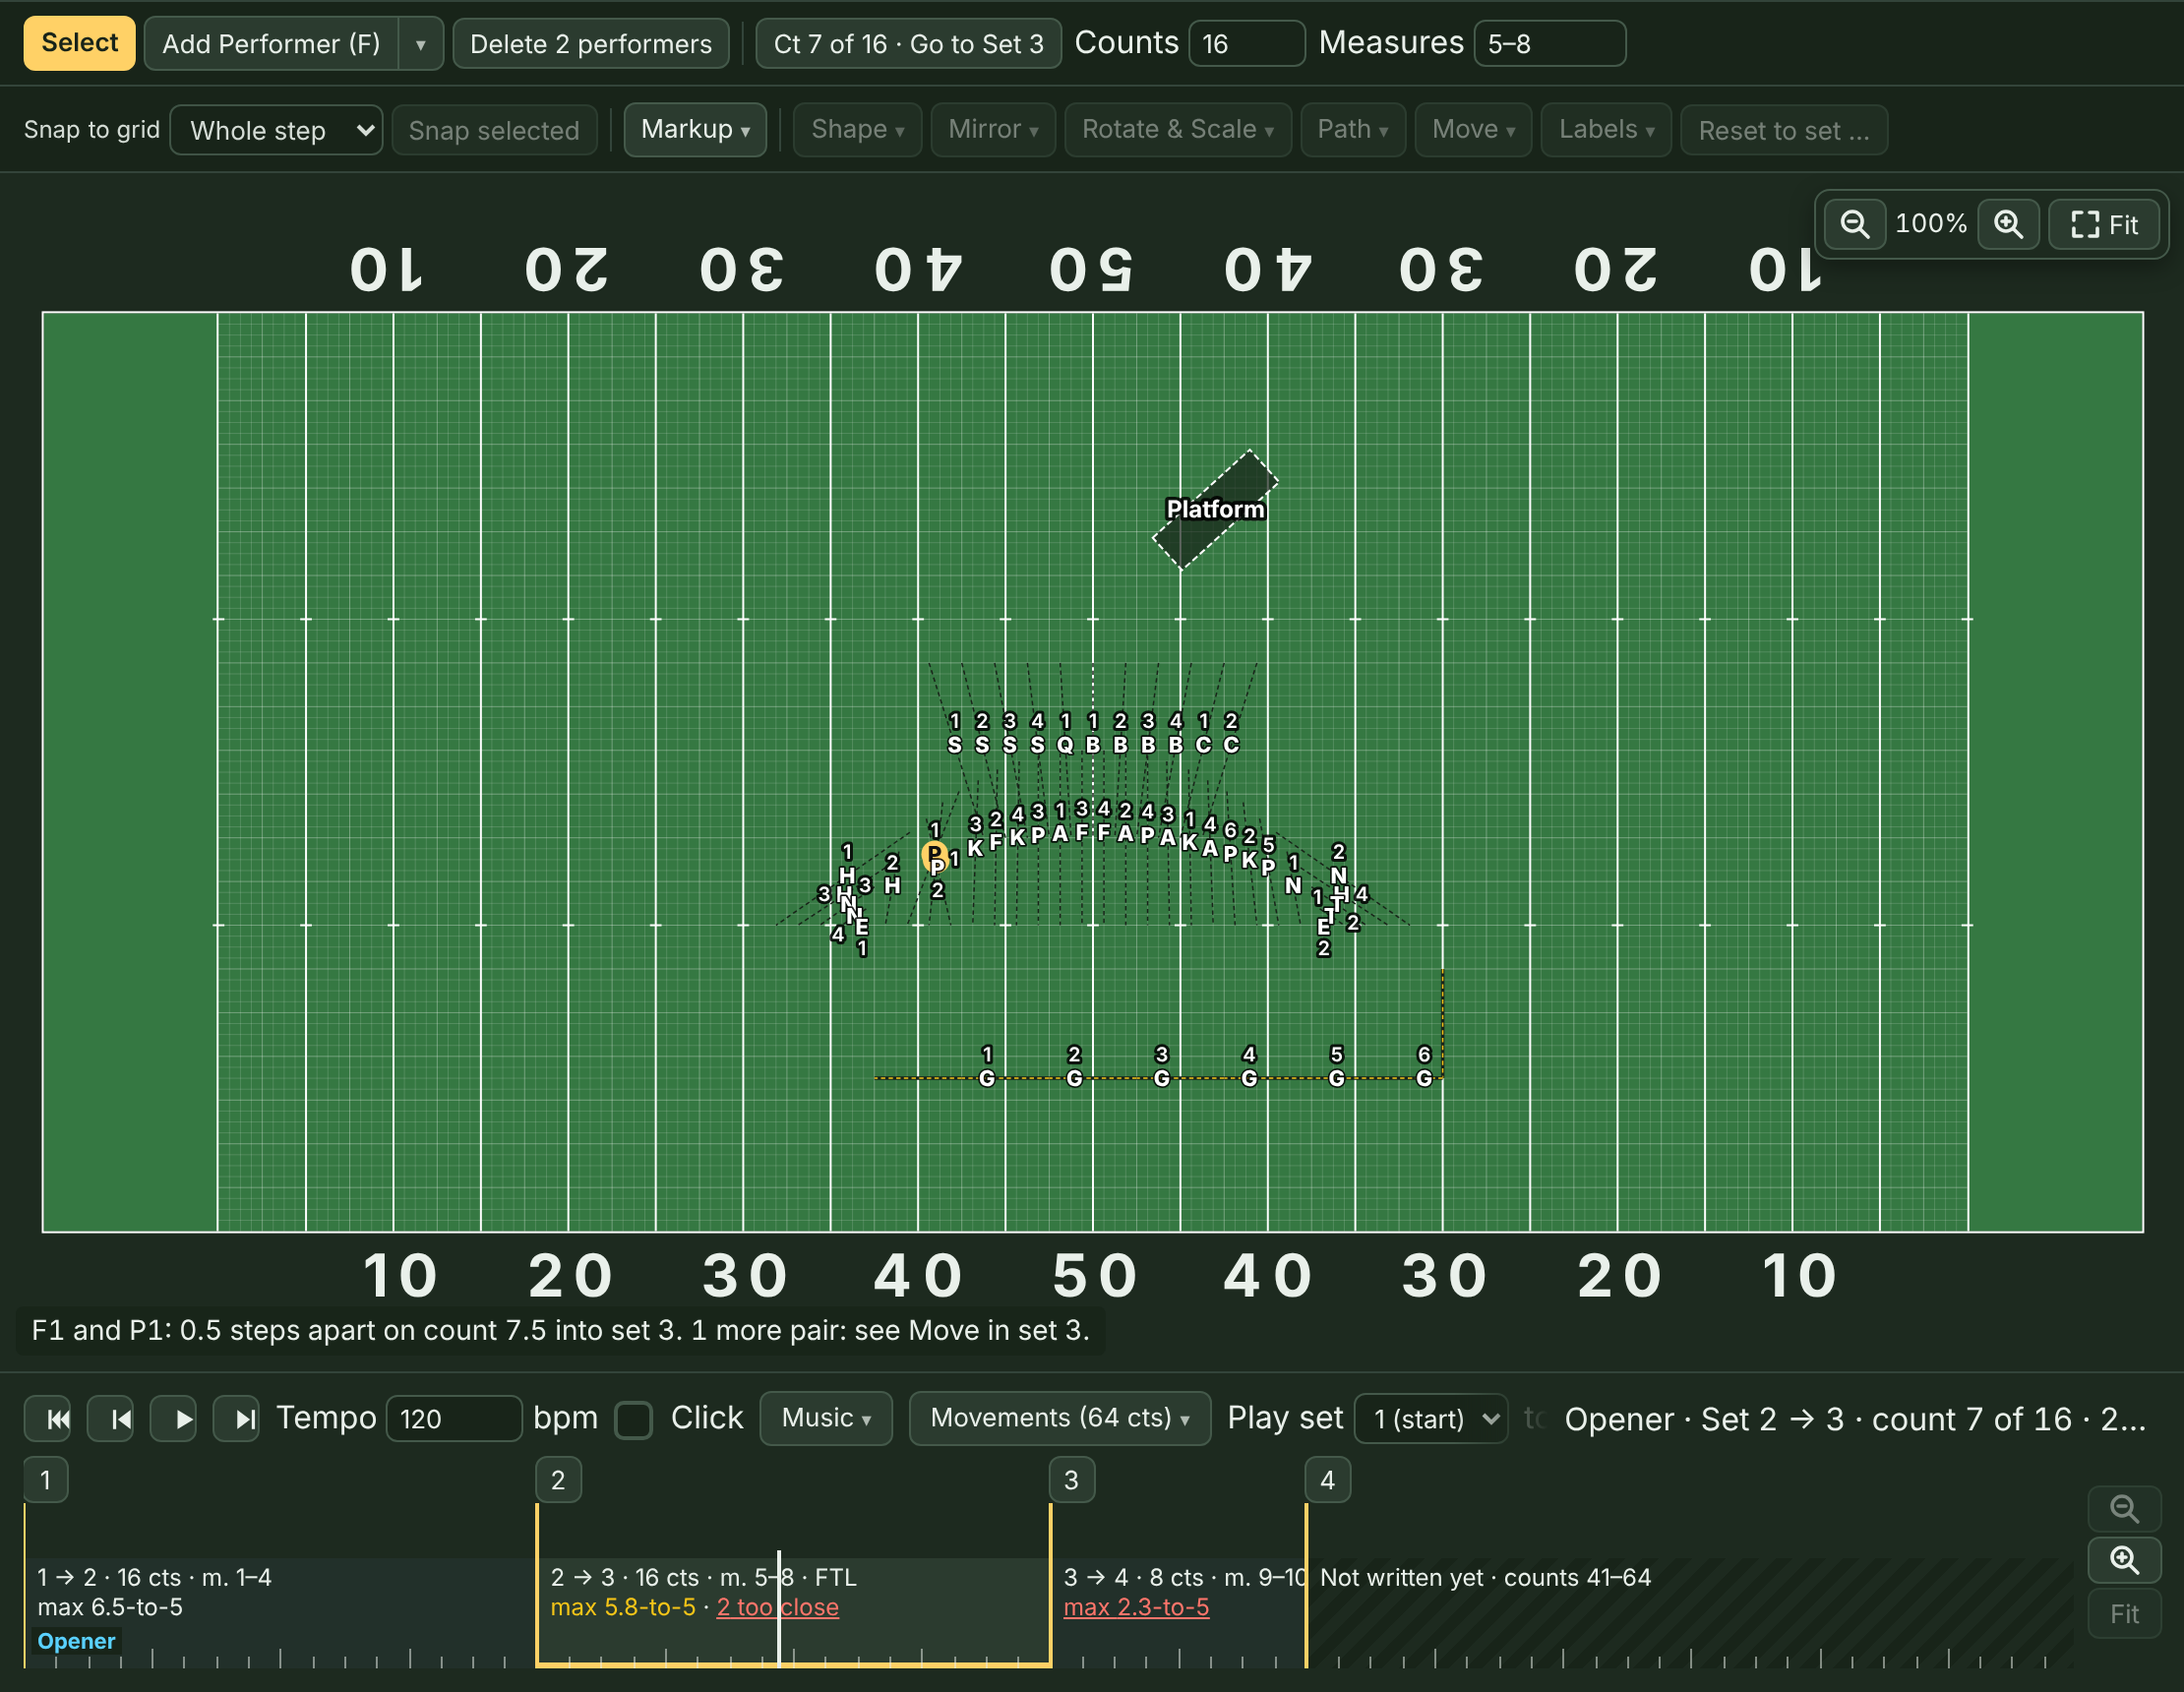
The warnings on the timeline cover one move at a time. Review, in the top bar, lists the problems it checks for across the whole show in one place, in show order. The button shows how many there are, like Review (3). It lists:
- Steps: everyone over the step limit in a move.
- Too close: each pair of performers who come within a step of each other, and on what count.
- Straight now: imported Pyware paths that are straight lines now (see below).
- No spot: performers missing a spot in a set (this can happen with an imported show).
- Not written: counts in your Movements that don't have sets yet.
Click an item to go there: the playhead moves to that set or count, the performers are selected, and a note at the bottom of the field says what's wrong. The list stays open while you fix things and updates as you go (while you drag, it waits until you let go, so a big band drags smoothly), and it says "Nothing to fix" when none of those problems are left. That covers only the checks above (and leaves out anything you dismissed), so still watch the show through before you send it. Close puts it away.
Practice first. Help, then Try the practice show, opens the sample show with three problems left in: two trumpets who cut through the line and pass too close in the move to set 3, a move into set 4 that's too fast for its 8 counts, and counts in the Opener with no sets yet. Each set's notes say what's wrong and how to fix it. Open Review, fix all three, and watch it say "Nothing to fix." It opens as a show of its own, so yours stays under Shows…. (The plain sample show is finished, so Review has nothing to say about it.)
Dismissing a warning. Some warnings are fine as written: two performers who pass each other on purpose, or one long step you've already planned for. Check the box beside it (or beside several, or Select all at the top of the list) and click Dismiss. They leave the list and the count on the Review button, and they're saved with the show. If a problem changes (another performer joins it, say), it shows up again as a new warning. It also comes back if it gets worse than when you dismissed it: a 2-to-5 you dismissed shows again if it becomes a 1-to-5, and a pair you dismissed at 0.8 steps apart shows again if they get closer. If it gets better, it stays dismissed. Once you've dismissed any, the list has two tabs, To check and Dismissed. To bring warnings back, open Dismissed, check one, several, or Select all, and click Bring back.
Imported paths that go straight. A move imported from Pyware count by count (a follow-the-leader, a delayed step-off, a rotation) keeps its route only while both of its sets and its counts stay as they came in. If you move one of those performers in either set, or change the move's counts, that performer marches a straight line instead. When an edit does that, a note at the bottom of the field says so, like "4 imported paths in the move into set 7 are straight lines now." Undo brings the routes back, and so does putting the spots and counts back the way they were. Until then, Review lists them.
Dot labels
FreeFORM keeps labels from overlapping each other or covering another dot. Each one sits above its dot, or below, beside, or on a diagonal when that spot is taken. In a tight block, some labels hide until you zoom in.
To place labels yourself, select performers, open Labels, and click a direction on the compass for the current set. The center A goes back to automatic, and Hide hides them. For a curve of three or more performers, Inside curve and Outside curve point every label toward or away from the curve's center.
Labels hide while a show plays (they'd jump around) and come back when you stop. Printed charts always show every label, with a thin leader line when one has to move away from its dot to find room.
Markup and notes
Markup (in the toolbar) puts notes on the field for the current set only:
- Text: click the field and type. (Press T as a shortcut.)
- Arrow: drag from where the arrow starts to where it points.
- Draw: drag to draw freehand.
Press Esc (or V) to go back to Select when you're done. Click a piece of markup to select it, drag it to move it, and press Delete to remove it.
There are two kinds of written notes in the sidebar:
- Ensemble notes belong to a set and print under that set's drill chart, for everyone.
- Performer notes belong to the selected performers and print on their dot sheets for that set ("Slide L, horns 45"). Write facings and equipment here too: "Face Side 2," "Pick up flag."
Play it back
The play controls are at the left end of the timeline: back to the start, back one count, play or pause, and forward one count.
- Play starts where you are and goes forward. Pick a set, then press Play (or Space).
- Set the speed with Tempo.
- Check Click for a metronome: a click on every count, and a higher click where each set lands. It plays only at a tempo; when playback follows your recording, the music is the click.
- Play set … to … limits playback to a range of sets. Check Loop to repeat it.
- The left and right arrow keys step one count at a time (when no one is selected).
Add your music
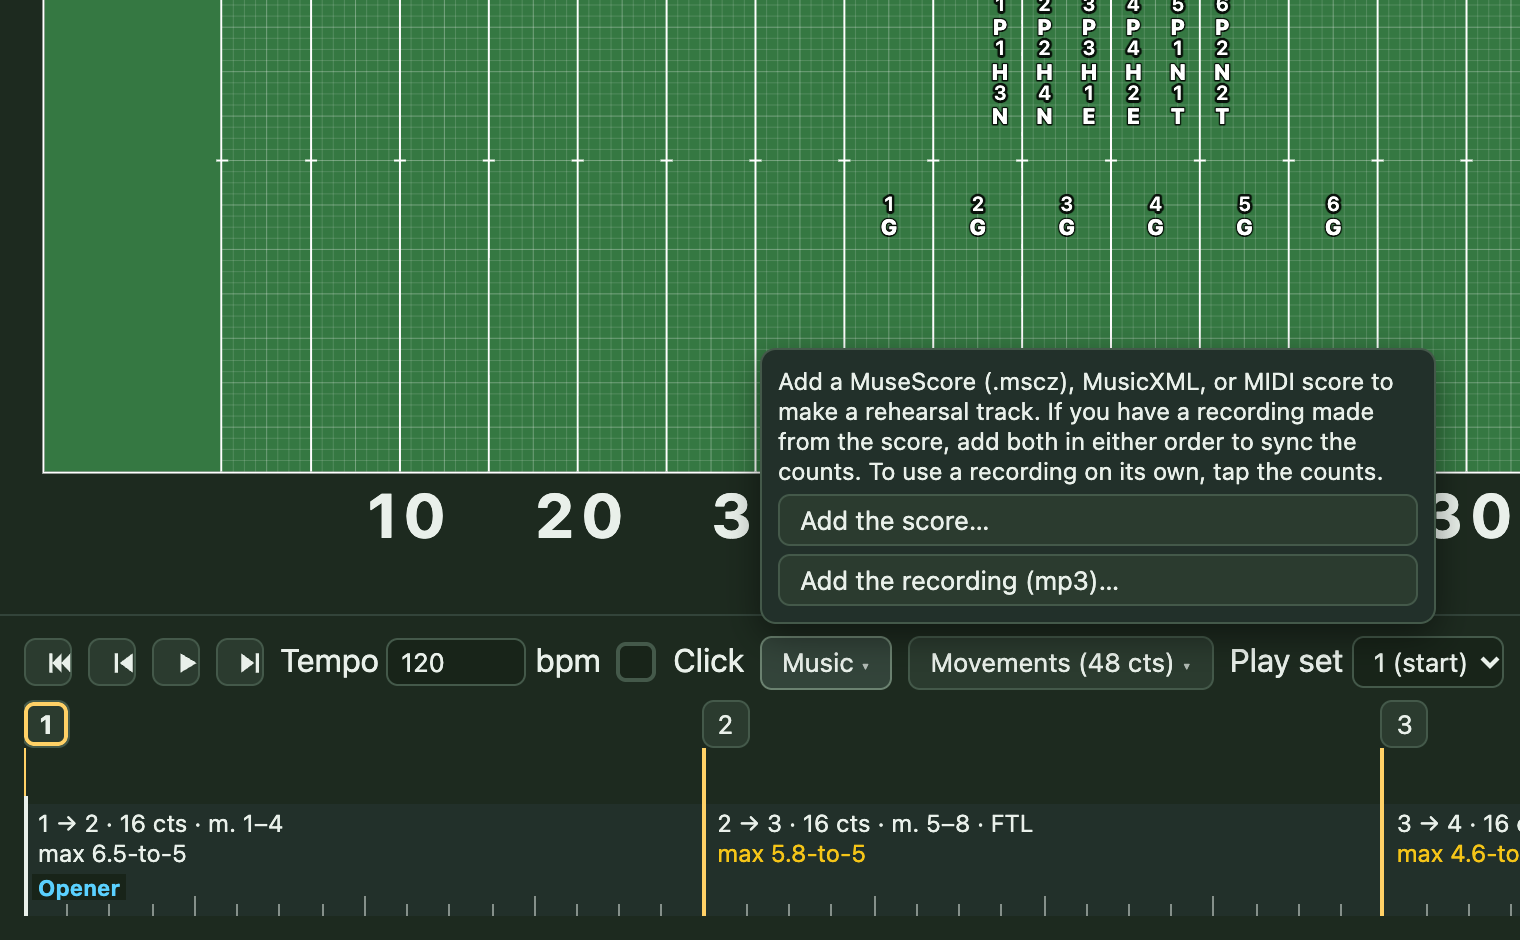
FreeFORM can play your drill along with the recording, so the moves line up with the music the way they will on the field.
The easy way, from your notation program:
- In your notation program, export the score as audio (mp3).
- In FreeFORM, open Music (beside Tempo) and click Add the score…. From MuseScore, choose the
.msczfile. From Finale, Sibelius, or Dorico, export the score as MusicXML first and choose that (.musicxml,.xml, or.mxl). MIDI works too. - Click Add the recording (mp3)… and choose the mp3 you exported.
You can do steps 2 and 3 in either order. When both are ready, Preview music sync shows which sets fit their measures and which need a look. It also warns when the recording and score lengths suggest you picked different versions. FreeFORM keeps your movement lengths, set numbers, counts, and measure labels, including blank ones.
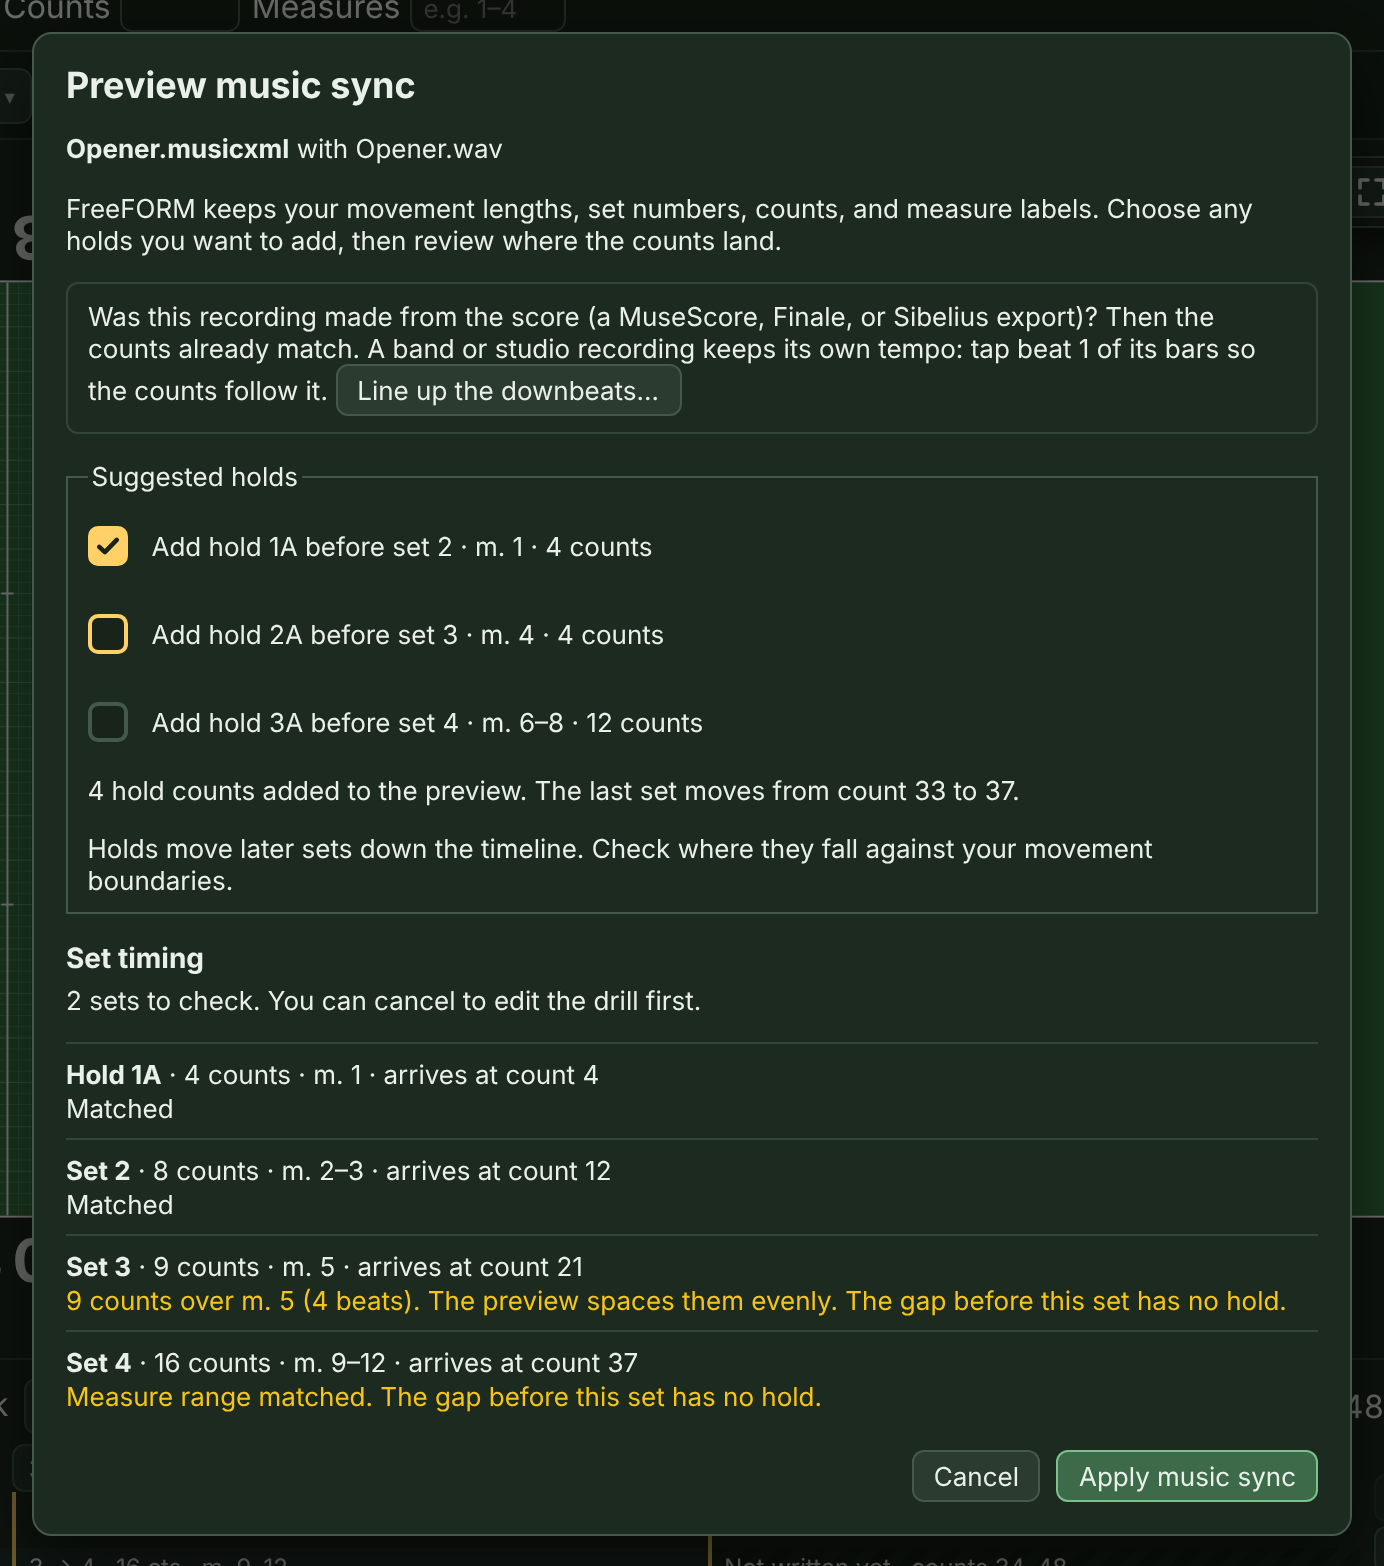
Check each suggested hold you want to add for an intro, a G.P., or another gap in the music. The preview updates as you check them and shows the count where each set arrives. A hold adds counts before the next set and can push later sets past a movement boundary. Choose Apply music sync to use the timing and add the selected holds. Choose Cancel to edit the drill first. If the recording is already loaded, use Music → Preview music sync… to review the fit again.
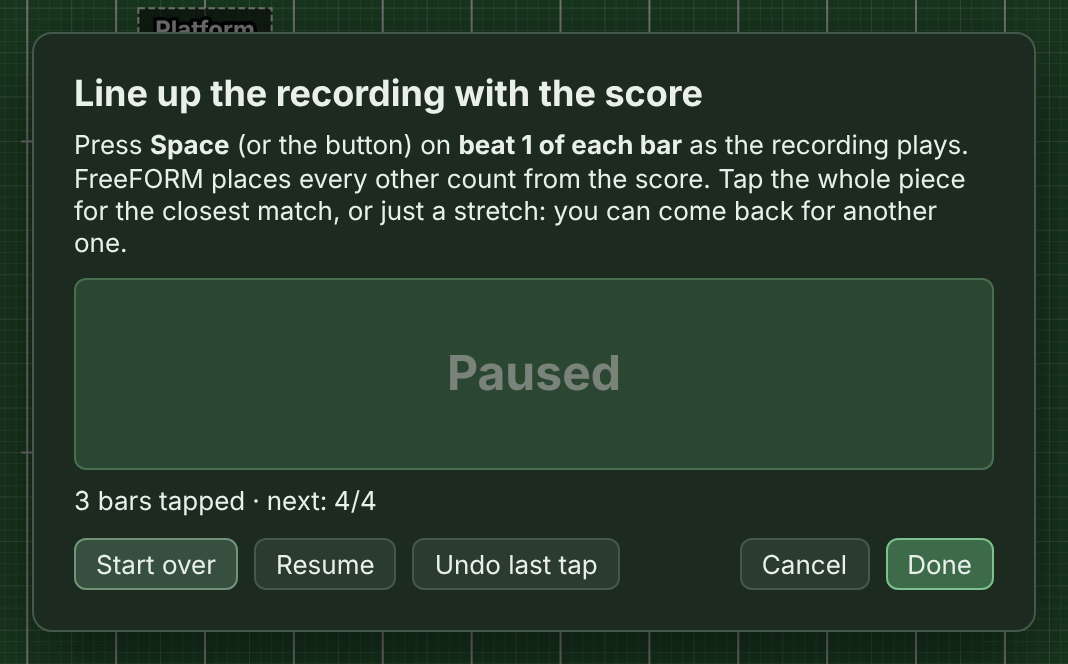
With a band or studio recording and its score: a recording of real players (or one your arranger made) doesn't keep the score's tempo exactly, so the score alone drifts away from it. Add the score and the recording as above, then choose Line up the downbeats… in the preview (or in Music). Press Start and tap Space on beat 1 of each bar as the recording plays. That's a quarter of the taps of counting every count, and FreeFORM fills in the other counts from the score, so meter changes and odd bars come out right. Each tap is moved onto the beat FreeFORM hears in the recording when there's one close by, so you don't have to tap perfectly. Before your first tap and after your last, the counts keep the pace of the bars you tapped.
You don't have to do it all at once. Tap the whole piece for the closest match, or just a stretch (where the band pulls away from the score, say), then Done. Tap more bars… picks up where you stopped, or set Start at bar to fix a stretch. Back in the preview, choose Apply music sync.
Repeats, endings, D.C., D.S., Fine, and Coda are played out the way MuseScore plays them, and the bars are numbered in the order you hear them. Say the score repeats m. 5–12, with a 1st ending on m. 12 and a 2nd ending on m. 13. Played through, that's m. 1–12, then m. 5–11 again, then the 2nd ending. In FreeFORM, the second time through is m. 13–19 and the 2nd ending is m. 20, so type each set's Measures that way. When you add the score, FreeFORM tells you how many bars it plays and gives an example from your score. It's the same numbering a MIDI exported from MuseScore uses.
With any recording, by tapping: add just the recording (mp3, m4a, or wav), then choose Tap counts…. FreeFORM plays it from the top while you press Space on every count, starting with count 0 (set 1). You can undo a tap, pause, or start over. To fix part of it later, set Redo from count first.
With no recording, a rehearsal track: add a MuseScore score (.mscz), MusicXML (.musicxml, .xml, or .mxl), or MIDI, then choose Make a rehearsal track. Review Preview music sync when the track is ready. The counts follow the same repeats, endings, and tempos as the audio. For MuseScore and MusicXML, FreeFORM plays the notes and ties with a steady volume. MuseScore parts use their starting instruments.
Recognized marching snares, tenors, bass drums, and cymbals get their own sounds. Other unpitched parts use the standard kit. If your notation program exports a generic drum track, use the native MuseScore score or export MusicXML with the marching instruments named.
It takes a few seconds. The first time, FreeFORM downloads the instrument sounds (about 7 MB, plus 1.4 MB if the score uses marching percussion). After that, the downloaded sounds work offline. The track goes along in Full backup… and in shared files with the music included. When the real recording comes in, choose Use a real recording instead….
When the counts are in, Play follows the music, rubato and all, and the recording's waveform shows along the bottom of the timeline. Uncheck Play with music to go back to the Tempo setting.
The recording stays in your browser. It isn't saved in the ordinary .freeform file, but the counts are, so on another computer you can add the same recording again and everything lines up. To take the recording along, use Full backup… (see Saving, backing up, and opening files).
Print dot sheets and drill charts
Click Print… in the sidebar.
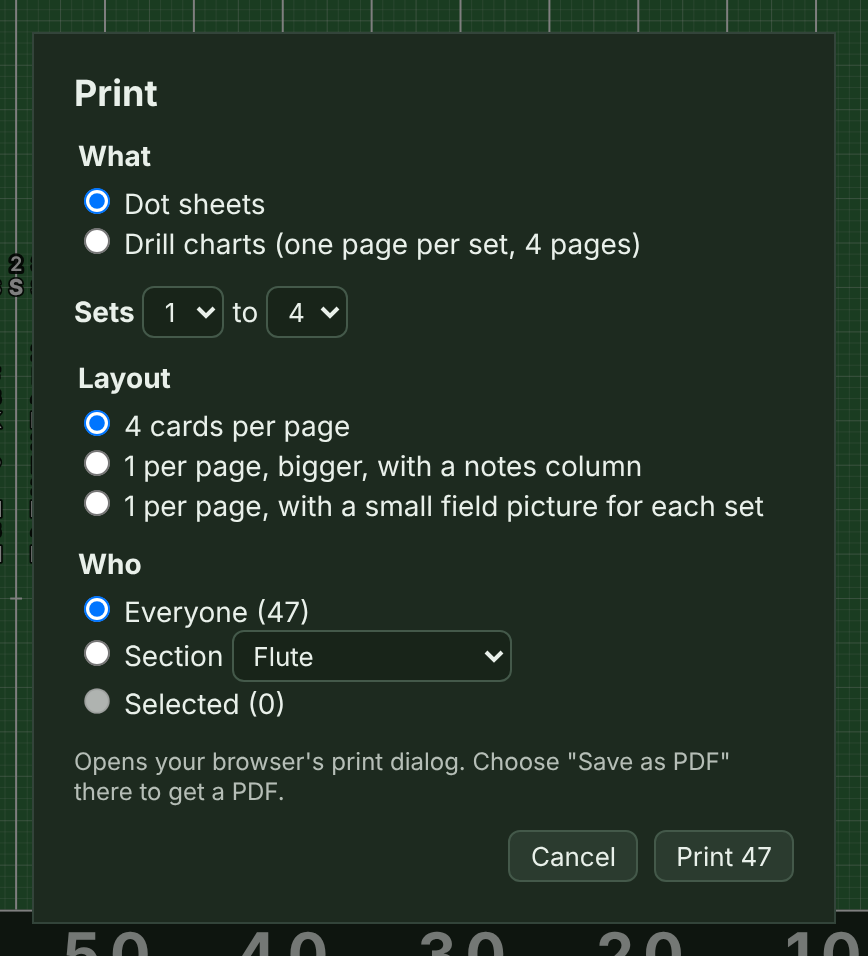
Choose Dot sheets or Drill charts, and who to print for: Everyone, one Section, or the performers you have Selected. Sets … to … prints just part of the show, for a rehearsal packet ("work sets 8 to 10 tonight"); All puts it back to the whole show. FreeFORM opens your browser's print dialog. To get a PDF instead of paper, pick Save as PDF there.
Once you've published the show to phones, charts and dot sheets print its revision number next to the title ("rev 6"), so paper and phones can be compared. If you've changed the drill since you published, it prints "rev 6 + changes" instead. Publish, then print, so the number matches what students have.
Dot sheets come four cards to a page. Each card has the performer's label, name, and section, then every set with its counts, measures, and coordinates. Under a set go any notes for it: a delayed step-off ("Hold 4, move 12") and the performer notes.
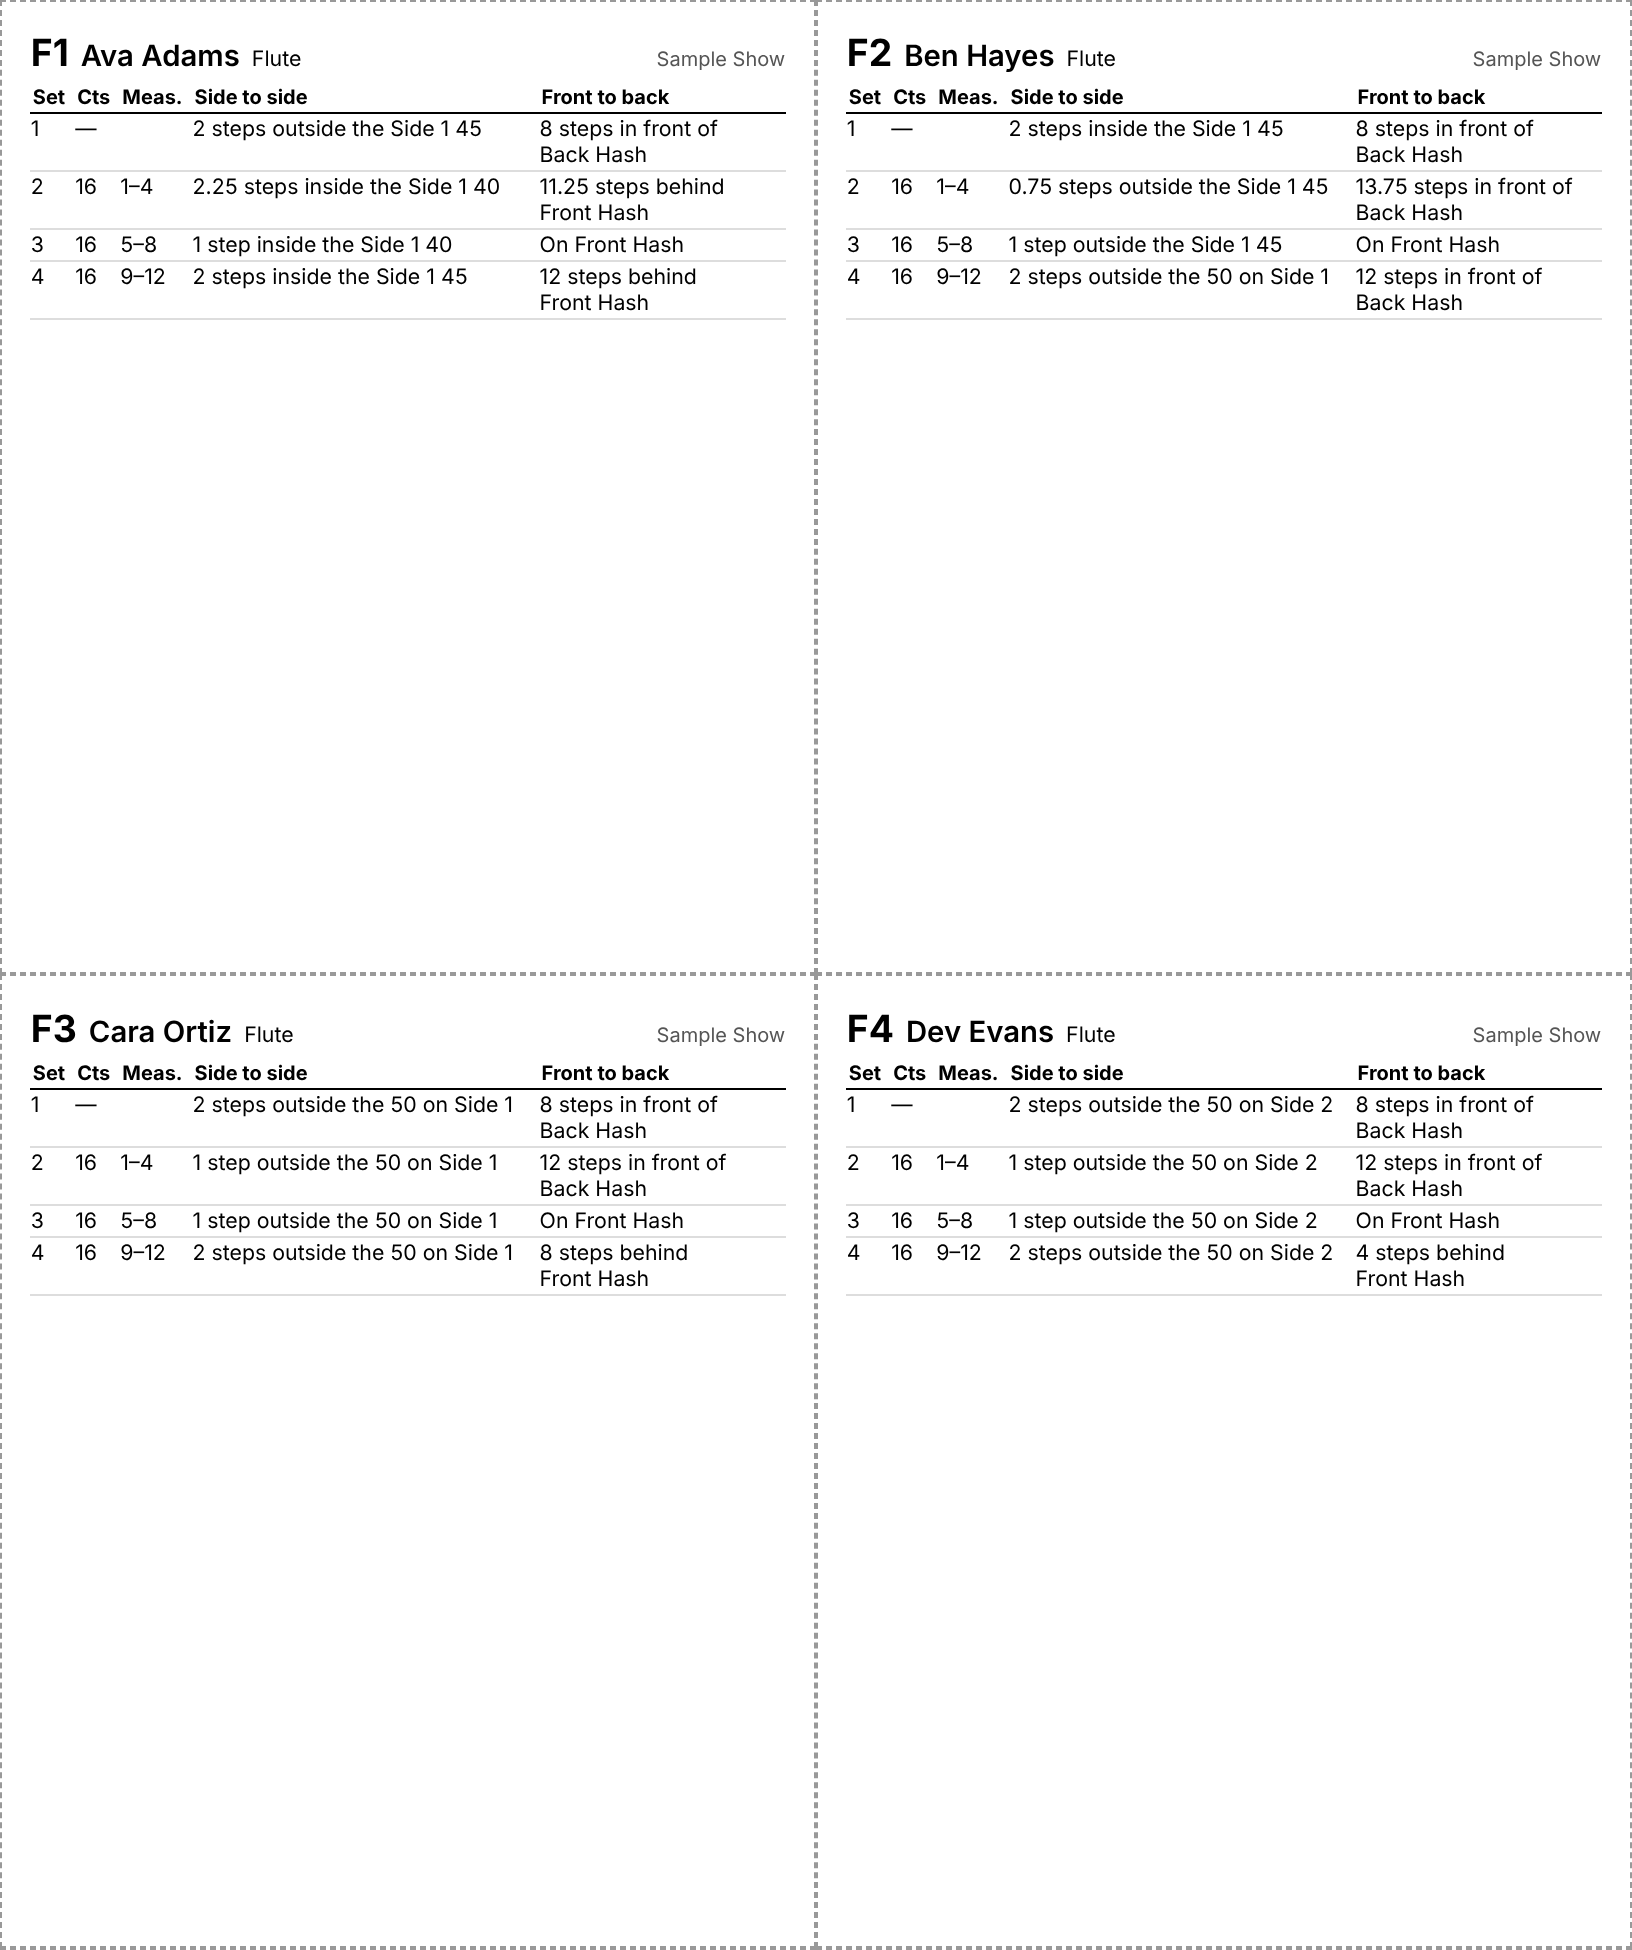
For bigger print, choose 1 per page, bigger, with a notes column under Layout. Each performer gets a whole page, and the notes go in their own column.

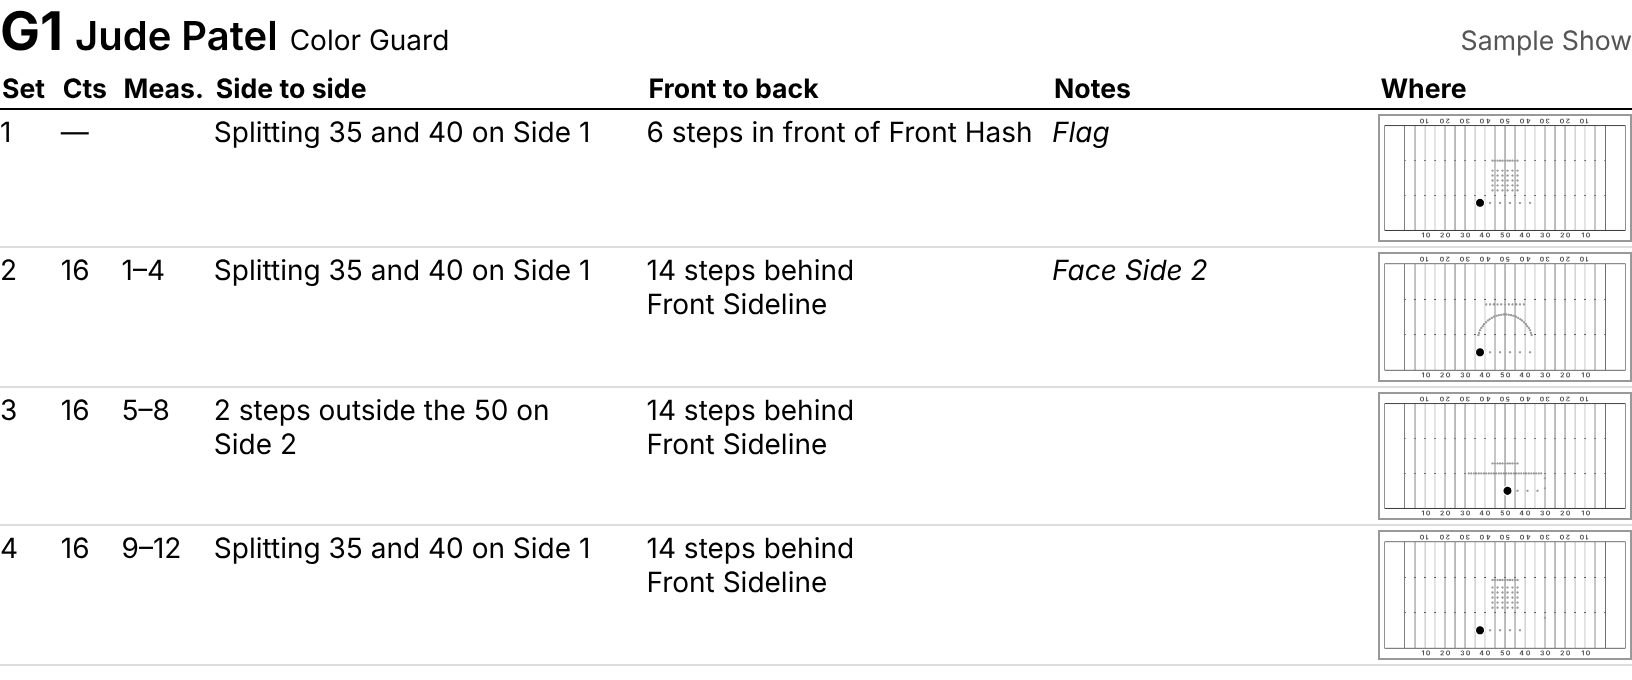
To give performers a dot book, choose 1 per page, with a small field picture for each set. Each set's row gets a little picture of the whole field, with everyone else faint and that performer as a big black dot, so a student can see the shape of the picture at a glance. It takes more paper: about 12 sets fit on a page.
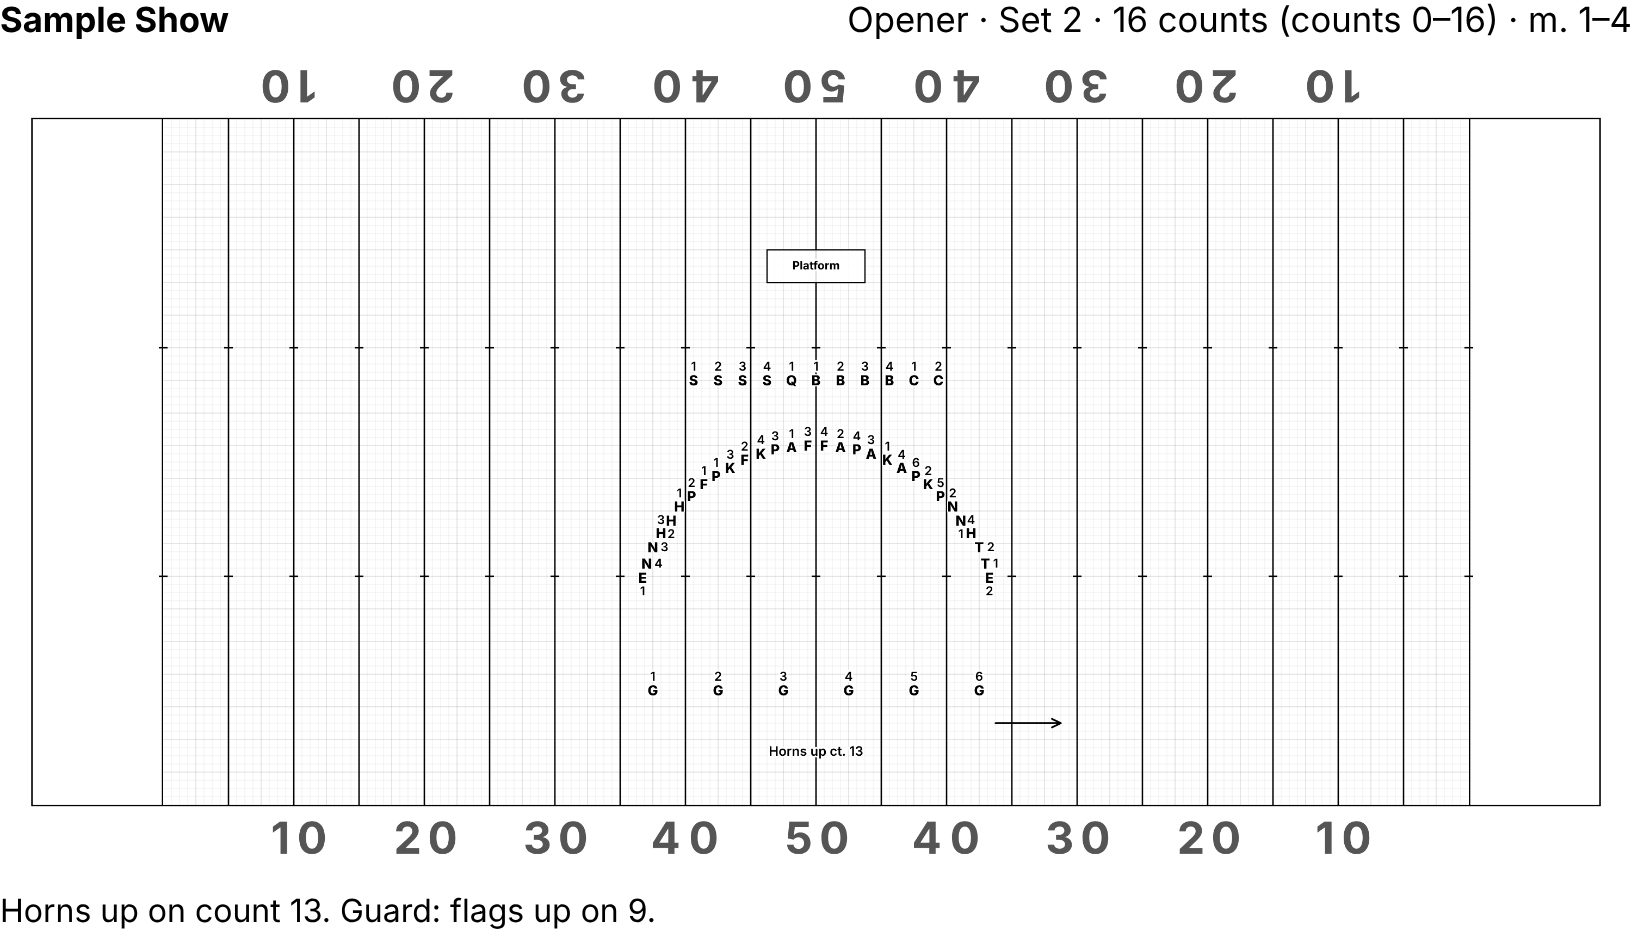
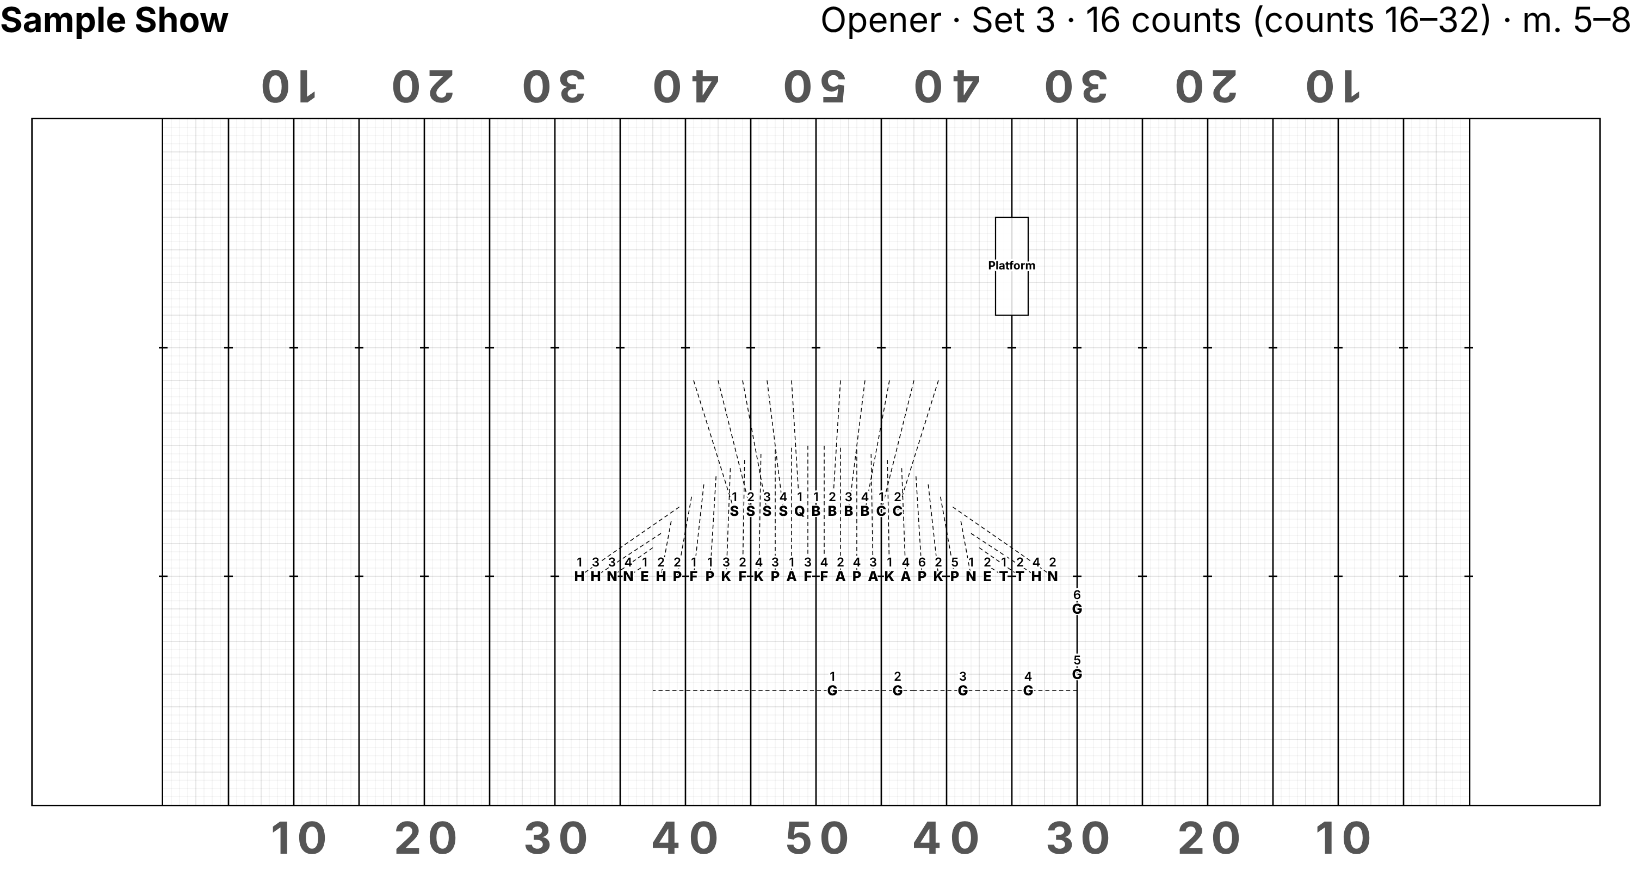
Drill charts are one page per set, with every dot labeled, the set's markup, props, and its ensemble notes underneath. They're black on white so they copy well. Sections with a color print as colored dots, which come out as shades of gray on a black-and-white printer.
Check Show the paths into each set to add a thin dashed line from where each performer was in the set before, along the route they march (follow-the-leader trails and turning moves included).
Make a video
Video… (in the sidebar, next to Print… and Share…) makes an MP4 of the show: the whole field from the press box, with the show's title, the piece (from Movements), the set, and the count across the top. Post it in the band's group chat, send it to your staff, or show it at a booster meeting.
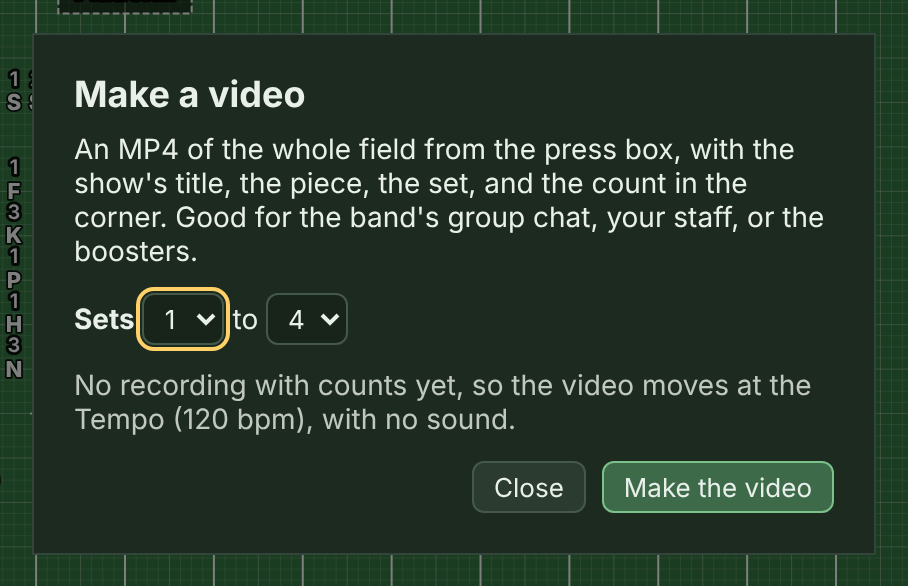
- Pick the sets with Sets … to … (All puts it back to the whole show).
- If the show has its recording and counts (see Add your music), With the music puts the recording in the video, and the drill follows it. Without a recording, the video moves at the Tempo and has no sound.
- Click Make the video. A bar shows how far along it is, usually much faster than the show plays. Keep the tab open until it's done. The file goes where your browser saves downloads.
The video is 1920 by 1080 (full HD). It needs a current browser; one that can't make videos says so. The sound is saved as AAC, which plays everywhere, when the browser can; otherwise it's saved as Opus, which plays in browsers and most video players but not in some older Apple apps. If the sound matters, try Chrome or Edge on a Mac or Windows computer first, and check the file before you send it.
Send the show to your performers
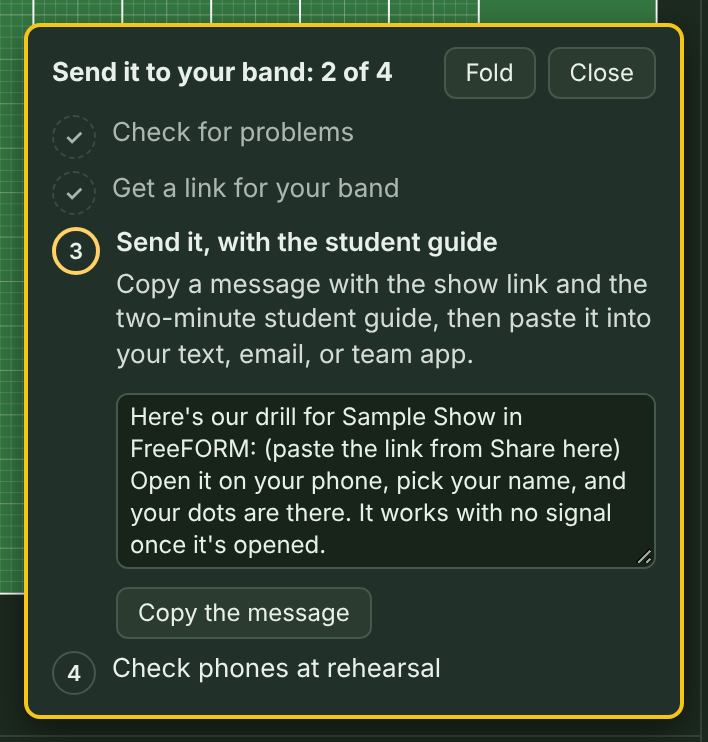
Send it to your band, step by step. Help, then Send it to your band, opens a short checklist in the field's corner, like Getting started: check for problems (Open Review), get a link (Open Share…), send it with the student guide, and check phones at rehearsal. The third step has a message ready to paste into a text, email, or team app: the show's link (if you've published it; otherwise a spot to paste the link from Share), a line about what to do, and the two-minute student guide in English and Spanish. Copy the message copies it. Each step ticks itself off, and Close turns the checklist off for that show.
Click Share… in the sidebar. The dialog has two choices at the top, and each one says what's included before it gives you a link.
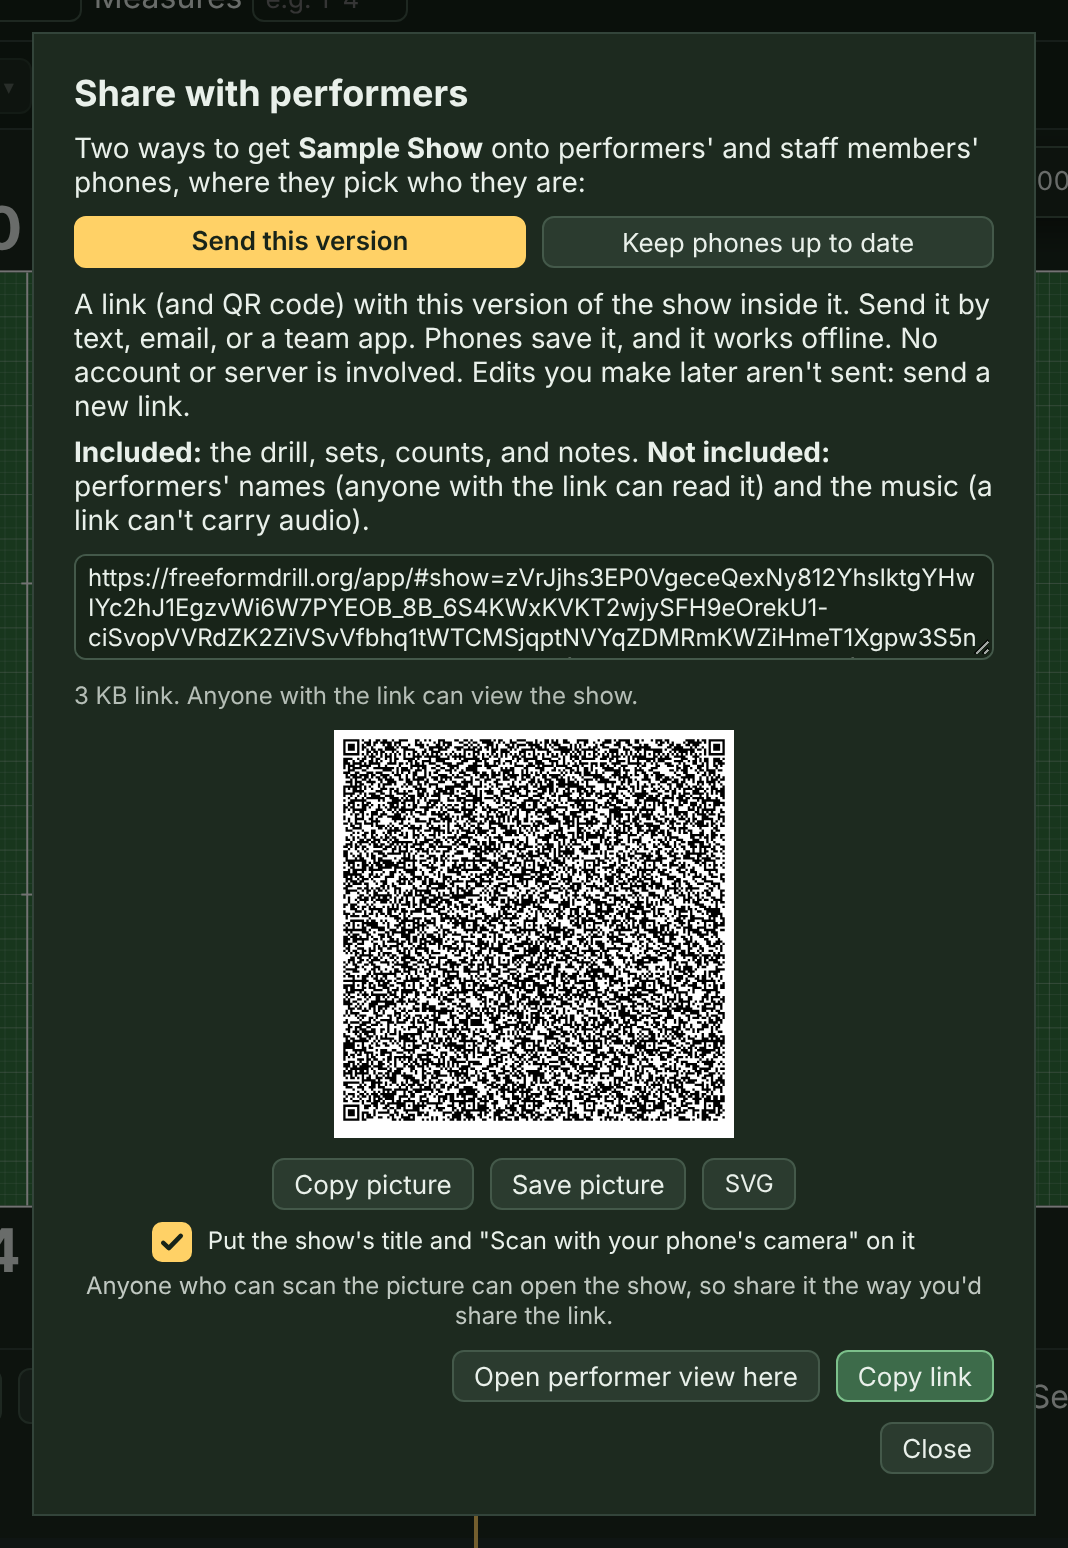
Send this version is the quick way. The whole show is packed inside the link, so there's no server and no account involved. Text it, email it, or post it in your band's group chat. For a small show you also get a QR code you can put on a screen at rehearsal. Three things to keep in mind:
- Anyone with the link can see the show, so names are left out.
- A link can't carry audio, so the music isn't included. Phones can still play at a tempo.
- Changes you make later aren't sent. After you edit, share a new link.
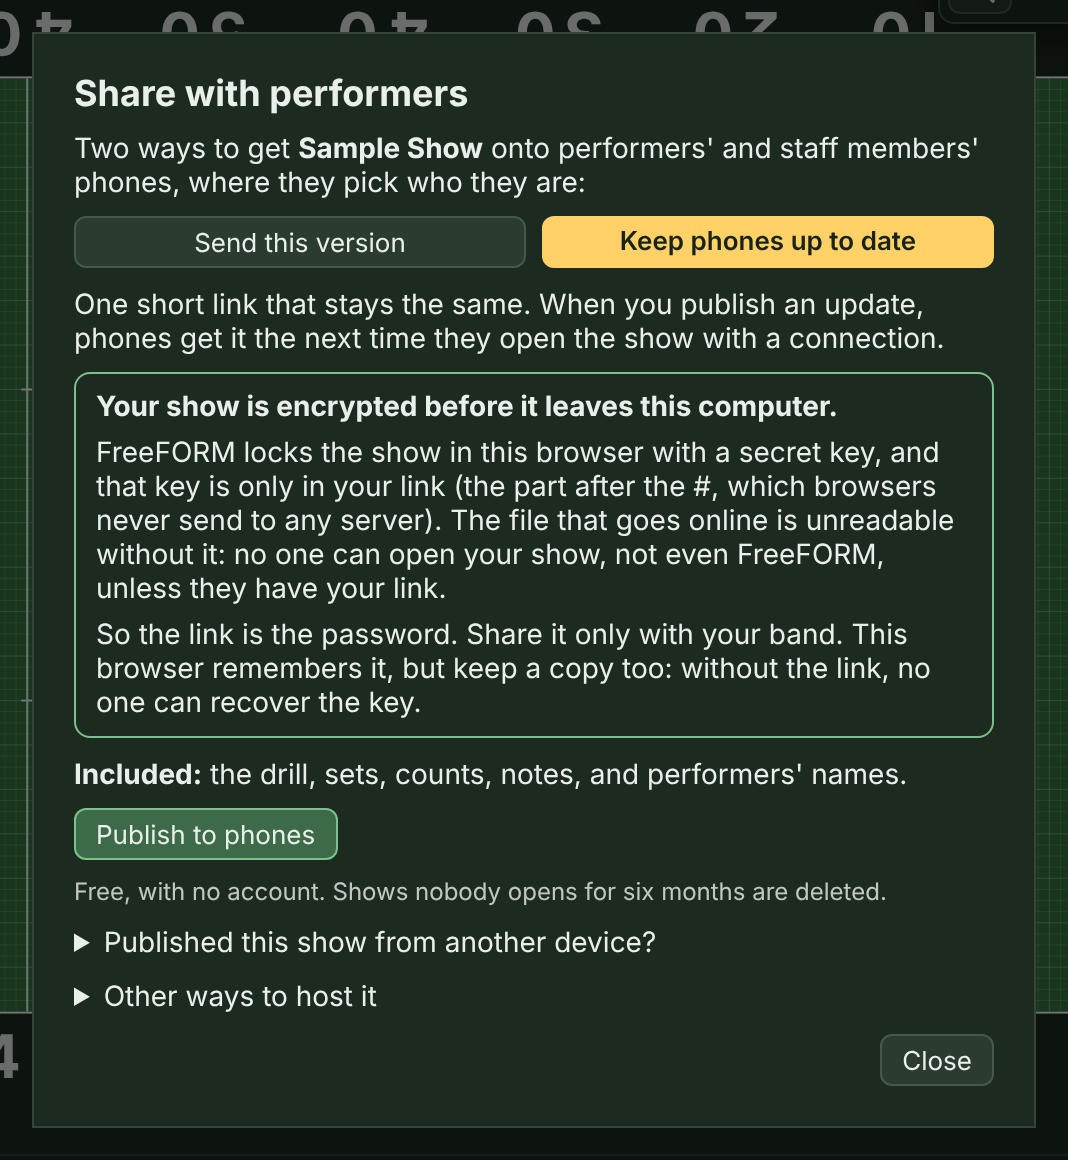
Keep phones up to date is better for a real season. Click Publish to phones, and you get one short link (and a QR code that scans easily) that keeps working when you change the show: after an edit, click Publish update, and performers' phones pick up your latest version the next time they open it online, within a minute or so. There's no account and no setup. A published show carries performers' names and, if you check the box, the music.
Put the QR code on a slide, a handout, or an email. Under either QR code, Copy picture copies it so you can paste it straight into PowerPoint, Keynote, Google Slides, a document, or an email. Save picture saves it as a PNG file, big enough to fill a projector screen or a printed page. SVG saves a copy that stays sharp at any size, for a poster. With the box checked (it starts checked), the picture has the show's title above the code and "Scan with your phone's camera" below it, in English and Spanish; uncheck it for just the code. A few tips:
- For a slide or a poster, use the Keep phones up to date code. Its link is short, so the code has big squares that scan from the back of a band room, and it has the FreeFORM Drill logo in the middle. A Send this version code holds the whole show, so its squares are tiny, it needs to be big and close, and it has no room for the logo.
- In an email, include the link too. Most students read email on their phones, and a phone can't scan a code on its own screen. The picture helps the ones reading on a laptop.
- Anyone who can scan the picture can open the show, so share it the way you'd share the link. A slide you post online for everyone shares the show with everyone.
Your show is encrypted before it leaves your computer. FreeFORM locks the show in your browser with a secret key, and the key is only in your link: in the part after the #, which browsers never send to any server. The file that goes online is unreadable without that key. No one can open your show, not even FreeFORM or me, unless they have your link. That makes the link the password, so share it only with your band. Your browser remembers the link, but keep a copy too (your band's group chat is fine): without the link, no one can recover the key.
FreeFORM's service keeps published shows for free. A show nobody has opened or updated for six months is deleted automatically, so a season fits with room to spare. Stop sharing takes a show off right away.
A new computer or iPad mid-season. Only the browser that published a show can update it: the link alone can't, or any student could change the drill. To keep updating the same link from a new device, bring the show's publishing with you, either way:
- Full backup… carries it (along with the recording and tracing picture). Import… the file on the new device, and Publish update keeps the same link.
- Use on another device, under the link in the Share dialog, shows a recovery code, with the steps to use it written right above it. Click Email it to yourself (or Copy recovery code and keep it somewhere safe), so the steps travel with the code. On the new device, click Open from a link or recovery code… on the blank field (or Shows… → Open from a link or recovery code…) and paste the whole message. You can also paste it under Published this show from another device? in the Share dialog. Keep the code private: like the link, it's a password, and it can also change the show.
If the old device is gone and you have no file, the drill isn't lost: paste the link students use into Shows… → Open from a link or recovery code…, and the whole show comes back, names and music included. (The link holds the key that unlocks it.) Without the recovery code, though, publishing from there makes a new link.
Other ways to host it, at the bottom of the dialog, are for directors who'd rather keep the file themselves. It's the same locked file either way:
- Publish to your own GitHub repository in one click, once you connect FreeFORM to a public repository of your own. (Public is fine, since the file is encrypted.) You'll need the repository's name and a fine-grained GitHub token that can write only to that repository (Contents: Read and write). Both stay in your browser.
- Host the file yourself: download the locked file and upload it anywhere that gives you a direct link to it. Paste that address into the box, and FreeFORM makes your short link.
Revision numbers. Each time you click Publish to phones (or Publish update), or download a locked file, the show's revision number goes up by one. Phones show it under the set ("Revision 6"), and so do printed charts and dot sheets. If you change the drill after publishing, paper you print says "rev 6 + changes" until you publish again, so a newer chart can't pass for what's on the phones. Share says so too. At rehearsal, "Does everyone have revision 6?" is a quick check. Share links don't change the number.
What the phone says about its copy. One line at the top of My dots (and under the field) tells a student where they stand, like "Ready offline · Revision 6 · checked for updates 3:42 PM":
- Ready offline (or Ready offline, with the music): the show and FreeFORM itself are saved on the phone, so it works with no signal. It doesn't say this until both are true.
- Revision 6: which version they have.
- For a hosted link, whether it's the latest: checked for updates 3:42 PM, checking for updates…, Offline: using the copy on this phone (last checked 3:42 PM), or Couldn't check for updates: using the copy on this phone. A Check for updates button under the line checks again right away, and the phone checks on its own when it gets signal back.
To cut off a link (say, a student leaves the program), click Stop sharing, then Publish to phones again for a new link, and send the new one to everyone else. Phones that already had the show keep their copy but get no more updates, and a student who opens the old link is told it isn't online anymore.
What performers see on their phones
A two-minute guide for students. Send your students freeformdrill.org/students/ (in Spanish, freeformdrill.org/es/students/) with the show link the first time. It walks them through opening the link, picking who they are, reading their dots, watching a move, and checking their revision. The phone links to it too, under My dots and on its first screen. It's written in docs/STUDENTS.md.
When a student opens your link on their phone, they pick who they are.
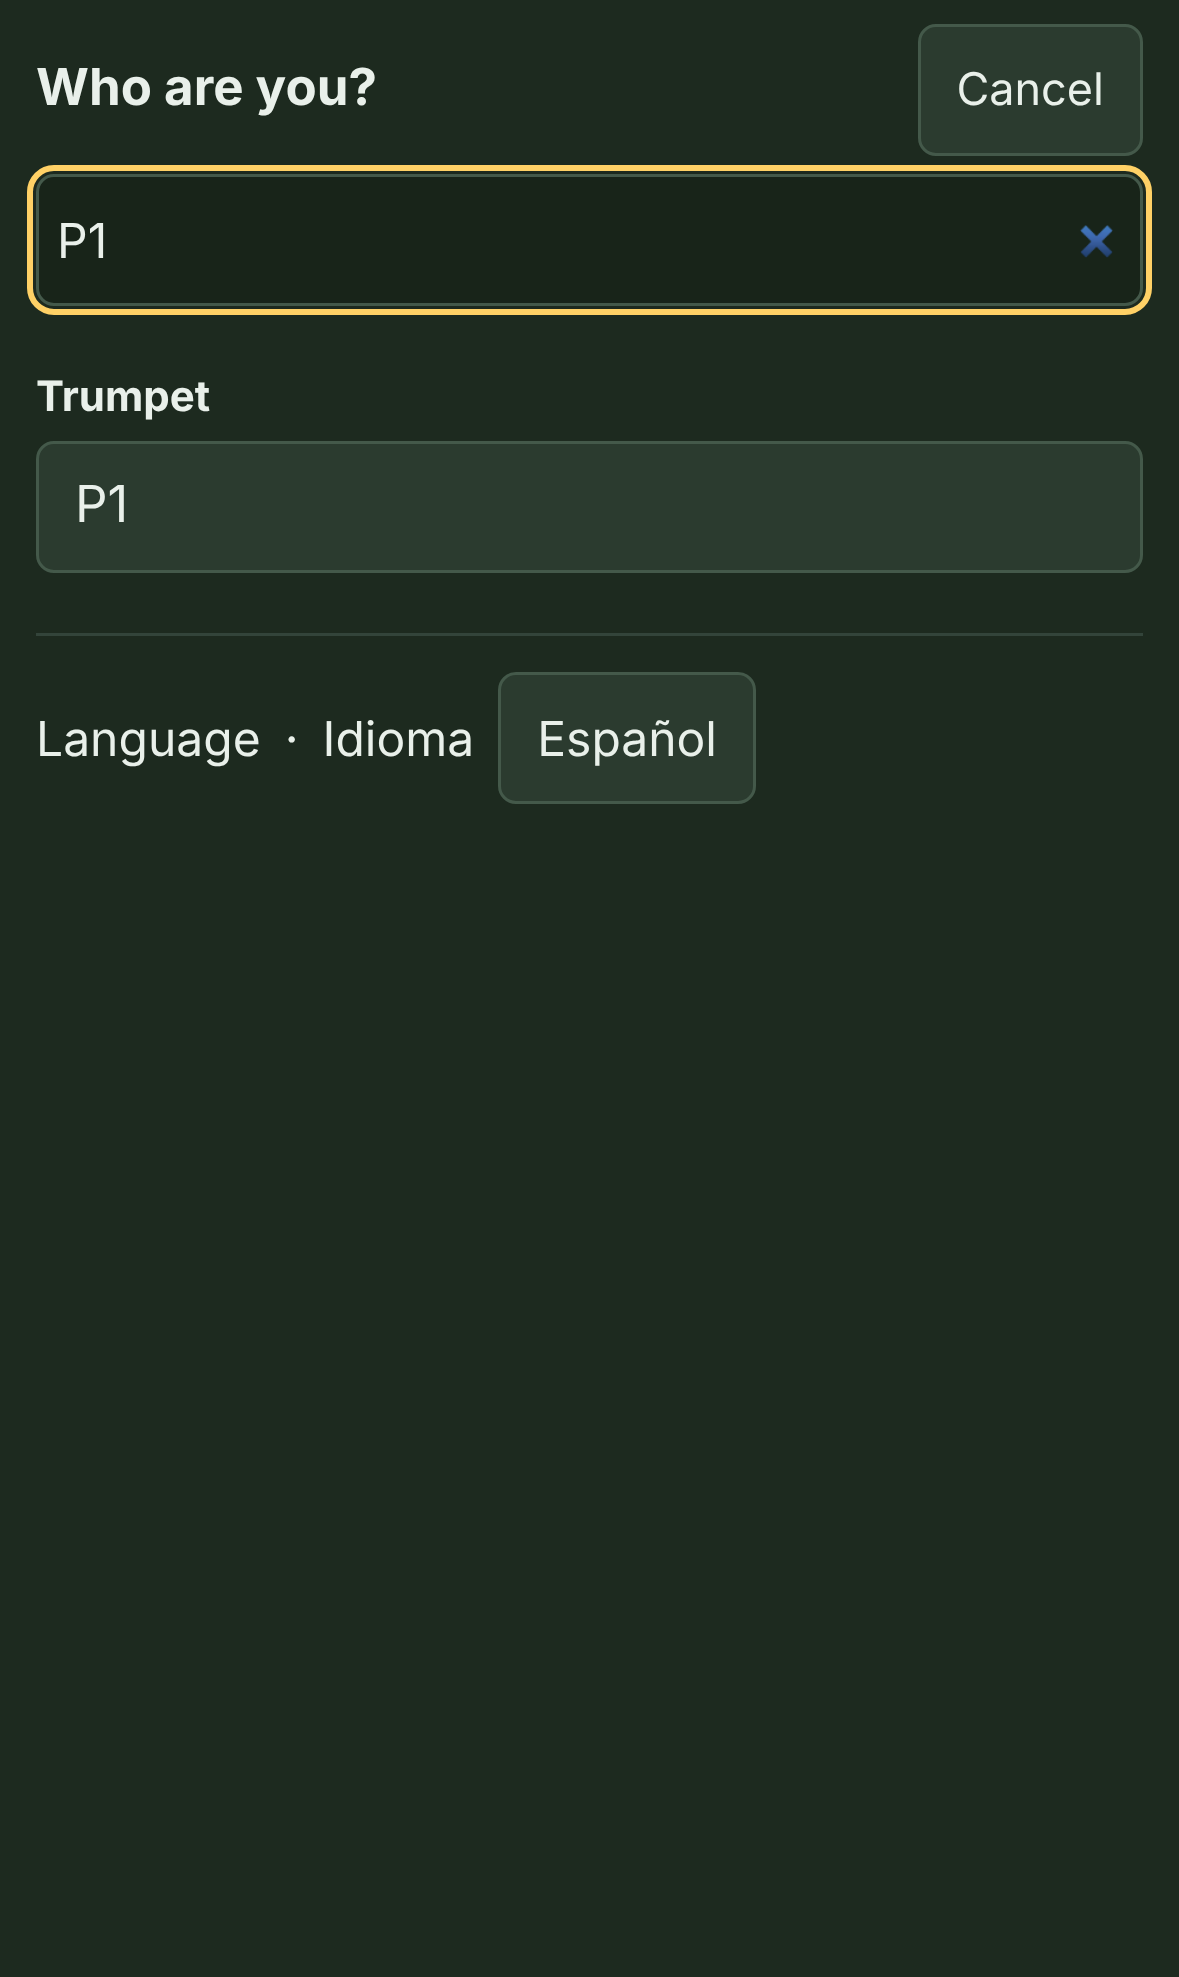
They can search by name, by dot (P4), or by section, and Staff (whole band) at the top shows everyone. FreeFORM remembers their choice, and the show keeps working offline once it's opened. (If the phone can't save it, say in a private window or with its storage full, a warning says so: the show will be gone when they close it and won't work offline, so they should open it in a regular window.)
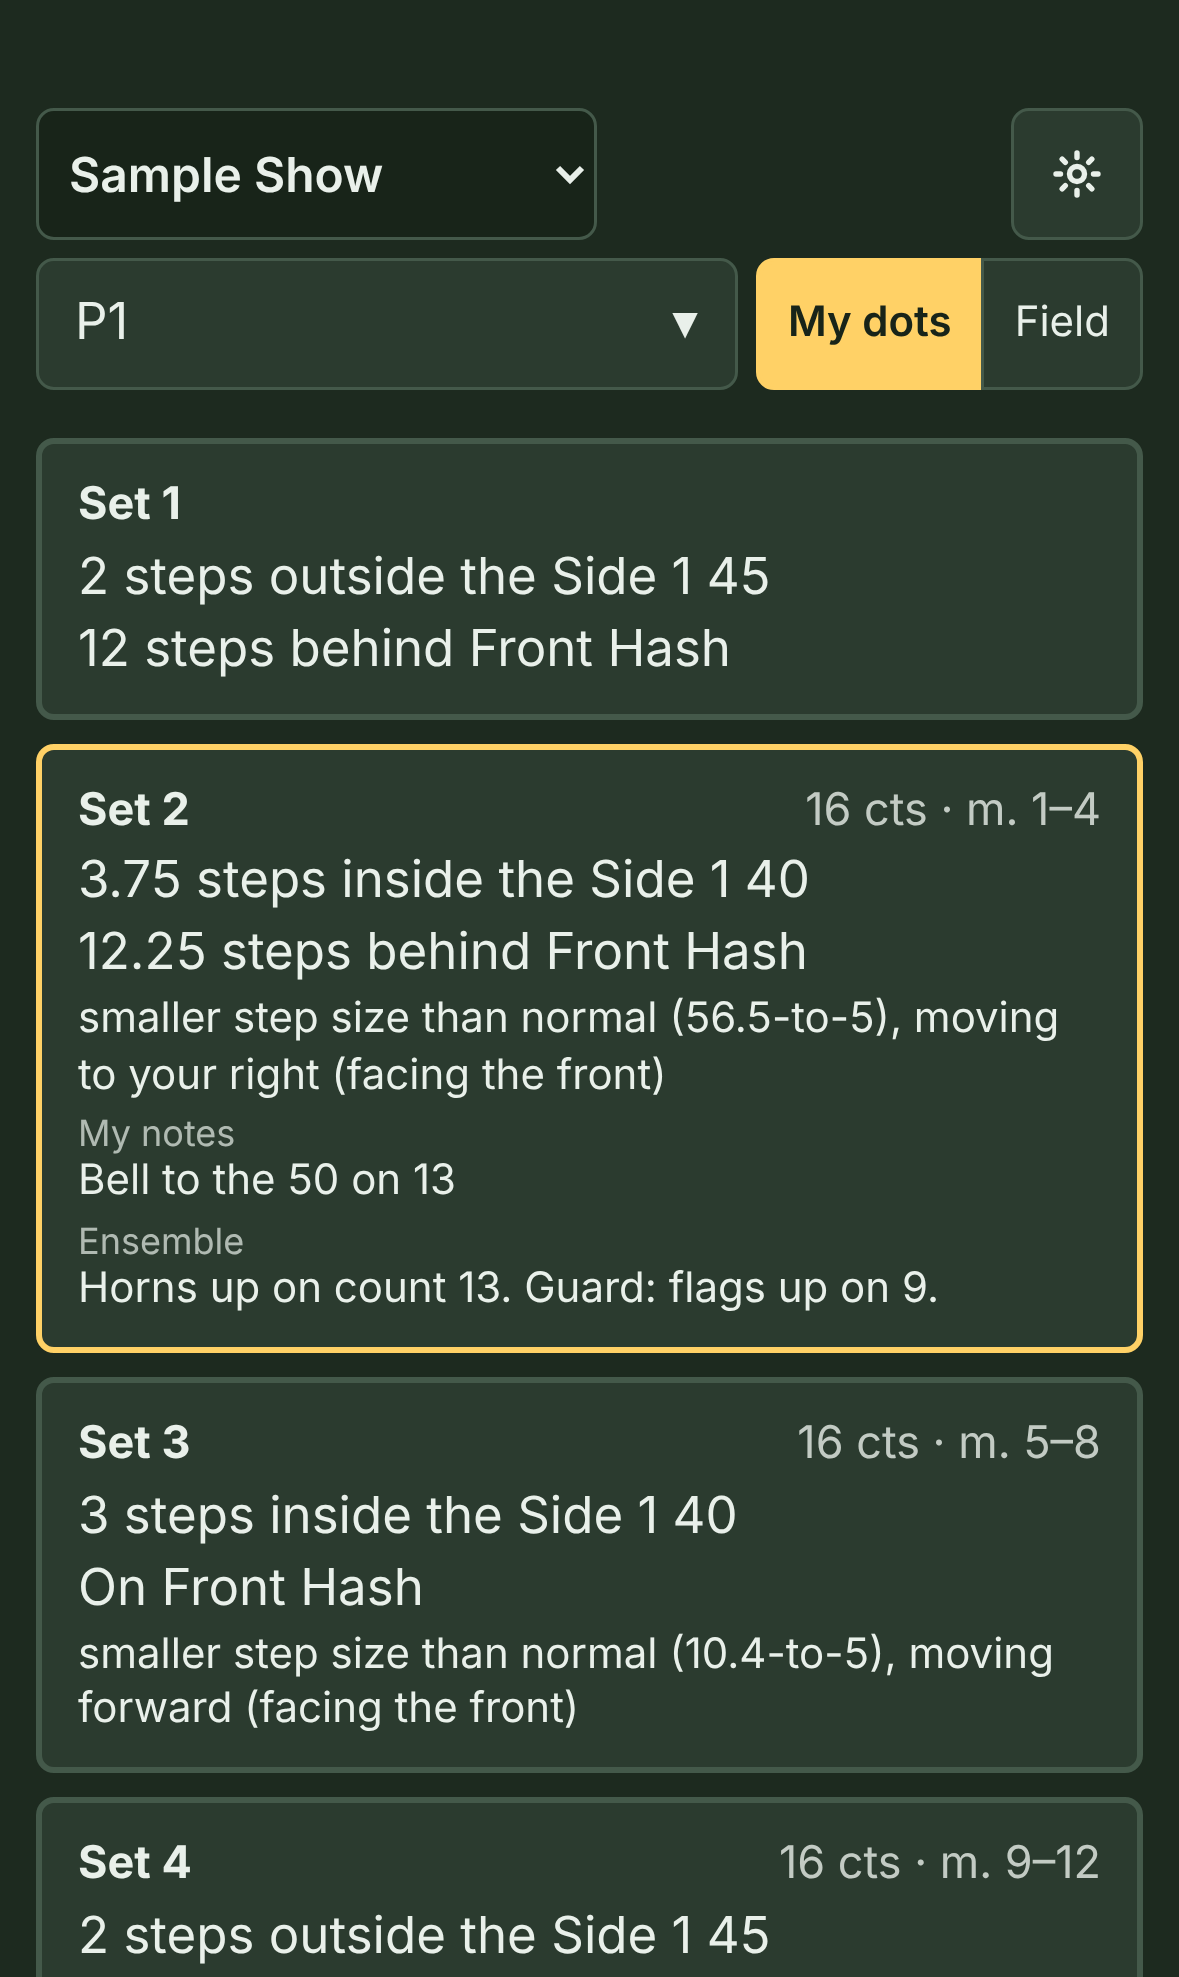
Upright, the phone shows their dots. Holding the phone upright, a performer sees My dots: a card for every set, like their printed dot sheet. Each card has the set, its counts and measures, and the side-to-side and front-to-back spot. It also says the move into it in plain words, with the step size in parentheses, like "normal step size (8-to-5), moving back and to your left (facing the front)," plus any hold before stepping off, their own notes, and the ensemble notes. When the route isn't a straight line (a custom path, a follow-the-leader, or a turn), it says so and gives only where they end up, like "not a straight line (watch the move), ending up back and to your left (facing the front)," since the straight-line direction would point them the wrong way. Those cards have a ▶ Watch the move into set 3 button (or whichever set) under them: it switches to the field and plays just that move, once, at the tempo or with the music. My dots goes back to the list. A set where they don't travel says Hold (same spot as set 3): it doesn't say what to do there (mark time, a visual), so put that in their notes. The set they're on is outlined in gold. Tap a card to go to that set.
Sideways, the phone shows the field. Turn the phone on its side and the field takes the left side of the screen, with the controls in a column on the right:
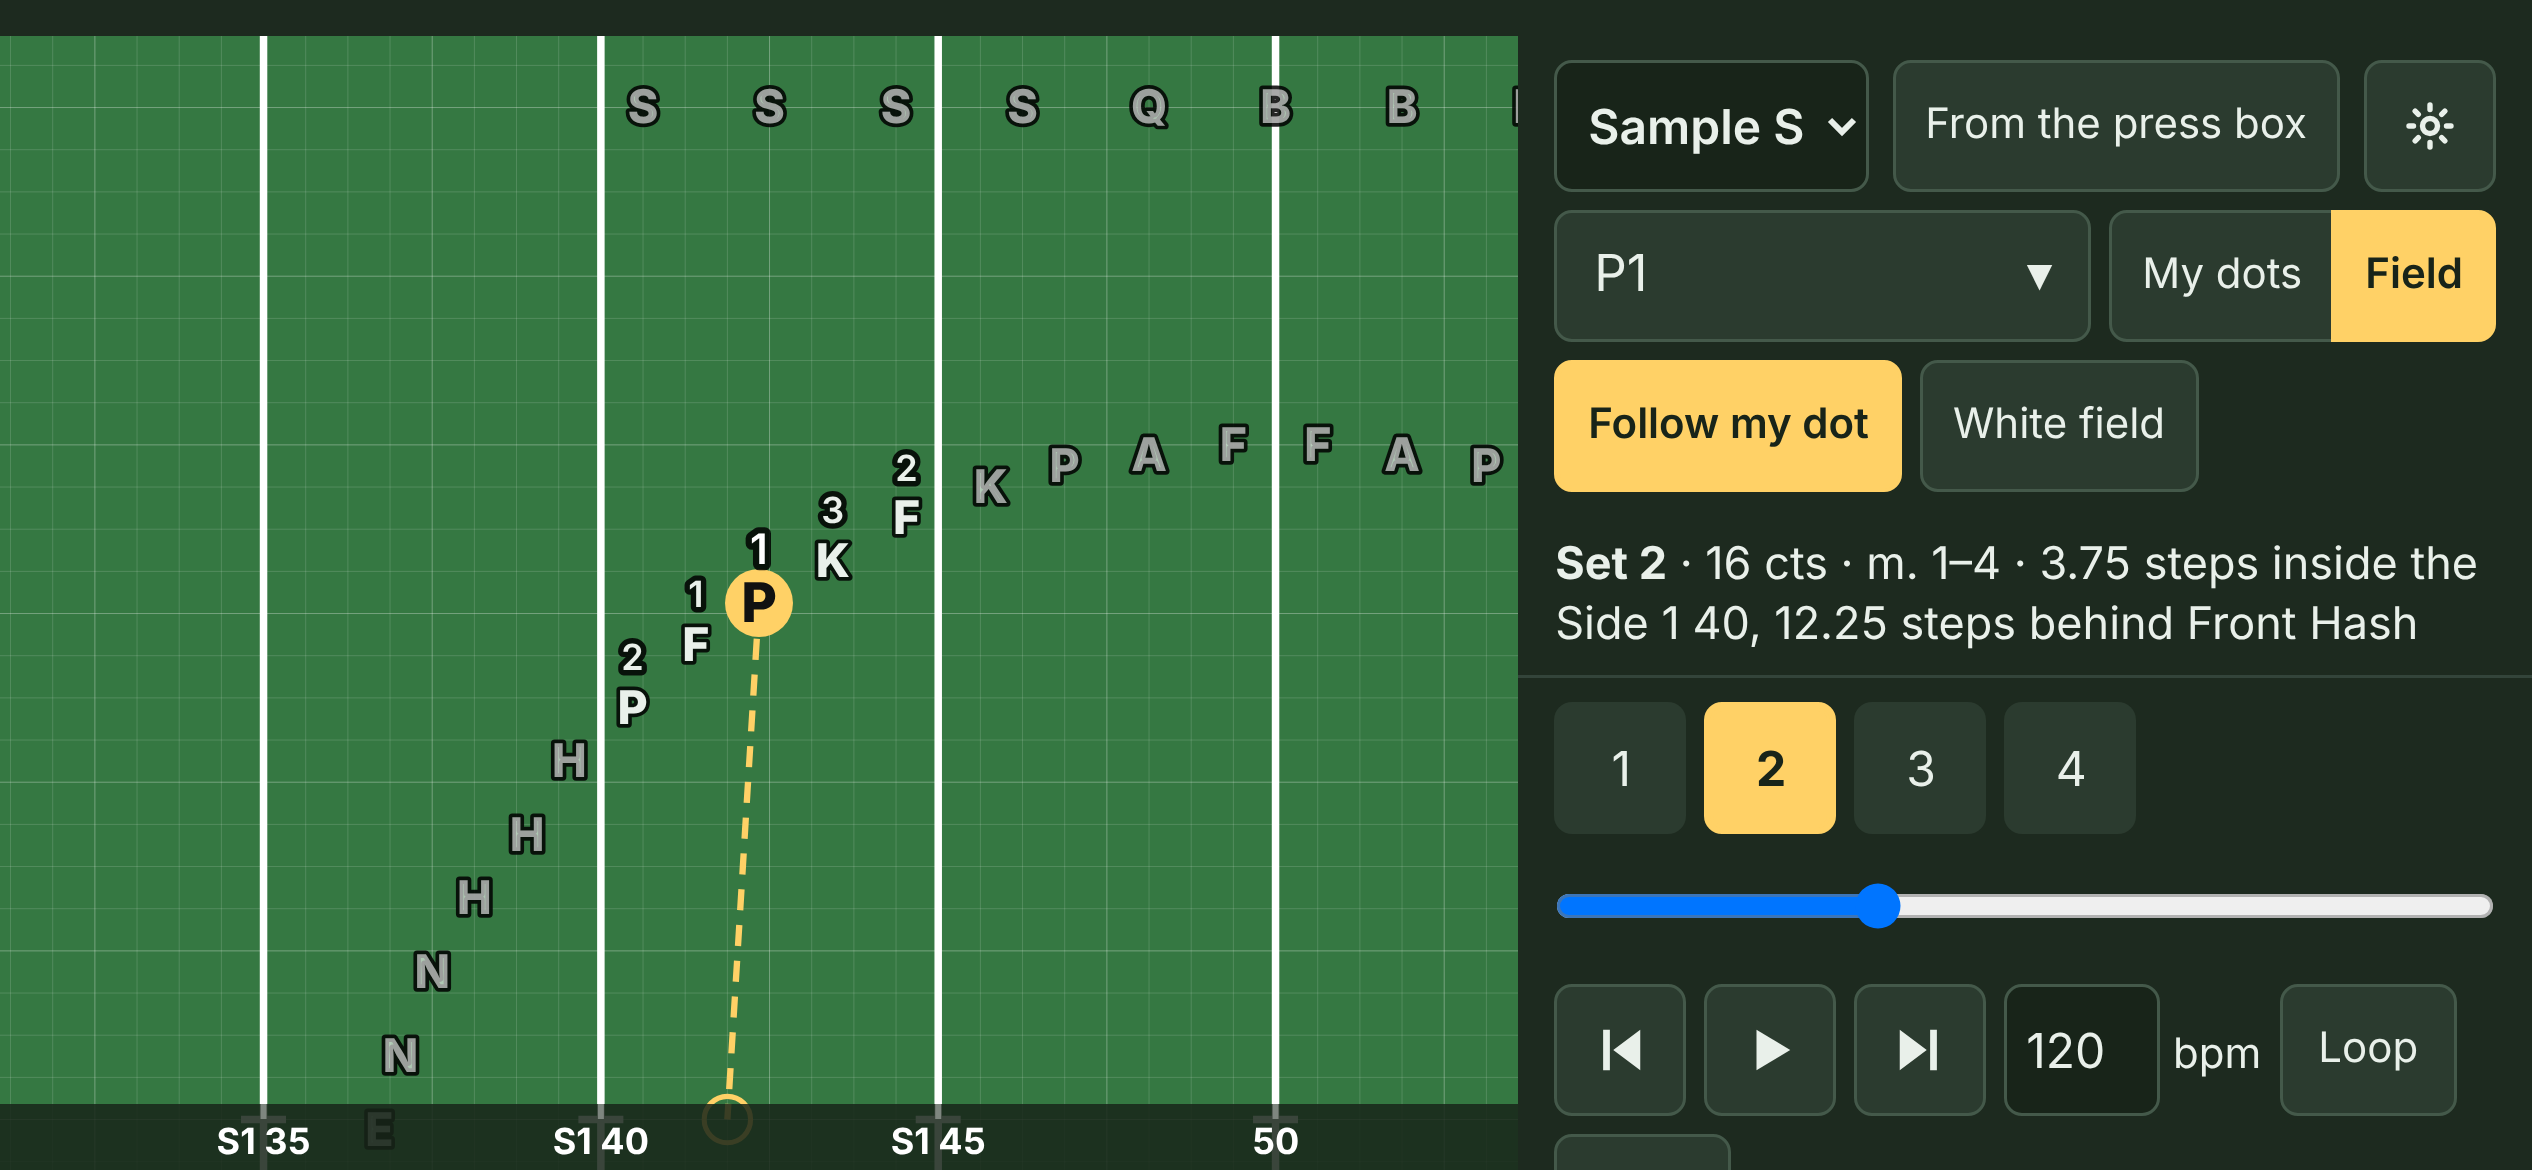
- My dots and Field, next to who they are, switch between the two by hand. That's for a phone locked upright, or for a quick look at the list while it's sideways. Turning the phone goes back to its own view.
- Follow my dot keeps their dot in the middle through each move. Tap it off to see the whole field. Pinch-zoom works either way. Zoomed out on the whole band, performers show as dots until a pinch makes room for their letters.
- The field orientation button, next to the show's title, reads From the press box when the field is drawn the way the editor shows it. Tap it to switch to Facing the front, which turns the field around to match what they see facing the audience.
- One line under the field (or at the top of the column) says the set and the spot they're standing on. On the field, the performers closest to them are drawn a little brighter and labeled.
- They can play at any tempo, step count by count, scrub, or tap a set number to jump to it. If the show has music, Play follows it, and ♪ Music switches back to a tempo.
- White field, next to Follow my dot, draws the field white with black lines and letters, for anyone who finds it easier to read. Tap it again for green. The phone remembers it.
- Staff (whole band) always sees the field, upright or sideways.
Loop a few sets. Loop (next to the tempo) opens a panel to pick Sets … to …. Tap Loop these sets, and Play starts on the first set and jumps back to it each time it reaches the last one, at the tempo or with the music. The button then reads Loop 8–10 (or whichever sets). Tap it again to change the sets or Stop looping.
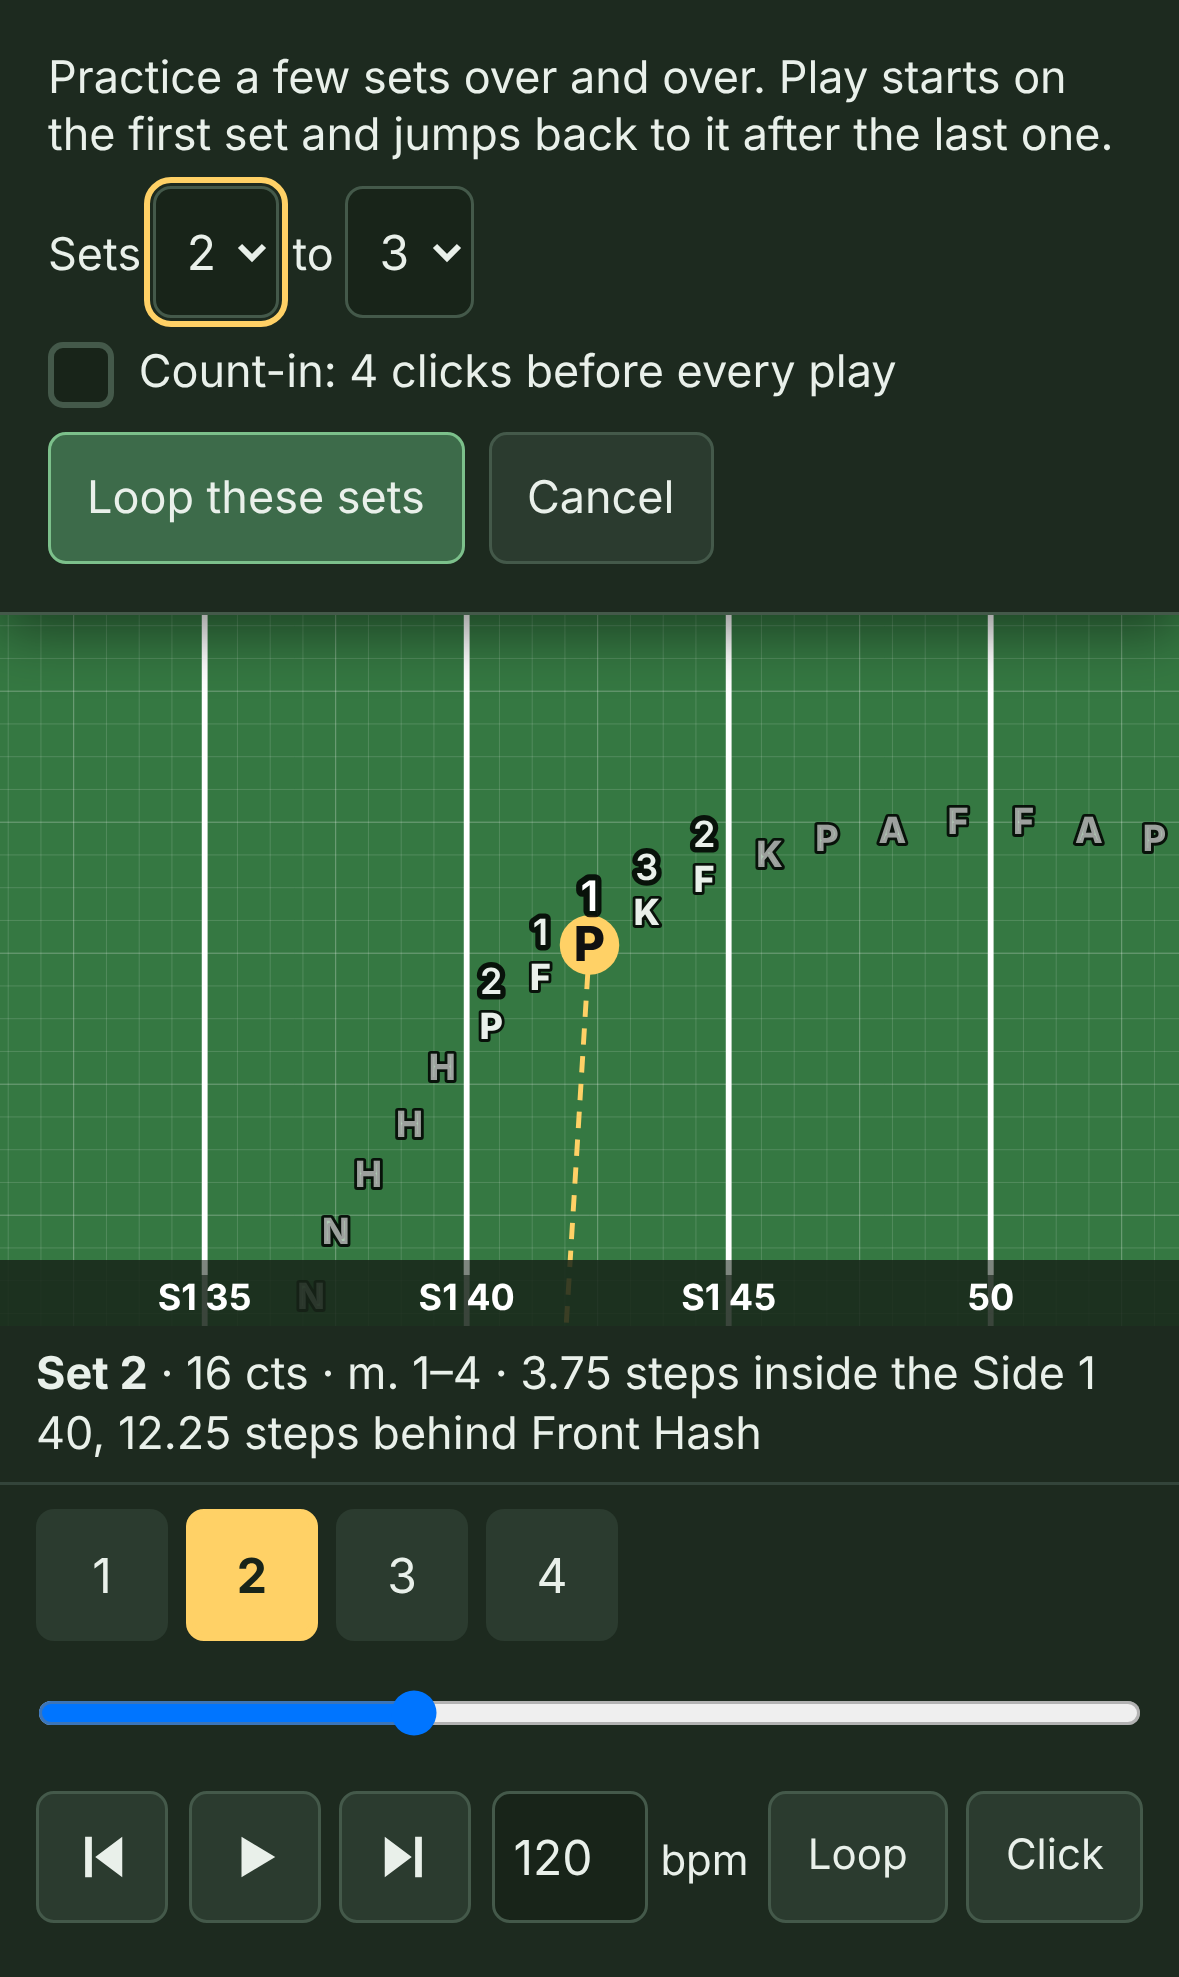
Count-in. The same panel has a Count-in checkbox. With it on, every time they press Play the phone clicks 4 counts (and shows 4, 3, 2, 1 over the field) before the drill starts moving, at the tempo, or at the music's pace if it's playing with the music. Tap Pause during the count-in to cancel it. The phone remembers the setting.
A click for rehearsal. When there's no recording (or ♪ Music is off), a Click button sits next to the tempo. It clicks every count while the drill plays, with a higher click where each set lands, so a section can run a move with the phone in a pocket or on a stand.
VoiceOver and big text. The phone view works with VoiceOver, the iPhone's screen reader: each My dots card reads in order with pauses ("Set 2. 16 counts, measures 1 to 4. Splitting 35 and 40 on Side 2. 14 steps behind Front Sideline…"), the name button says "Who are you? G6," and the field says its set and spot are in the line with it. With Safari's aA text size turned up (up to 300%), the buttons wrap onto more lines instead of running off the screen, and the student's name always shows.
Several shows on one phone. If your Opener, Ballad, Drum Feature, and Closer are separate files, send each one's link. Every link a student opens is added to the list on their phone instead of replacing what's there. The show's title at the top of the screen is a menu: tap it and pick another show to switch. Each show remembers who they are, and a new show starts on the same dot (B5 in the Opener starts as B5 in the Ballad). Opening a link for a show that's already on the phone (an updated version of the same hosted link, or a new share link of the same show) replaces it in place. Two different shows that happen to have the same title are kept apart. Each show has its own permanent id, made when the show is started, so the copy of the Opener on a phone knows it's your Opener and not another band's. + Add a show… in the same menu opens a box to paste a link or Scan QR code, and Remove this show… takes the open show off the phone. A phone keeps up to 12 shows.
In Spanish. On a phone set to Spanish, the performer view is in Spanish, coordinates included ("3 pasos adentro de la 45 del Lado 2"). Español or English, at the bottom of the who-are-you list and on the start screen, switches it. The front page has a Spanish version too (freeformdrill.org/es/). The editor and this guide are still in English. The Spanish is a first draft: if you direct a band in Spanish, please tell me how your band says the drill terms.
Students can add FreeFORM to their home screen. In the home-screen app, they open a show with Scan QR code or by pasting the link, and add more with + Add a show….
To check a performer's view while you write, select one performer and click Performer view under Selection in the sidebar. (It's there only when exactly one performer is selected.) You see the show you're editing the way they see it on their phone, starting on them, and you can pick someone else, or Staff (whole band), from the list at the top. It's a preview: it doesn't replace a show saved on that computer or iPad from a link. ← Editor takes you back. Open performer view here in the Share dialog opens a share link on the same screen.
Using an iPad
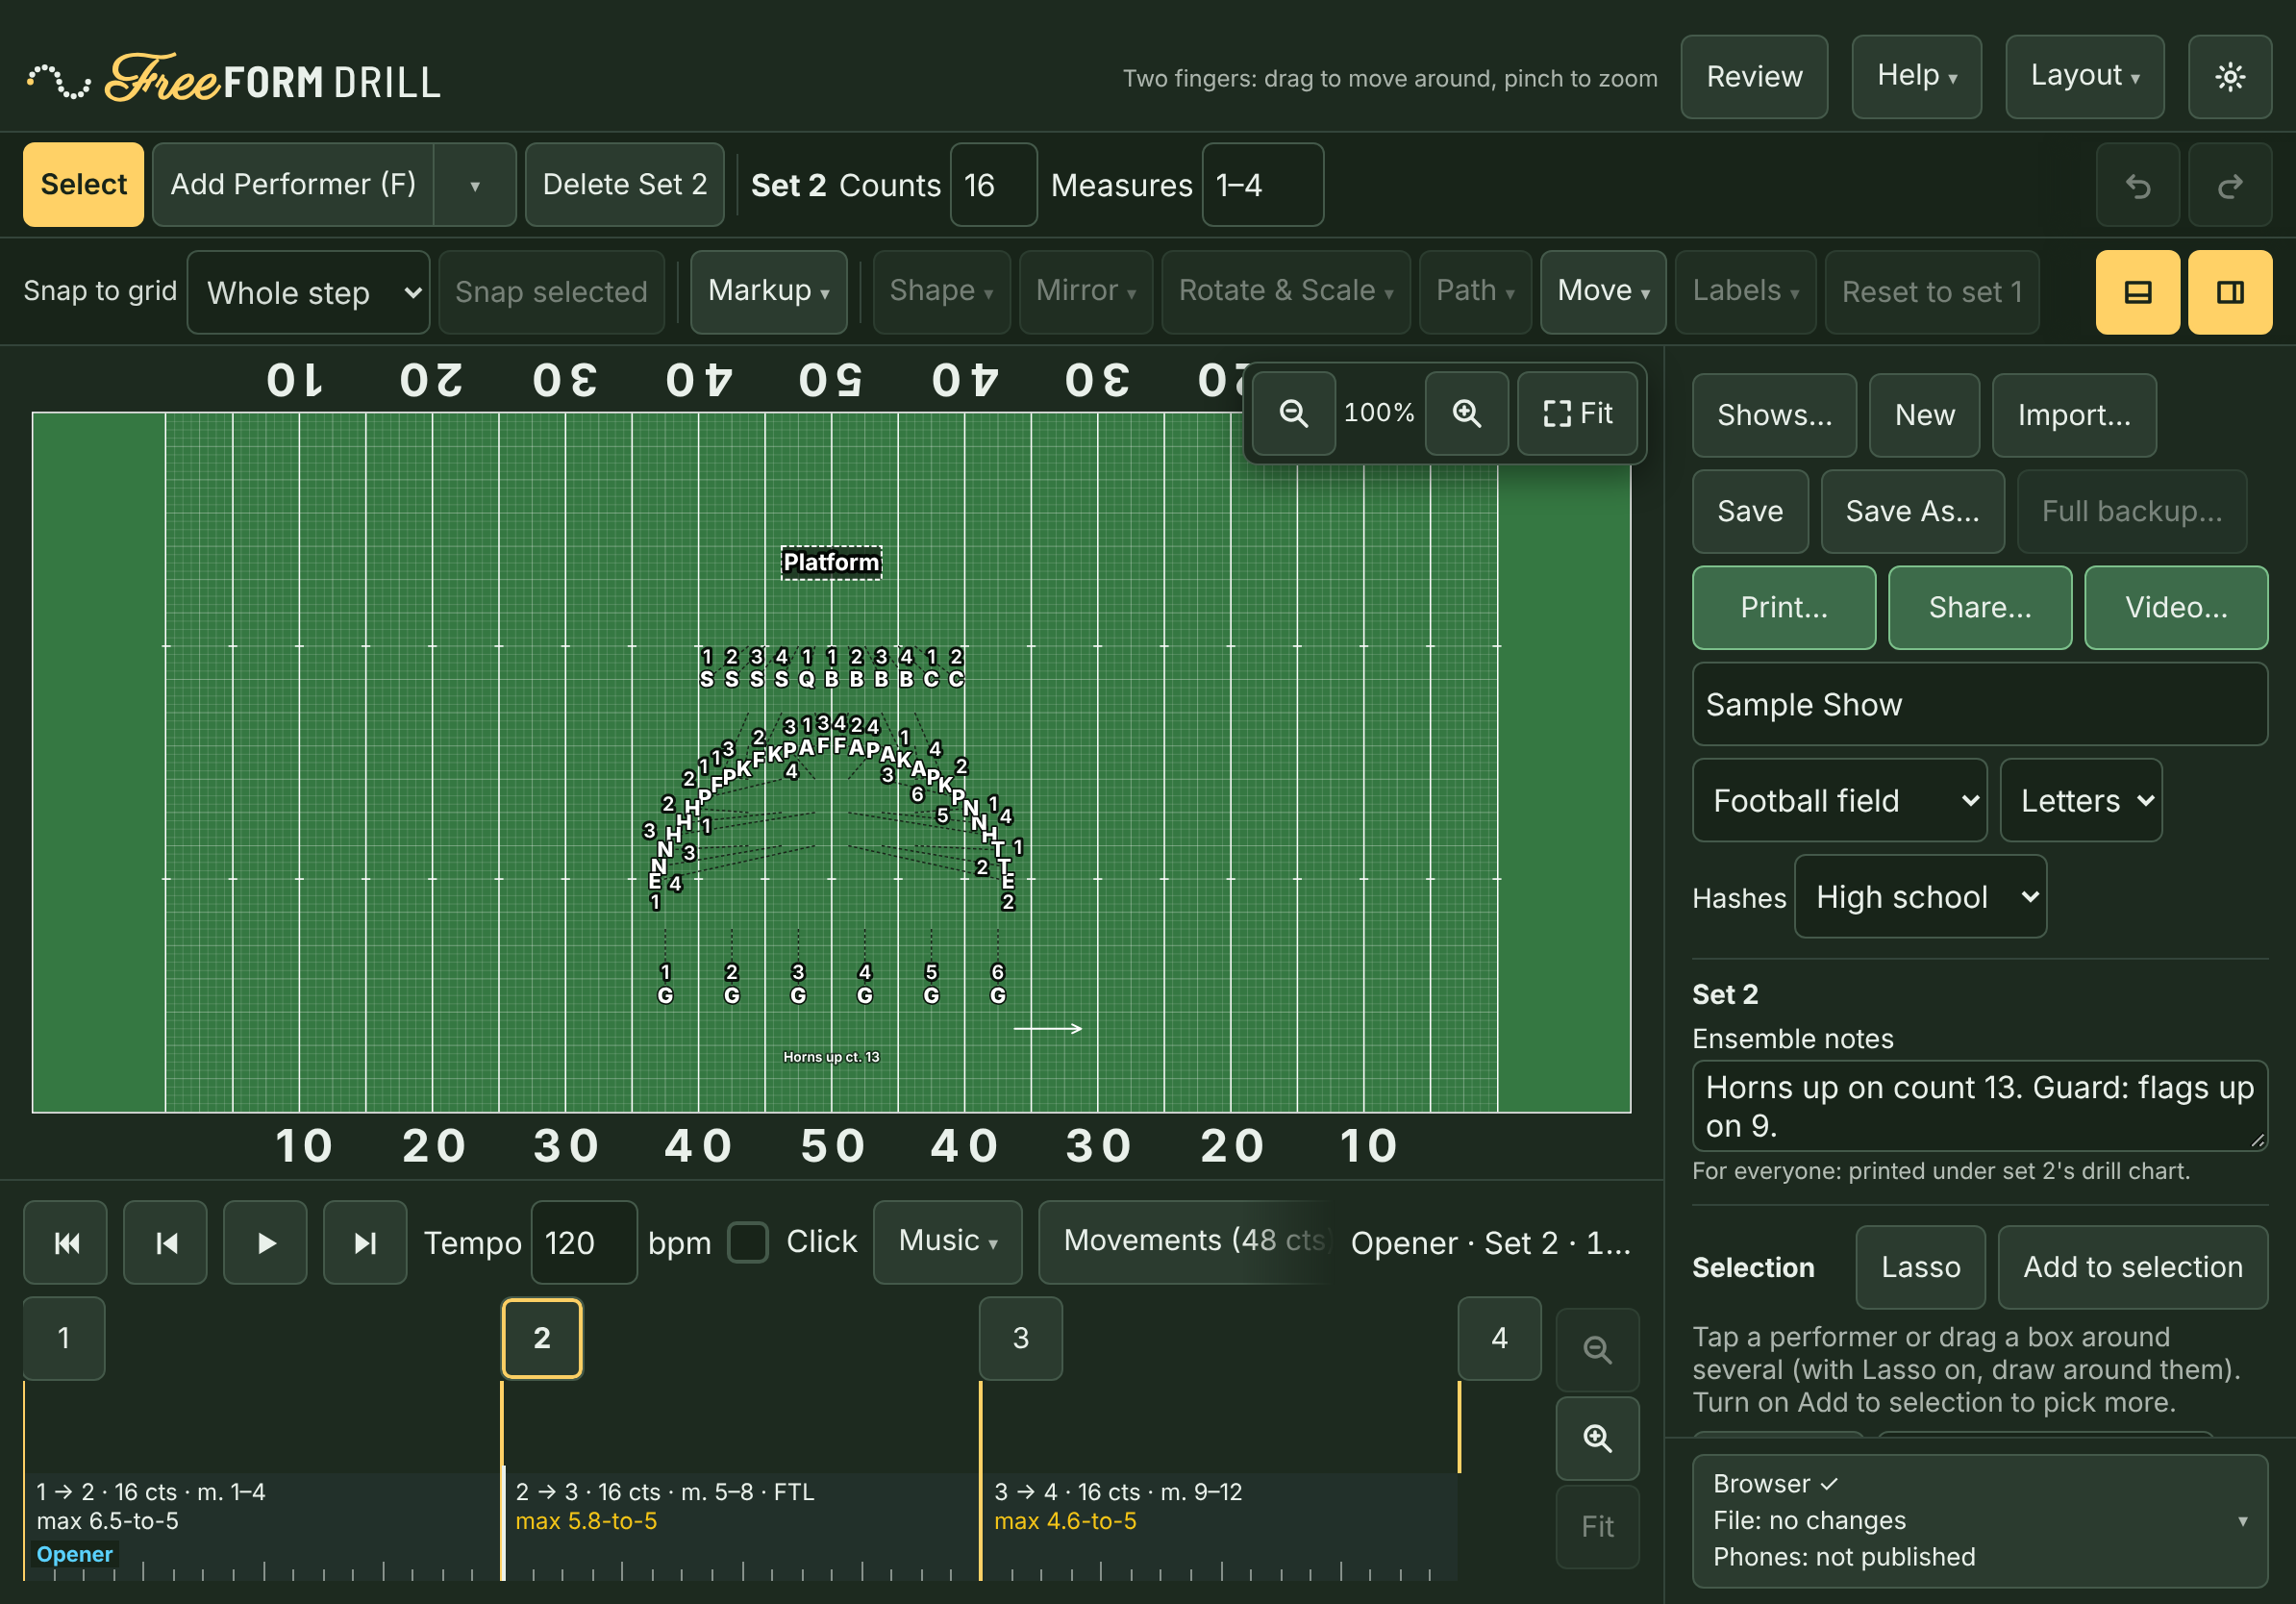
The editor works on an iPad the same way it does on a computer, with a few touch habits:
- One finger does whatever the tool does: tap to select or add, drag to move, drag on open field for a box (or, with Lasso on, draw around performers to select them).
- Two fingers pan and pinch-zoom the field. If a second finger lands while the first one has started something, FreeFORM takes that back and moves the view instead.
- While editing a Bézier, use Shape → Independent handles to move one handle. Turn it off and drag a round handle at a joint to make the joint smooth again. Pinch with two fingers to get closer without moving the handles.
- With an Apple Pencil, the Pencil does the editing. Once you've used it on the field, a single finger or a palm resting on the screen does nothing there, so you can rest your hand while you work. Two fingers still pan and zoom, and they never undo what the Pencil just did. To go back to editing with your finger, reload the page.
- Turn on Add to selection to build up a selection without a Shift key.
- On the timeline, tap a set to go to it and swipe to scroll. To move a set to a new count, touch and hold its button until it lifts, then drag. That way a swipe can't move a set by accident.
- On an iPad held upright, the sidebar starts hidden. The sidebar button opens it over the side of the field it sits on.
- For more room while you write drill, hide the timeline, the sidebar, or both. The timeline button (a window with a bar along the bottom, or along the top if you moved the timeline there) and the sidebar button (a window with a bar on the right, or on the left) are at the right end of the toolbar's second row, and each one shows and hides its panel. The field grows to fill the space and zooms back out to fit. You can still change sets with the arrows at the top, and the keyboard shortcuts still work.
With a keyboard attached, the keyboard shortcuts work too.
Saving, backing up, and opening files
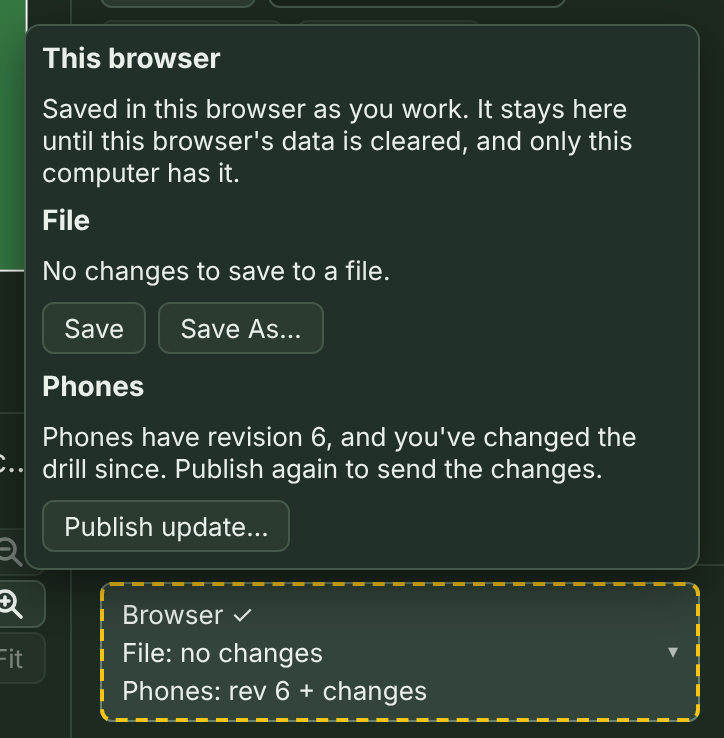
Get a show back. Lost something? Help, then Get a show back, asks what happened and has the button for each case: Undo for a mistake you just made, See earlier versions (below), Open Shows… for another show missing from the screen, Import a file… when it's gone from this browser (a new computer, or cleared history) and you saved a file, and Open from a link or recovery code… for anything else (if you published the show to phones, its link brings the whole show back). It also says when you last saved the open show to a file.
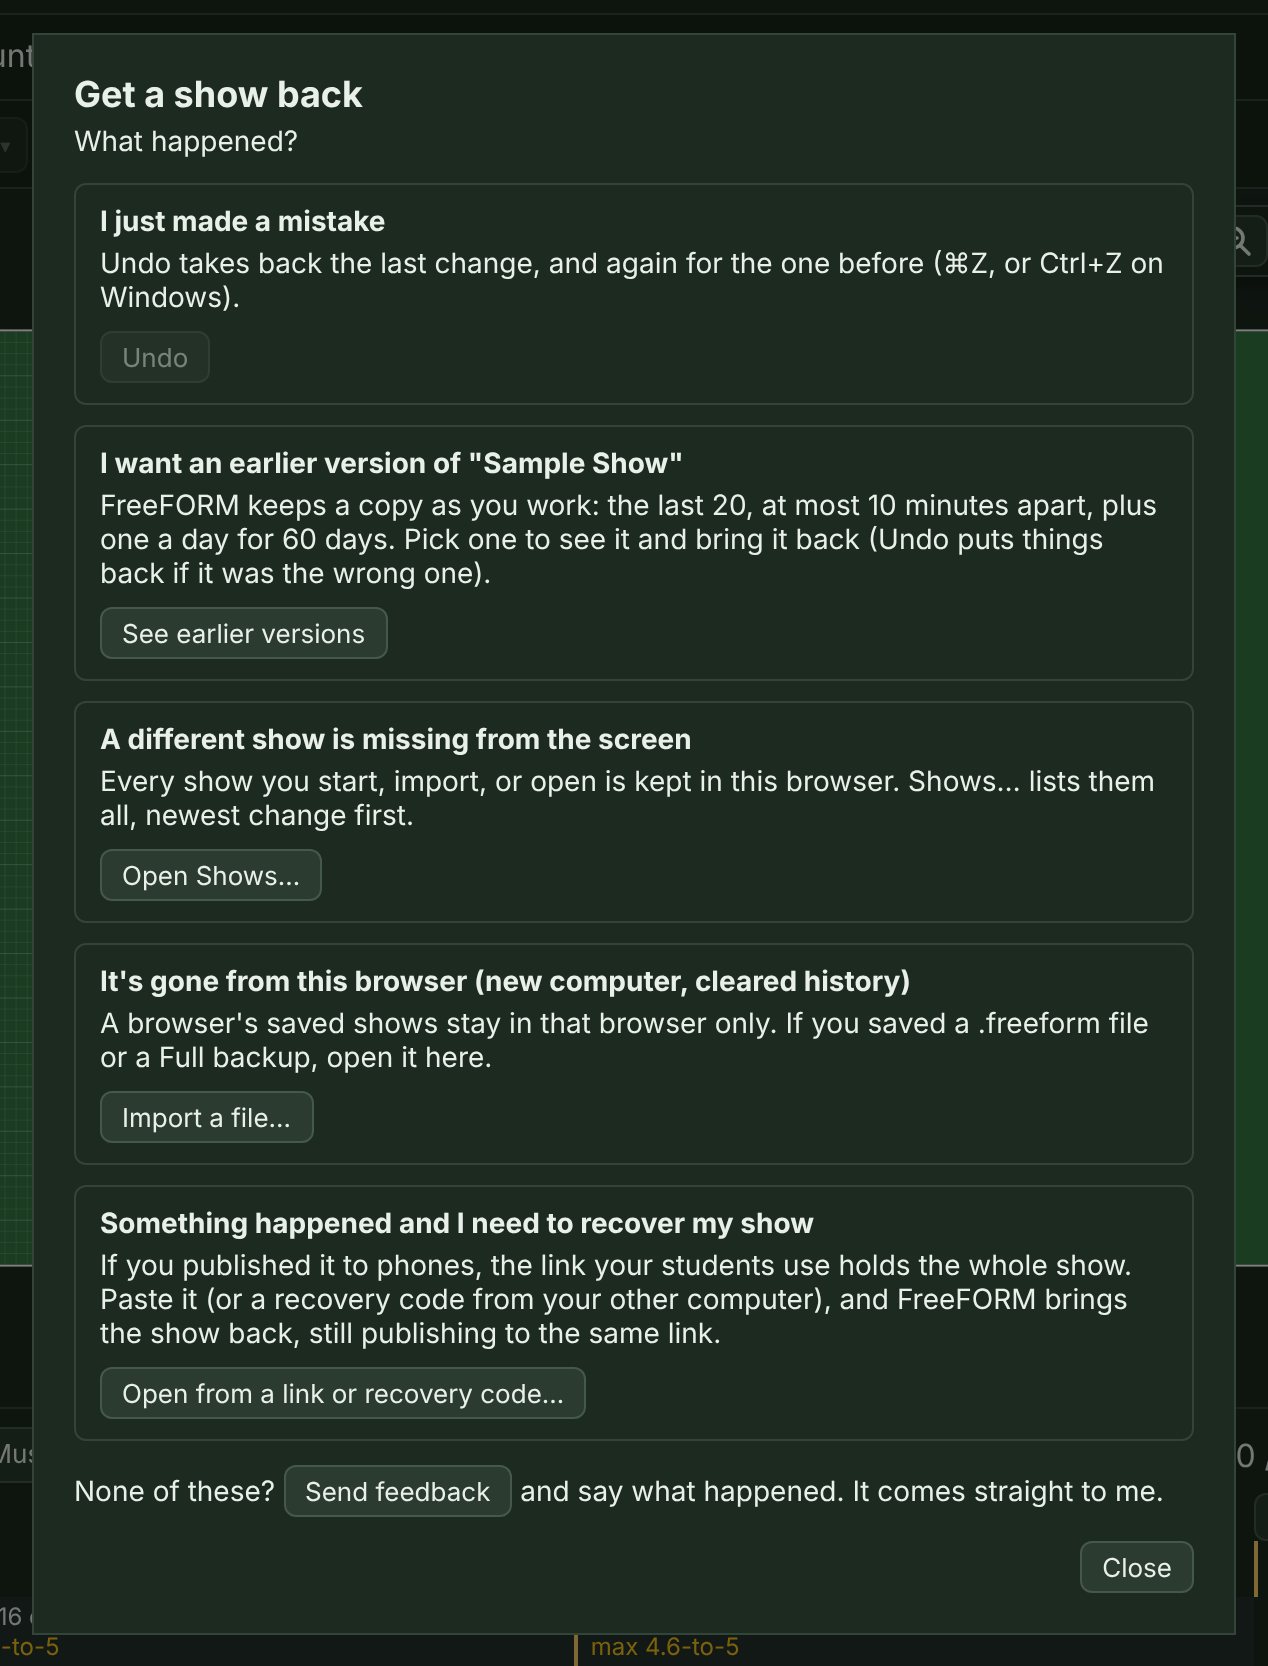
Is my work saved? The box pinned to the bottom of the sidebar answers that, a line for each place your show can be, like "Browser ✓ / File: 2:14 PM / Phones: rev 6":
- Browser: every change is saved in this browser as you go. If the browser can't save (its storage is full), it says Browser: not saved.
- File: when you last saved a .freeform file, or unsaved changes if you've changed the show since.
- Phones: the revision your performers have, rev 6 + changes if you've changed the drill since you published, or not published.
When something isn't saved somewhere it could be, the box also gets a dashed outline. Click it for a sentence about each part, with Save, Save As…, Full backup… (when the show has music, a tracing picture, or a phone link), and Share… or Publish update… right there.
Autosave: every change is saved in your browser right away.
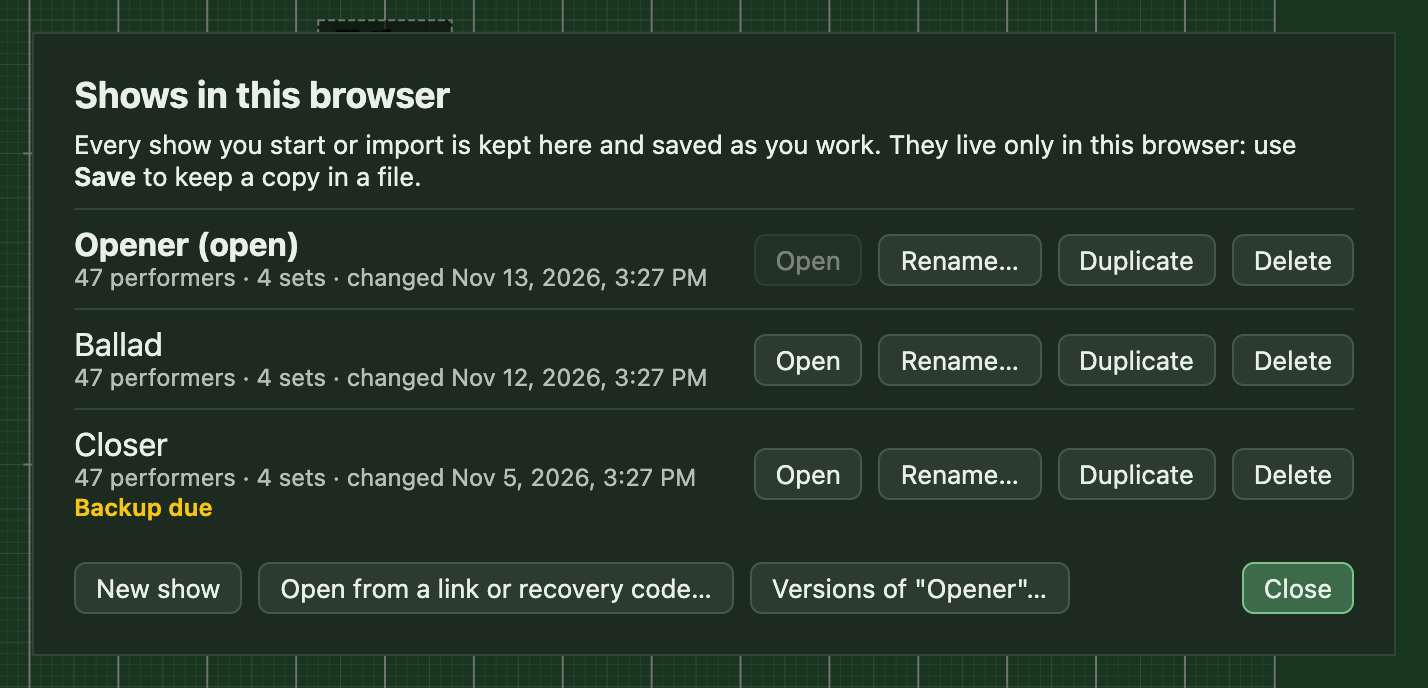
Several shows: Opener, Ballad, Closer. Every show you start, import, or open from the sample is kept in this browser. Shows… (first of the sidebar's file buttons) lists them, newest change first. Open switches to one (the show you had open is saved first). Open from a link or recovery code… brings in a show from a link students use, or from a recovery code (see Send the show to your performers). Rename… changes a show's title, Duplicate makes a copy to try something new (with its own copy of the recording and tracing picture), and Delete removes a show from this browser after asking. Delete can't be undone, so save a file first if you might want the show again. New show starts a blank one. Each show keeps its own recording and tracing picture. Undo works within one show: opening another starts its Undo fresh.
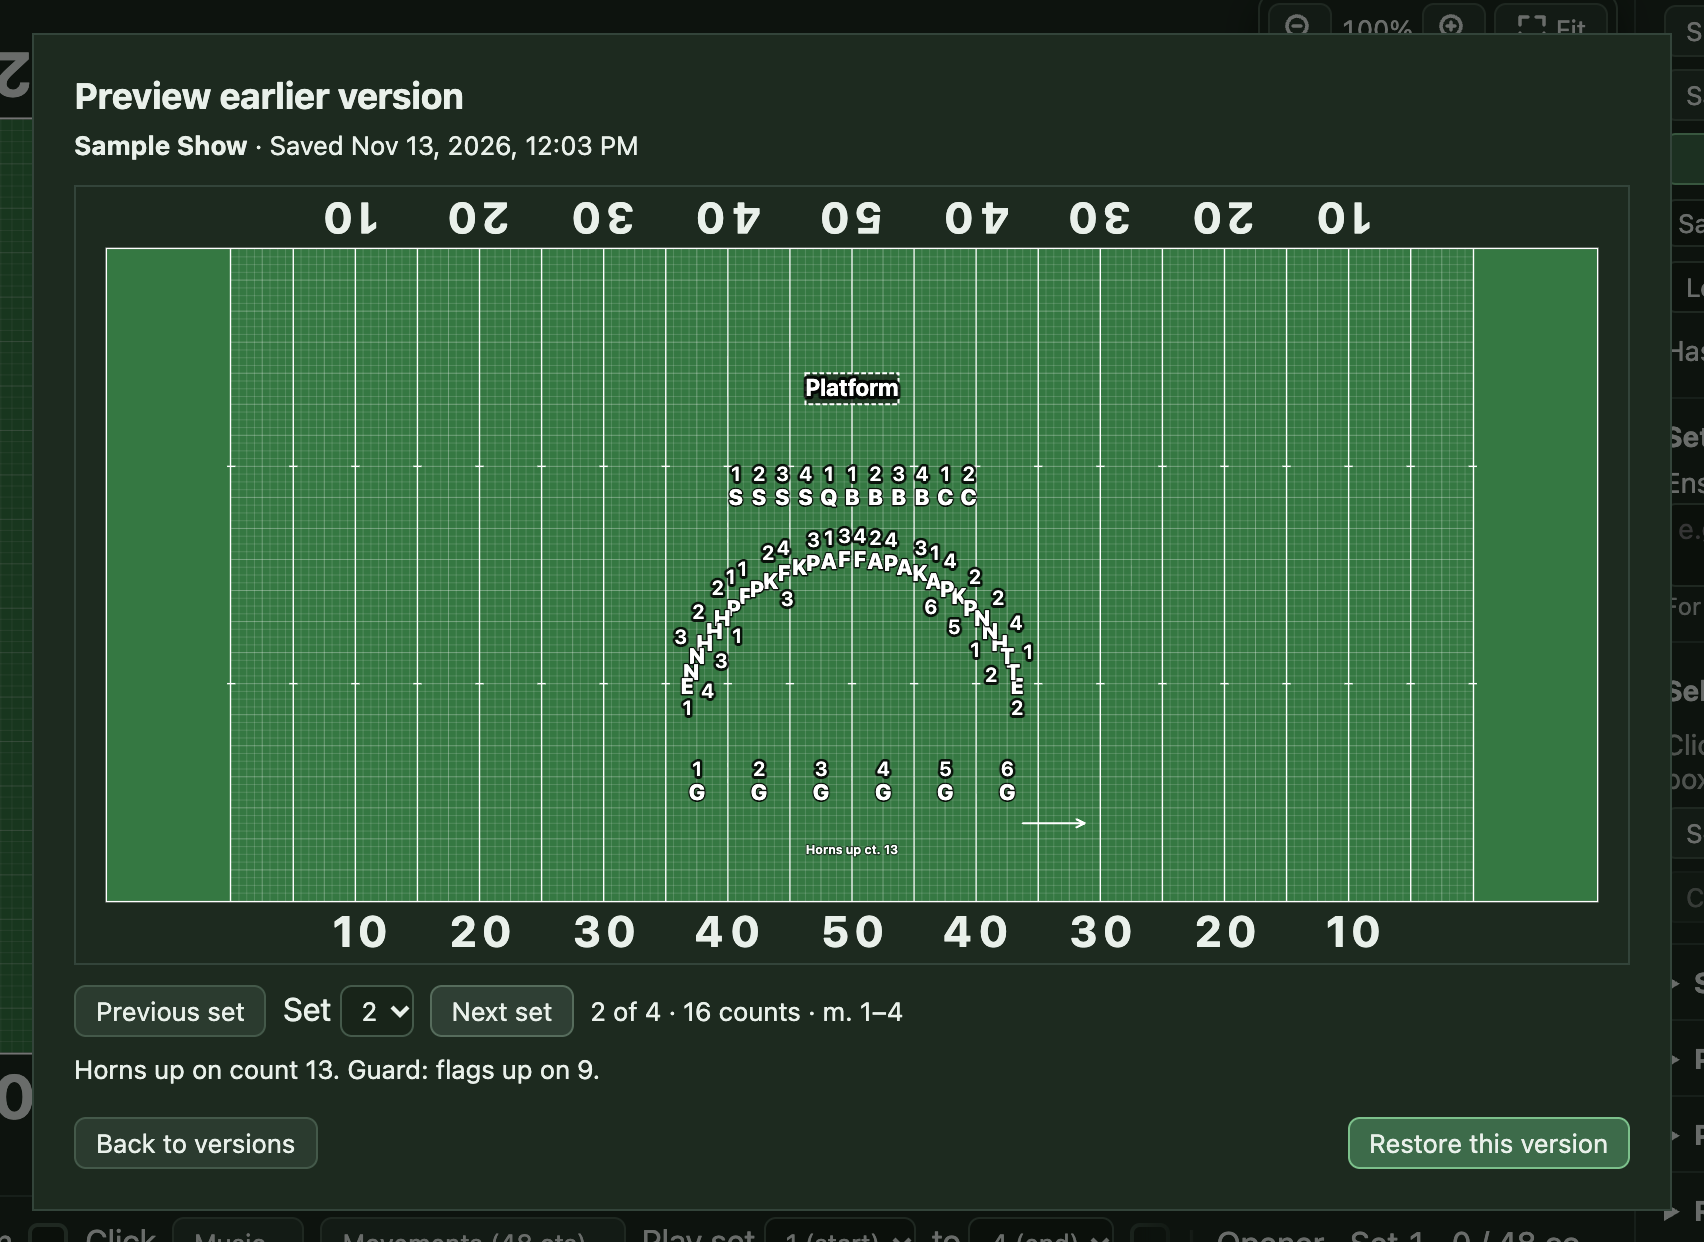
Earlier versions. While you work, FreeFORM keeps a copy of each show at most every 10 minutes, including the last 20 and the last one of each day for 60 days. In Shows…, click Versions of "…", then choose Preview beside the version you want to see. Use Previous set, Next set, or the set menu to look through its formations. Choose Back to versions to look at another copy or Restore this version to put it in the editor. Undo takes the restore back, and FreeFORM keeps a copy of the show as it was before the restore.
Two tabs. If the same show is open in two tabs (or two windows) and you change it in one, the other says "This show was changed in another tab" and stops saving until you choose: Load that version brings in the other tab's changes (Undo goes back), and Keep this one saves this tab's version over it.
Save saves the show as a
.freeformfile. This is your real backup, because the autosave lives in only that one browser. Save before big changes and at the end of every session. Where the file goes depends on the browser:- Chrome and Edge on a computer open a Save dialog the first time, so you pick the folder and the name (a Dropbox or Google Drive folder works well). After that, Save writes to that same file without asking, and a note at the bottom of the field says "Saved to Opener.freeform." Save As… (next to Save) always asks, for a copy with a new name or in a new folder; later Saves go to the new file.
- On an iPad, the share sheet opens. Choose Save to Files and pick a folder (iCloud Drive, On My iPad, or a Dropbox or Google Drive folder you've added to Files).
- Safari and Firefox on a computer download the file. It goes to your Downloads folder unless you've set the browser to ask where to save each download (Safari: Settings, General, File download location: Ask for each download; Firefox: Settings, General, Always ask you where to save files).
In Safari, Firefox, and on an iPad, Save and Save As… do the same thing (the share sheet or a download), since those browsers can't save back to a file you chose earlier.
⌘S (Ctrl+S on Windows) is the same as Save, even while you're typing in a box. FreeFORM forgets the file when you open or start another show, or close the page; the next Save asks again.
If a show with performers has changes you haven't saved to a file for a week, a note over the field reminds you, with a Save button (and Full backup… if the show has a recording or a tracing picture). Later asks again tomorrow. In Shows…, Backup due stays beside each show that needs a file copy, even while it's closed or the field reminder is snoozed. Saving a file clears the label.
Full backup… (next to Save As…) saves a
.freeformfile that also holds the show's recording and tracing picture, and its publishing if you published it to phones from here, so the show moves to another computer complete and keeps updating the same phone link. Keep a full backup private, since it can change the published show. It's much bigger than an ordinary save (a 4-minute mp3 adds about 8 MB), so keep using Save for everyday backups. It always asks where to save, and ⌘S never writes over it. Import… on the other computer brings the show in with its recording and picture. Share links never carry the recording.If the autosave fails. If the browser refuses to save (its storage is full, or it's a private window), a note over the field says so, with Save now. Until it's fixed, your work is only in that open tab and any file you save.
Import… opens a
.freeformfile (older.freeform.jsonfiles too) as a new show; the one you had open stays under Shows…. A file of a show that's already in this browser comes in as a copy beside it, never over it. A file from before November 7, 2026 with facings or guard equipment set opens with them as performer notes on the same set ("Face Side 2," "Flag").Pyware 3D files (
.3dj): Import… also opens these. You get the sets with their counts and names, measures and notes, sections from Pyware's symbols, label positions, and the roster names. Moves that aren't straight in Pyware (follow-the-leader, rotations, delayed step-offs) come in count by count, with even steps. If a follow-the-leader was only described in the set's note, Pyware saved it as straight lines that run through each other; FreeFORM rebuilds it as a follow-the-leader group when the two sets fit one exactly, and you can change its leader or turns with Path. Check which end leads: when the file could have turned at either end, FreeFORM picks the leader nearest the front. Drawn markup and the 3D figures don't come over.If a Pyware file is locked (a show you bought that the drill writer locked) or encrypted, FreeFORM says so and doesn't open it. FreeFORM never unlocks or decrypts drill, so ask the drill writer for an unlocked copy. If it's your own show and FreeFORM says it's locked, please tell me which version of Pyware saved it with Send feedback.
OpenMarch files (
.dots): Import… opens these too. You get the pages as sets, with OpenMarch's names (0, 1, 1A, 2, and so on), their counts, measures, and notes; a section for each of OpenMarch's sections, with each marcher's drill number (T12 stays T12) and name; and the field, a football field with the nearest of FreeFORM's hashes, or a floor the same size. A curved path comes in count by count, with even steps. If the show file has its music in it, the recording comes along, timed to OpenMarch's beats, so playback follows the music right away. Midsets, shapes, tags, colors, and the field picture don't come over. If a show doesn't come in right, please tell me with Send feedback.
Keyboard shortcuts
Press ? in the editor (or open Help, then Keyboard shortcuts) to see this list without leaving your show.
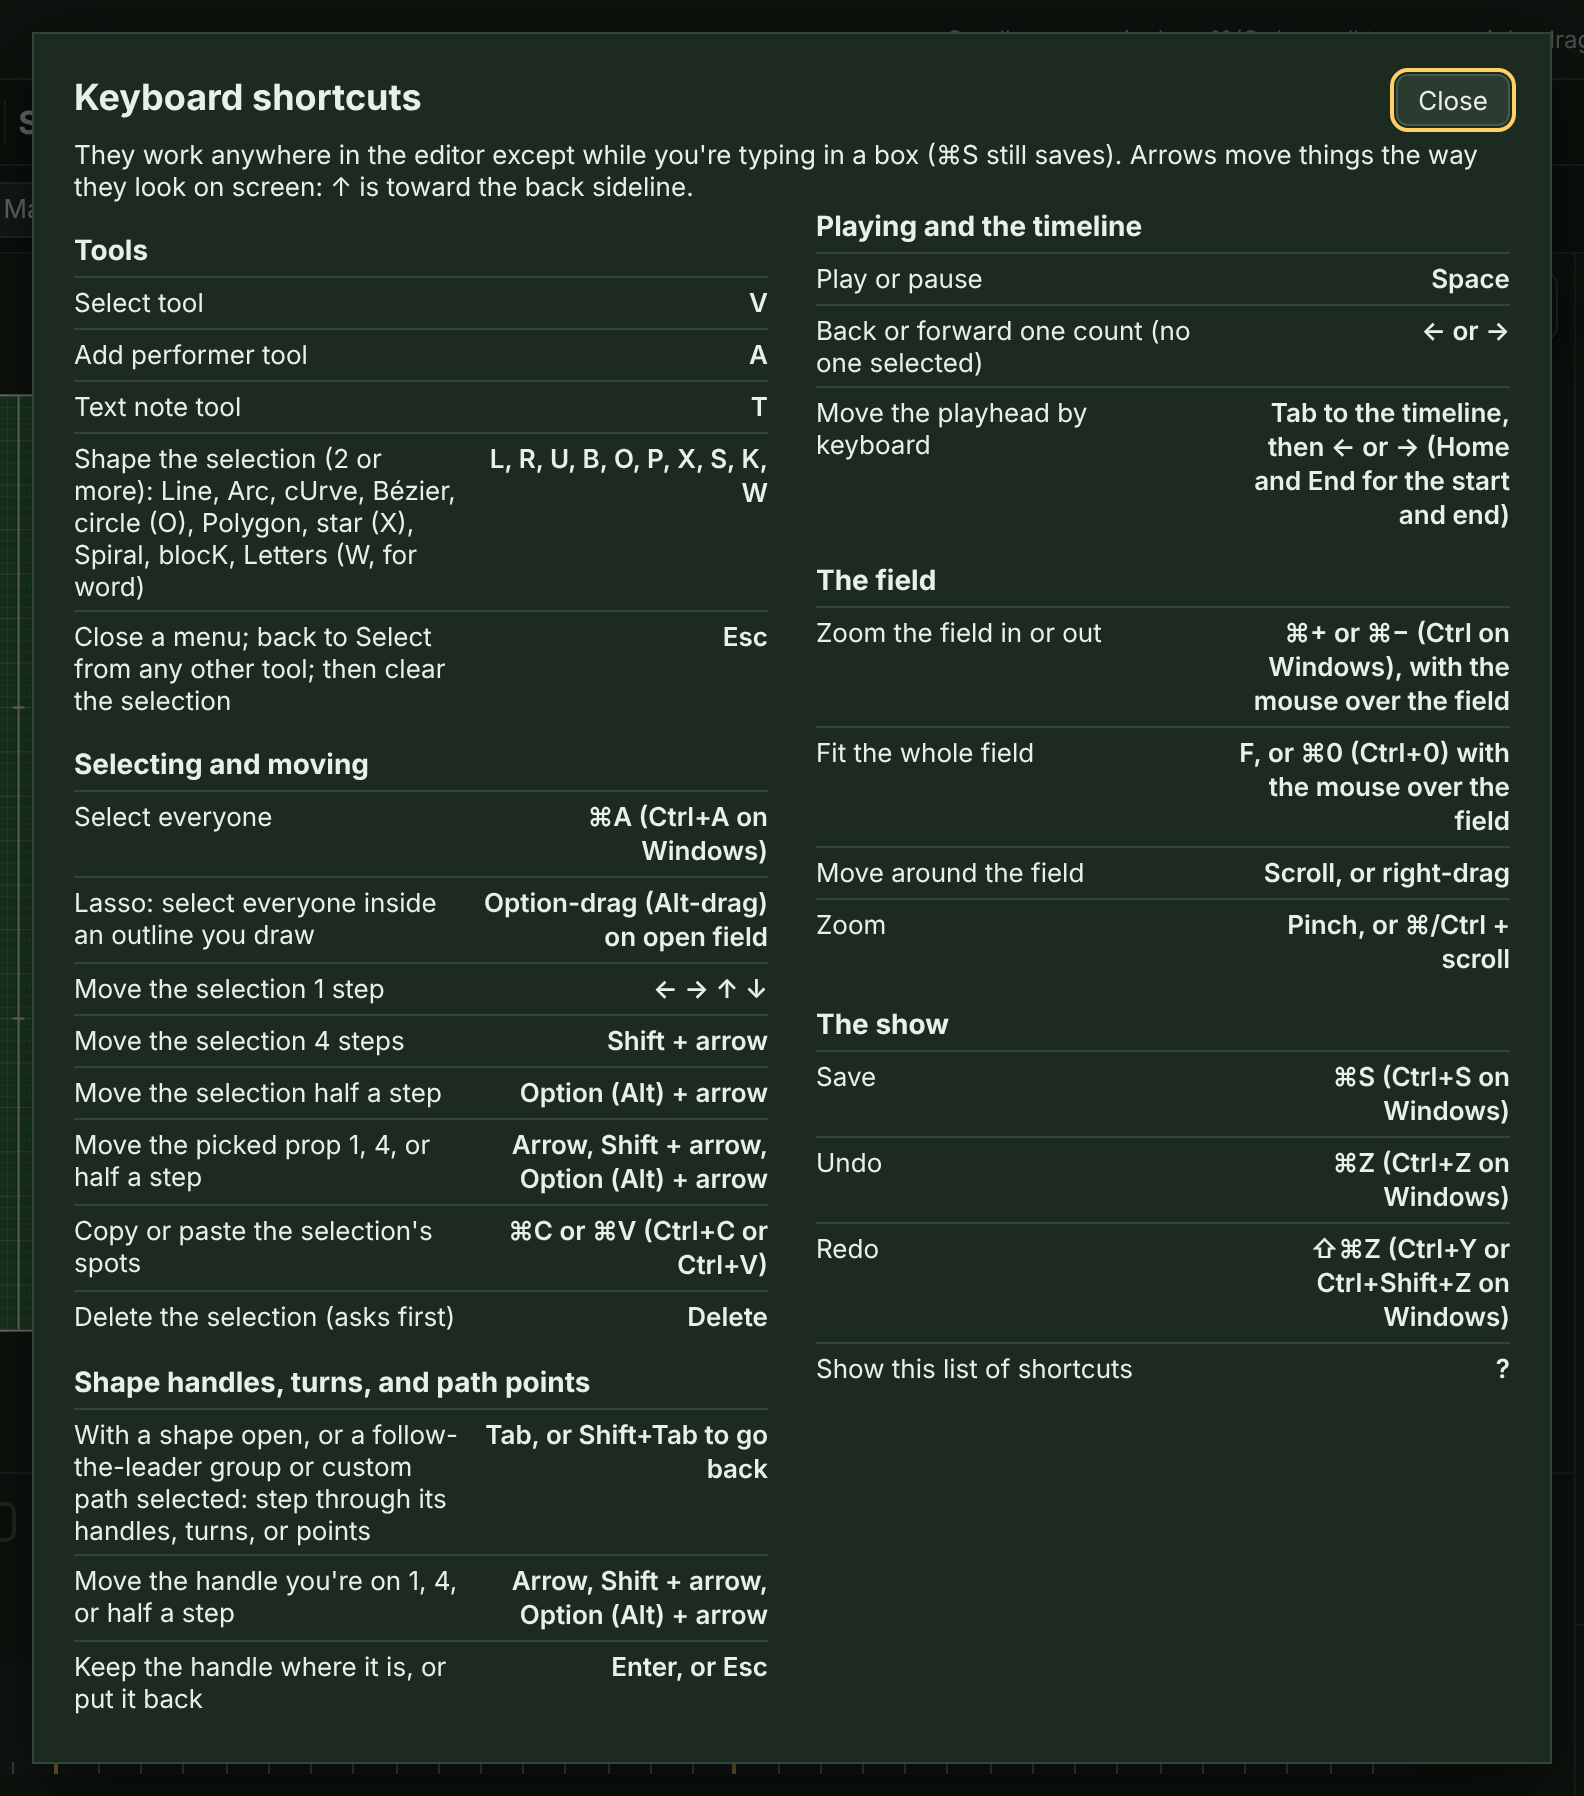
Tools
| Do this | Press |
|---|---|
| Select tool | V |
| Add performer tool | A |
| Text note tool | T |
| Shape the selection (2 or more): Line, Arc, cUrve, Bézier, circle (O), Polygon, star (X), Spiral, blocK, Letters (W, for word) | L, R, U, B, O, P, X, S, K, W |
| Close a menu; back to Select from any other tool; then clear the selection | Esc |
Selecting and moving
| Do this | Press |
|---|---|
| Select everyone | ⌘A (Ctrl+A on Windows) |
| Lasso: select everyone inside an outline you draw | Option-drag (Alt-drag) on open field |
| Move the selection 1 step | ← → ↑ ↓ |
| Move the selection 4 steps | Shift + arrow |
| Move the selection half a step | Option (Alt) + arrow |
| Move the picked prop 1, 4, or half a step | Arrow, Shift + arrow, Option (Alt) + arrow |
| Copy or paste the selection's spots | ⌘C or ⌘V (Ctrl+C or Ctrl+V) |
| Delete the selection (asks first) | Delete |
Shape handles, turns, and path points
| Do this | Press |
|---|---|
| With a shape open, or a follow-the-leader group or custom path selected: step through its handles, turns, or points | Tab, or Shift+Tab to go back |
| Move the handle you're on 1, 4, or half a step | Arrow, Shift + arrow, Option (Alt) + arrow |
| Keep the handle where it is, or put it back | Enter, or Esc |
Playing and the timeline
| Do this | Press |
|---|---|
| Play or pause | Space |
| Back or forward one count (no one selected) | ← or → |
| Move the playhead by keyboard | Tab to the timeline, then ← or → (Home and End for the start and end) |
The field
| Do this | Press |
|---|---|
| Zoom the field in or out | ⌘+ or ⌘− (Ctrl on Windows), with the mouse over the field |
| Fit the whole field | F, or ⌘0 (Ctrl+0) with the mouse over the field |
| Move around the field | Scroll, or right-drag |
| Zoom | Pinch, or ⌘/Ctrl + scroll |
The show
| Do this | Press |
|---|---|
| Save | ⌘S (Ctrl+S on Windows) |
| Undo | ⌘Z (Ctrl+Z on Windows) |
| Redo | ⇧⌘Z (Ctrl+Y or Ctrl+Shift+Z on Windows) |
| Show this list of shortcuts | ? |
Arrows move the selection the way it looks on screen: ↑ is toward the back sideline. Shortcuts don't fire while you're typing in a box, except ⌘S. With the mouse anywhere but the field, ⌘+, ⌘−, and ⌘0 zoom the whole page, the way they do on any website, so you can make the buttons and text bigger.
If something goes wrong
My show is gone. First look in Shows…: another show may be open. Make sure you're in the same browser on the same computer you used before. The autosave doesn't follow you to other browsers or devices. If you saved the show to a file, use Import… to open it. If you published it to phones, Shows… → Open from a link or recovery code… brings it back from the link students use.
I made a mistake. Undo (⌘Z or Ctrl+Z) works for every edit, including deleting performers. For something older than Undo reaches, try Shows…, then Versions of "…".
A student's phone shows an old version. A share link holds the show as it was when you made it, so send a new one. A hosted link updates itself when the phone opens it while online. If you changed the file online but the phone hasn't caught up, have the student tap Check for updates (at the top of My dots) while connected. The line above it says which revision the phone has, when it last checked, and whether it's offline.
The browser says it's too old. Update your browser, or on an iPad, update iPadOS to 16.4 or later.
FreeFORM hit an error. The error page has Download autosaved show, so you can save your work before you reload. If it keeps happening, please tell me about it and say what you were doing.